> ## Documentation Index
> Fetch the complete documentation index at: https://trainings.air.athelas.com/llms.txt
> Use this file to discover all available pages before exploring further.
# Review your Tasks
The **Tasks** page allows you to assign and receive tasks from colleagues, set due dates, and track progress. It can be used for any type or size of task - whether you’re requesting that a colleague upload supporting documentation on a claim or arranging a replacement MRI machine.
When you navigate to the Tasks page, you’ll see four tabs:
* **My Tasks** – tasks assigned to you
* **Available Group Tasks** - tasks assigned to groups you are a member of
* **Assigned by Me** – tasks you have assigned to others
* **All Tasks** - tasks assigned across the organization
 ### Create a New Task
1. Click **+ Task** on the top right of the page.
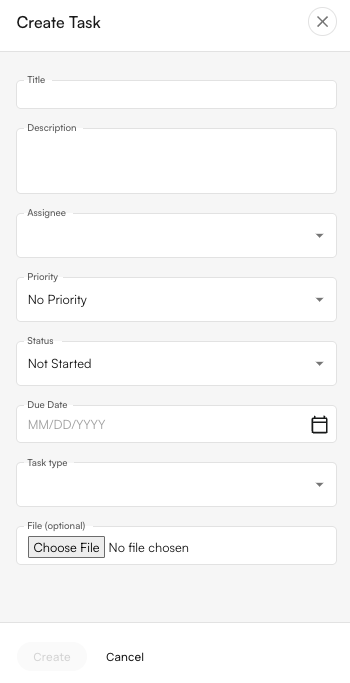
2. In the Create Task popup, enter a clear **title** and **description**.
3. Under **Assignee**, start typing a colleague’s name. The menu will auto-populate with names of staff who have Insights accounts, click to select.
**Note: You can assign a task to multiple patients**
4. Set the **priority level**, **status**, and **due date** (if applicable).
5. Choose a **task type**:
* Select from existing options, or
* Create a new task type by typing in the box and clicking **+ Create**.
6. Optionally, upload a file related to the task (note: larger files may take longer to upload).
7. Once all fields are complete, click **Create**.
### Create a New Task
1. Click **+ Task** on the top right of the page.
2. In the Create Task popup, enter a clear **title** and **description**.
3. Under **Assignee**, start typing a colleague’s name. The menu will auto-populate with names of staff who have Insights accounts, click to select.
**Note: You can assign a task to multiple patients**
4. Set the **priority level**, **status**, and **due date** (if applicable).
5. Choose a **task type**:
* Select from existing options, or
* Create a new task type by typing in the box and clicking **+ Create**.
6. Optionally, upload a file related to the task (note: larger files may take longer to upload).
7. Once all fields are complete, click **Create**.
 When a task is assigned to you, you will be notified (with an update shown on the bell icon on top of the page)
### Update Tasks
**Update Task Status:** You can edit, delete, or update the status of a task by clicking the corresponding icons.
\*\*Sort Tasks: \*\*Click the arrow in any column header to sort by ascending, descending, or neutral order. Shift-Sort - Sort one column, then hold *Shift* while sorting another column to apply multiple sorting rules.
\*\*View Archived Tasks: \*\*To view archived tasks, use the Filter in the upper-right corner and include Archived in the statuses shown.
\*\*Bulk edit Tasks: \*\*To manage multiple tasks at once, check the boxes beside them and click on the edit button on the top to perform bulk actions.
### Assign Tasks to User Groups
Tasks can be assigned to 1 group OR 1 individual at any point of time. Once a task is self-assigned from a group, the task will be unassigned from the group and moved to your “My Tasks” tab.
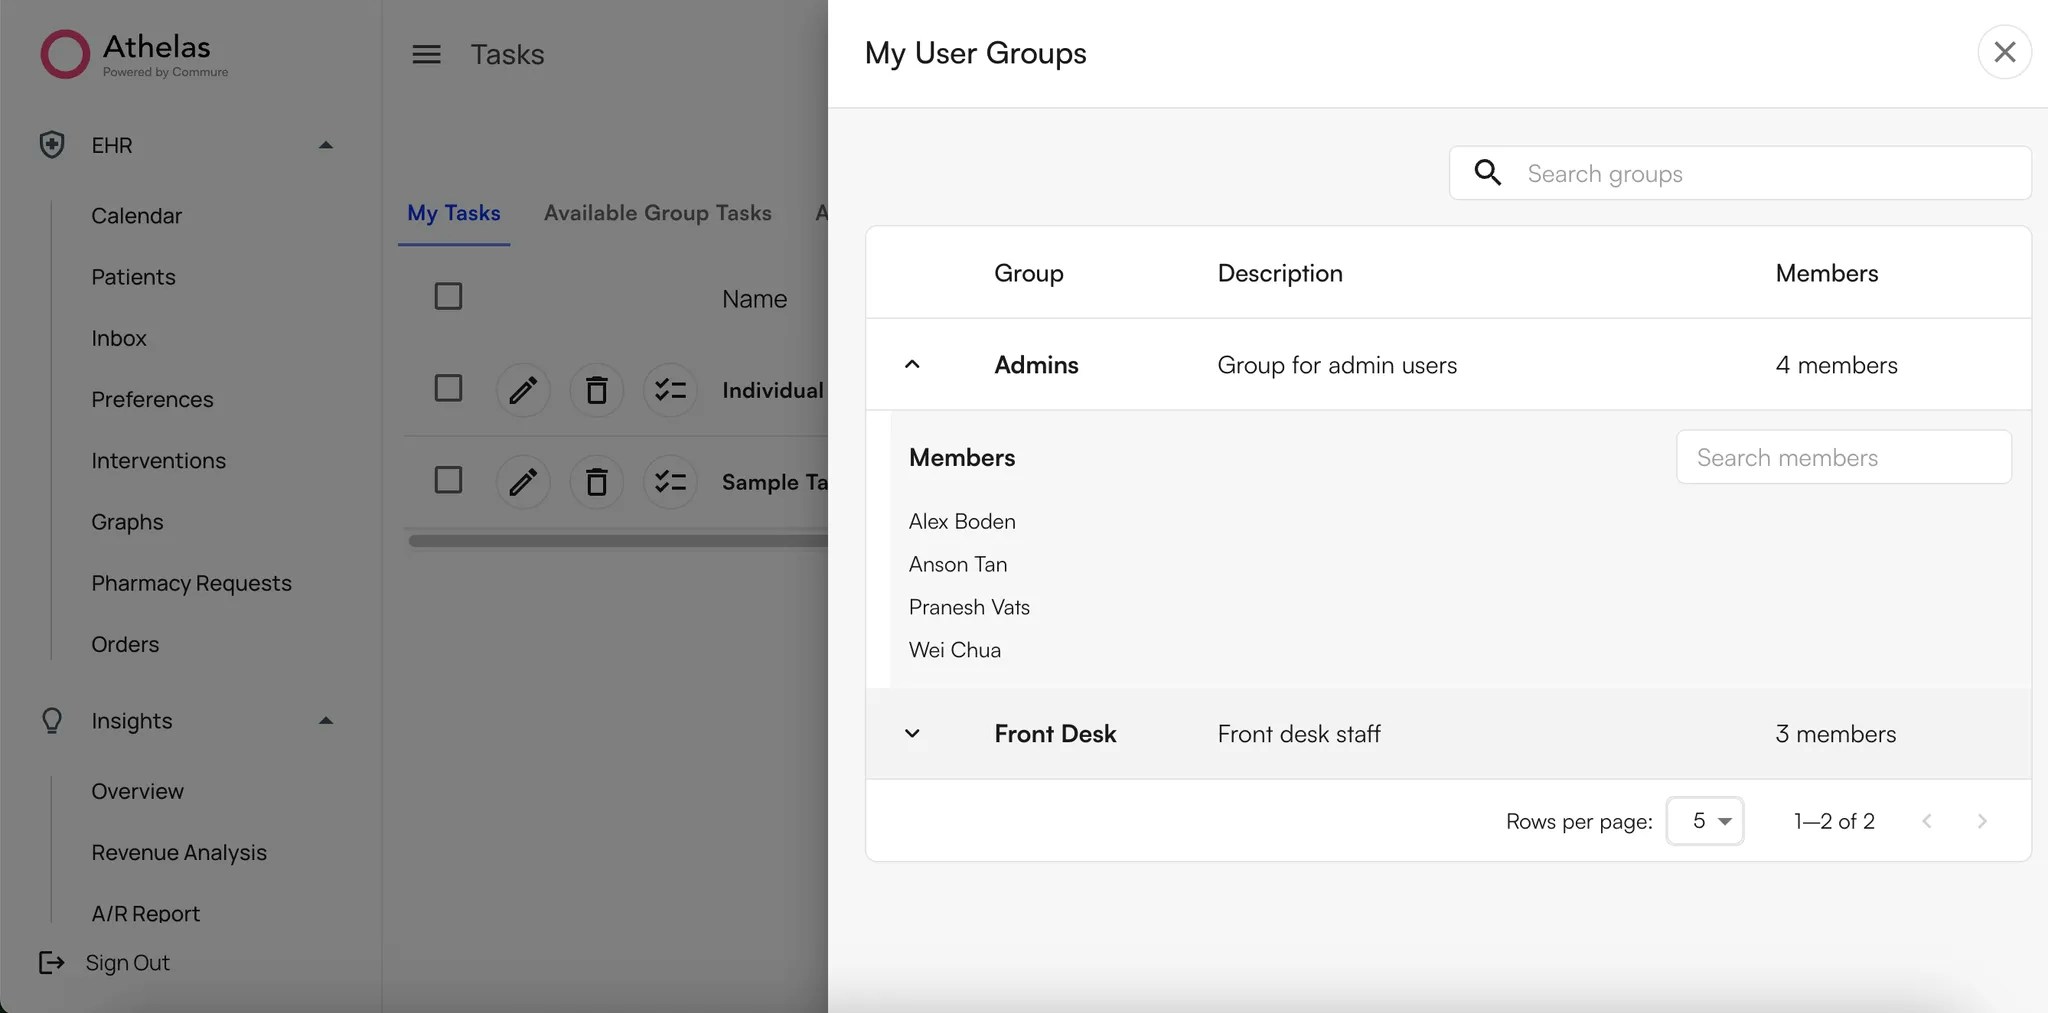
\*\*View Group Details: \*\*View your groups, search members, browse membership lists by clicking on **My Groups.**
**Assign a task to a group:**
1. Click **+ Task** (top right).
2. In the drawer:
* Add **Title** and optional **Description**.
* Choose **Assign to a Group** tab → pick a group from the dropdown.
* Complete other required fields (priority, due date, etc.).
* Click **Create**.
3. Find your task in **Assigned by Me** tab. You can edit or delete the task here.
**Self assign a task:** Open **Available Group Tasks** tab, from here:
* **Edit/Delete** group tasks if you have permissions.
* **Self-assign** → click **Assign to Me**.
* Confirm → task moves from **Group** → **My Tasks** tab.
**Note**: Once you self-assign a task it will be unassigned from the group and moved to your “My Tasks” tab.
In your “My Tasks” tab, search or filter for the corresponding task and select the pencil icon to bring up the “Edit Task” drawer.
Click on the “Assign to a Group” tab, and select a group that you want to assign to.
Save your changes, and the task will be reassigned to the group that you have selected.
No, a task can only have one assignee at any point of time. This means that if the task is assigned to a group, it cannot be assigned to a user.
Likewise, a task cannot be assigned to a group when it is assigned to a user. This helps to simplify task assignment and prevent duplicate efforts within your team.
### Set-up User Groups
Go to **Preferences → User Groups**.
* Click **Create Group** (top right).
* In the drawer:
* Enter **Group Name** (must be unique).
* Add an optional **Description**.
* Add **Users** (optional).
* Click **Create**.
* After the groups are created you can search for them, edit group name, description or members, delete the group.
### Create Tasks linked to patient Attachments
For a given attachment, you can create a task associated to it. The task created will be pre-filled with the attachment linked to it.
Navigate to the **Patient Attachments** page > Each row in the attachments table has a **Manage Tasks** button on the right.
The notifications next to the attachment will have one of the below icons:
* **Incomplete task** → Red icon
* **Complete task** → Green icon
* **No task attached** → No icon
\*\*To add a task: \*\*
* Click Manage Tasks > **New Task** (bottom left)
* Fill in required fields:
* Task Title
* Assignee
* Priority
* Due date
* Task type
* The task will be **automatically linked** to the current attachment.
* Click **Create** to save.
* Once created you can view details, edit, delete or update the task status. Status options include: *Not Started, In Progress, Done, or Archived.*
Once you create your task, you can view the task from the Attachments page and the Task page.
You can create a new task linked to an attachment only from the patient's attachment page. However, you can view and manage existing tasks linked to attachments from the Tasks page.
### Create Tasks linked to Faxes
For a given incoming or outgoing fax, you can create a task associated to it. The task created will be pre-filled with the fax number linked to it.
Navigate to the \*\*Fax \*\*page > Each row in the Fax table has a **Manage Tasks** button on the right.
The notifications next to the attachment will have one of the below icons:
* **Incomplete task** → Red icon
* **Complete task** → Green icon
* **No task attached** → No icon
**To add a task:**
* Click Manage Tasks > **New Task** (bottom left)
* Fill in required fields:
* Task Title
* Assignee
* Priority
* Due date
* Task type
* The task will be **automatically linked** to the current fax.
* Click **Create** to save.
* Once created you can view details, edit, delete or update the task status. Status options include: *Not Started, In Progress, Done, or Archived.*
Once you create your task, you can view the task from the Fax page and the Task page.
\*\*Note: \*\*You can also add task notes in the description by expanding the task
You can create a new task linked to a Fax only from the Fax page. However, you can view and manage existing tasks linked to a Fax from the Tasks page.
When a task is assigned to you, you will be notified (with an update shown on the bell icon on top of the page)
### Update Tasks
**Update Task Status:** You can edit, delete, or update the status of a task by clicking the corresponding icons.
\*\*Sort Tasks: \*\*Click the arrow in any column header to sort by ascending, descending, or neutral order. Shift-Sort - Sort one column, then hold *Shift* while sorting another column to apply multiple sorting rules.
\*\*View Archived Tasks: \*\*To view archived tasks, use the Filter in the upper-right corner and include Archived in the statuses shown.
\*\*Bulk edit Tasks: \*\*To manage multiple tasks at once, check the boxes beside them and click on the edit button on the top to perform bulk actions.
### Assign Tasks to User Groups
Tasks can be assigned to 1 group OR 1 individual at any point of time. Once a task is self-assigned from a group, the task will be unassigned from the group and moved to your “My Tasks” tab.
\*\*View Group Details: \*\*View your groups, search members, browse membership lists by clicking on **My Groups.**
**Assign a task to a group:**
1. Click **+ Task** (top right).
2. In the drawer:
* Add **Title** and optional **Description**.
* Choose **Assign to a Group** tab → pick a group from the dropdown.
* Complete other required fields (priority, due date, etc.).
* Click **Create**.
3. Find your task in **Assigned by Me** tab. You can edit or delete the task here.
**Self assign a task:** Open **Available Group Tasks** tab, from here:
* **Edit/Delete** group tasks if you have permissions.
* **Self-assign** → click **Assign to Me**.
* Confirm → task moves from **Group** → **My Tasks** tab.
**Note**: Once you self-assign a task it will be unassigned from the group and moved to your “My Tasks” tab.
In your “My Tasks” tab, search or filter for the corresponding task and select the pencil icon to bring up the “Edit Task” drawer.
Click on the “Assign to a Group” tab, and select a group that you want to assign to.
Save your changes, and the task will be reassigned to the group that you have selected.
No, a task can only have one assignee at any point of time. This means that if the task is assigned to a group, it cannot be assigned to a user.
Likewise, a task cannot be assigned to a group when it is assigned to a user. This helps to simplify task assignment and prevent duplicate efforts within your team.
### Set-up User Groups
Go to **Preferences → User Groups**.
* Click **Create Group** (top right).
* In the drawer:
* Enter **Group Name** (must be unique).
* Add an optional **Description**.
* Add **Users** (optional).
* Click **Create**.
* After the groups are created you can search for them, edit group name, description or members, delete the group.
### Create Tasks linked to patient Attachments
For a given attachment, you can create a task associated to it. The task created will be pre-filled with the attachment linked to it.
Navigate to the **Patient Attachments** page > Each row in the attachments table has a **Manage Tasks** button on the right.
The notifications next to the attachment will have one of the below icons:
* **Incomplete task** → Red icon
* **Complete task** → Green icon
* **No task attached** → No icon
\*\*To add a task: \*\*
* Click Manage Tasks > **New Task** (bottom left)
* Fill in required fields:
* Task Title
* Assignee
* Priority
* Due date
* Task type
* The task will be **automatically linked** to the current attachment.
* Click **Create** to save.
* Once created you can view details, edit, delete or update the task status. Status options include: *Not Started, In Progress, Done, or Archived.*
Once you create your task, you can view the task from the Attachments page and the Task page.
You can create a new task linked to an attachment only from the patient's attachment page. However, you can view and manage existing tasks linked to attachments from the Tasks page.
### Create Tasks linked to Faxes
For a given incoming or outgoing fax, you can create a task associated to it. The task created will be pre-filled with the fax number linked to it.
Navigate to the \*\*Fax \*\*page > Each row in the Fax table has a **Manage Tasks** button on the right.
The notifications next to the attachment will have one of the below icons:
* **Incomplete task** → Red icon
* **Complete task** → Green icon
* **No task attached** → No icon
**To add a task:**
* Click Manage Tasks > **New Task** (bottom left)
* Fill in required fields:
* Task Title
* Assignee
* Priority
* Due date
* Task type
* The task will be **automatically linked** to the current fax.
* Click **Create** to save.
* Once created you can view details, edit, delete or update the task status. Status options include: *Not Started, In Progress, Done, or Archived.*
Once you create your task, you can view the task from the Fax page and the Task page.
\*\*Note: \*\*You can also add task notes in the description by expanding the task
You can create a new task linked to a Fax only from the Fax page. However, you can view and manage existing tasks linked to a Fax from the Tasks page.