> ## Documentation Index
> Fetch the complete documentation index at: https://trainings.air.athelas.com/llms.txt
> Use this file to discover all available pages before exploring further.
# Schedule an Appointment
Easily create, copy, and manage patient appointments directly from the calendar or patient profile.
## Use AI to create an appointment
**✨Smart Tip:** Ask Athelas AI to create an appointment for you. Specify the patient name, provider name, date & time of appointment and appointment type. You can also use Voice Mode.
 ## Copy paste an existing appointment
* Right click an appointment → click on Copy appointment.
* Click a new time slot → select Paste appointment details
**Note:** Multiple appointments can be scheduled in the same slot. Air will warn you but won’t block it.
## Create a new appointment (single)
### Open new appointment window
**Option 1**: Click on a time slot on the calendar → Select New Appointment
**Option 2:** Click on the **Create New** button in the top-right corner of the page → Select New Appointment.
**Option 3:** Go to Patient Profile → Click on the**New Appointment** button in the top-right corner
A side panel will open to enter the following details:
* Appointment Date, Start and End Time (will auto-populate if you use Option 1)
* Rendering Provider (will auto-populate if you use Option 1)
* Patient
* Case
* Appointment Type
* Facility
* Format (In-person or Virtual)
* Referring Provider
* Supervising Provider
* Insurance (with Priority & Prior Authorization)
* Appointment Notes
**Note:** Clicking **Sync to Case** saves the insurance, priority, and prior authorization to the case, so they auto-populate for future appointments tied to that case.
## Copy paste an existing appointment
* Right click an appointment → click on Copy appointment.
* Click a new time slot → select Paste appointment details
**Note:** Multiple appointments can be scheduled in the same slot. Air will warn you but won’t block it.
## Create a new appointment (single)
### Open new appointment window
**Option 1**: Click on a time slot on the calendar → Select New Appointment
**Option 2:** Click on the **Create New** button in the top-right corner of the page → Select New Appointment.
**Option 3:** Go to Patient Profile → Click on the**New Appointment** button in the top-right corner
A side panel will open to enter the following details:
* Appointment Date, Start and End Time (will auto-populate if you use Option 1)
* Rendering Provider (will auto-populate if you use Option 1)
* Patient
* Case
* Appointment Type
* Facility
* Format (In-person or Virtual)
* Referring Provider
* Supervising Provider
* Insurance (with Priority & Prior Authorization)
* Appointment Notes
**Note:** Clicking **Sync to Case** saves the insurance, priority, and prior authorization to the case, so they auto-populate for future appointments tied to that case.
 ### Creating a New Patient
If you need to create a new patient:
* Click on create new appointment →Click on the **Create New Patient** at the bottom of the Select Patient dropdown OR go to the **Patients Tab → Create New Patient.**
* Fill out the following details:
* General patient demographics
* Contact Information
* Insurance Information
* Intake form settings
* Home Address \[Optional]
* Emergency Contact Information \[Optional]
* You can then view the patients details within the Patient Tab as needed.
### Add Patient Notes
You can add patient notes in three ways:
1. [Appointment Notes](/air_provider/review_patient_details/patient_info#add-patient-notes)
2. [Case Notes](/air_provider/review_patient_details/patient_info#add-patient-notes)
3. [Patient Notes (pinned, general)](/air_provider/review_patient_details/patient_info#add-patient-notes)
### Add a New Case
To add a new case, first select a patient, then click **Create New Case** button. A side panel will appear where you can enter:
* Case name and notes
* Insurance priority (auto-populated from the case, but can be overridden)
* Rendering/Referring Provider and Referral details
* Attachments
**Note:** Cases can also be created in the [**Demographics tab**](https://air_athelas.mintlify.app/patient_details/patient_demog#active-and-discharged-cases) of the patient profile.
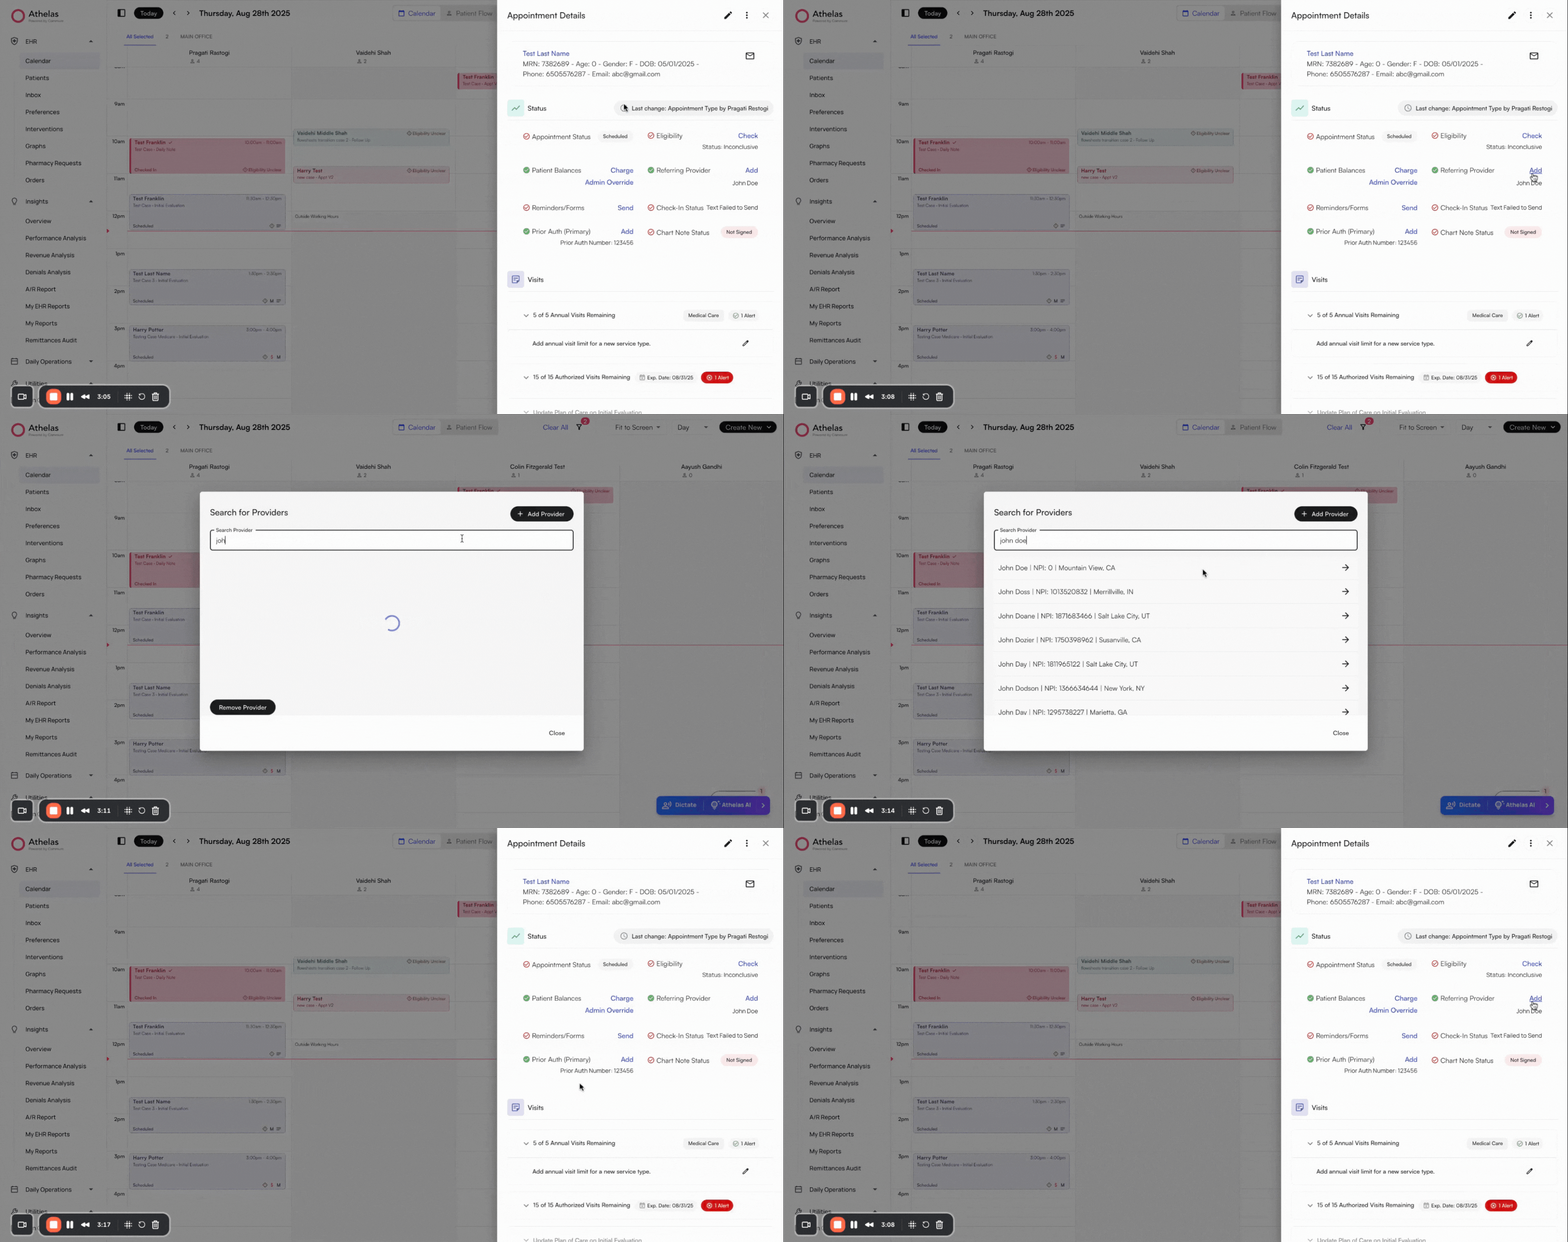
### Update Referring Provider
When adding a referring provider, you can search our Provider Directory (icon to the right of the search bar). It is sourced from the NPI Registry.
From the Provider Directory you can:
* Add a provider by NPI or name
* Edit provider details (fax, phone, address) via the pencil icon
* Have referrals auto-populate if “Direct Access” is chosen
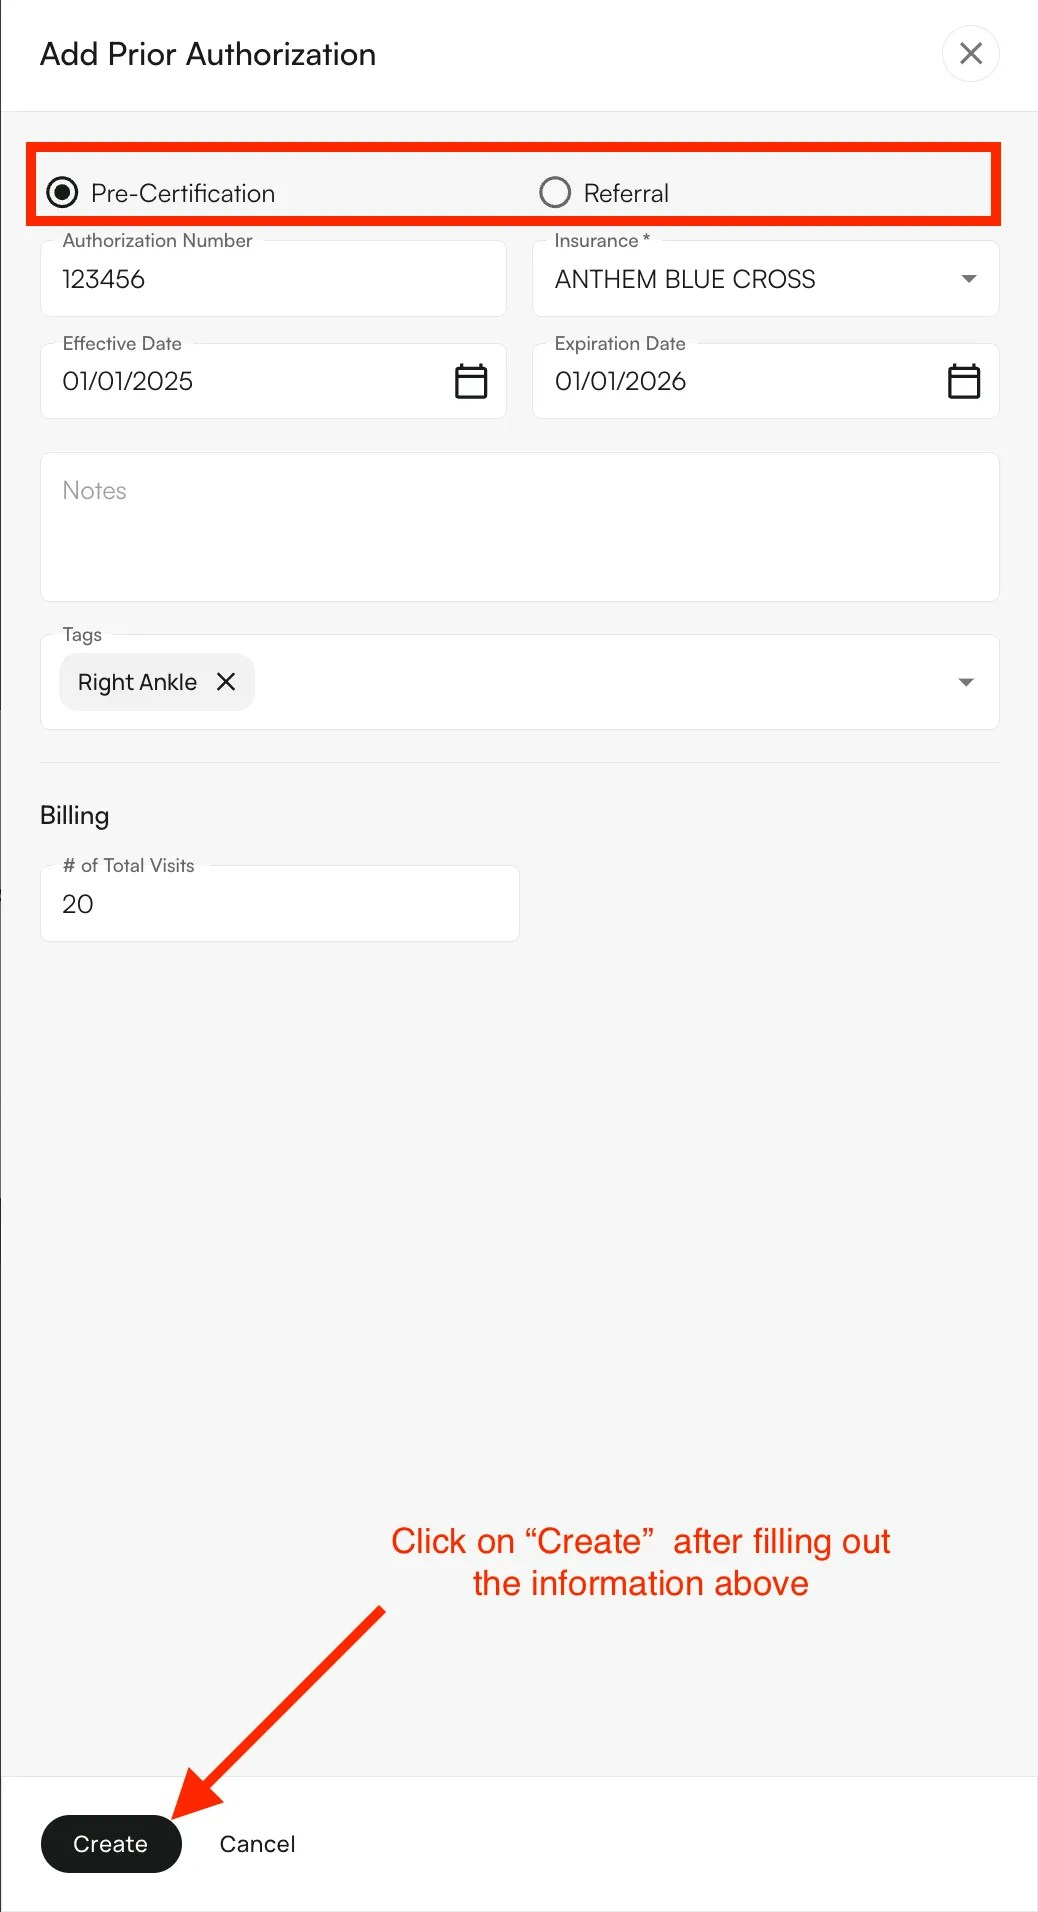
### Add Prior Authorization
To add a new prior authorization, click the **+** icon next to the Prior Authorization field.
1. In the pop-up window, click **+ Create.**
2. Fill in the authorization type (Pre-Certification or Referral), number, effective/expiration dates, insurance, notes, and tags.
3. Click **Create.**
The new authorization will appear in the list and can be selected for the appointment. If you can’t find the prior auth you just created, please check both the Pre-Certified and Referral sections within the Prior Auth table
**Note:** Prior authorizations can also be managed under the patient’s [Demographics tab.](https://air_athelas.mintlify.app/patient_details/patient_demog#patient-information)
### Change Insurance Priority
Insurance priority will be auto-populated based off what was indicated in the case.
To change insurance priority, ensure the **Secondary** and **Tertiary** checkboxes are selected. Then, use the dropdown to assign insurances to each priority level.
**Note:** You cannot create a new insurance from here—you must select one already on the patient’s record.
## Create new appointment (bulk)
* Use **Create New → Bulk Create Appointments** or click directly on the calendar.
* Choose the provider, title, time/date, and recurrence.
* If your practice policy allows you can also note credentialing exceptions during scheduling.
**Note:** You can bulk-schedule with a primary and a backup (alternate) provider. The calendar shows availability for both, you can pick who covers each date, and the system creates the right appointments under the right provider.
**We do not support updating a case for a completed appointment**. Sites must make sure the case is linked correctly **before finalizing the chart note in Air**.
If a site encounters this issue:
1. A completed appointment cannot be archived. Every completed appointment (which is typically intended to bill) will always have an encounter/claim.
2. The site should schedule a **new appointment** on the same day with the same provider, linked to the **correct case**.
3. Import the PDF of the incorrect case into this new appointment.
4. Mark this new appointment as **“for documentation only”** so no duplicate encounters/claims are generated.
5. Once the document is imported, they can apply Scribe to the chart note.
6. Going forward, they will be able to carry forward information from the correct case into future appointments for that case.
### Creating a New Patient
If you need to create a new patient:
* Click on create new appointment →Click on the **Create New Patient** at the bottom of the Select Patient dropdown OR go to the **Patients Tab → Create New Patient.**
* Fill out the following details:
* General patient demographics
* Contact Information
* Insurance Information
* Intake form settings
* Home Address \[Optional]
* Emergency Contact Information \[Optional]
* You can then view the patients details within the Patient Tab as needed.
### Add Patient Notes
You can add patient notes in three ways:
1. [Appointment Notes](/air_provider/review_patient_details/patient_info#add-patient-notes)
2. [Case Notes](/air_provider/review_patient_details/patient_info#add-patient-notes)
3. [Patient Notes (pinned, general)](/air_provider/review_patient_details/patient_info#add-patient-notes)
### Add a New Case
To add a new case, first select a patient, then click **Create New Case** button. A side panel will appear where you can enter:
* Case name and notes
* Insurance priority (auto-populated from the case, but can be overridden)
* Rendering/Referring Provider and Referral details
* Attachments
**Note:** Cases can also be created in the [**Demographics tab**](https://air_athelas.mintlify.app/patient_details/patient_demog#active-and-discharged-cases) of the patient profile.
### Update Referring Provider
When adding a referring provider, you can search our Provider Directory (icon to the right of the search bar). It is sourced from the NPI Registry.
From the Provider Directory you can:
* Add a provider by NPI or name
* Edit provider details (fax, phone, address) via the pencil icon
* Have referrals auto-populate if “Direct Access” is chosen
### Add Prior Authorization
To add a new prior authorization, click the **+** icon next to the Prior Authorization field.
1. In the pop-up window, click **+ Create.**
2. Fill in the authorization type (Pre-Certification or Referral), number, effective/expiration dates, insurance, notes, and tags.
3. Click **Create.**
The new authorization will appear in the list and can be selected for the appointment. If you can’t find the prior auth you just created, please check both the Pre-Certified and Referral sections within the Prior Auth table
**Note:** Prior authorizations can also be managed under the patient’s [Demographics tab.](https://air_athelas.mintlify.app/patient_details/patient_demog#patient-information)
### Change Insurance Priority
Insurance priority will be auto-populated based off what was indicated in the case.
To change insurance priority, ensure the **Secondary** and **Tertiary** checkboxes are selected. Then, use the dropdown to assign insurances to each priority level.
**Note:** You cannot create a new insurance from here—you must select one already on the patient’s record.
## Create new appointment (bulk)
* Use **Create New → Bulk Create Appointments** or click directly on the calendar.
* Choose the provider, title, time/date, and recurrence.
* If your practice policy allows you can also note credentialing exceptions during scheduling.
**Note:** You can bulk-schedule with a primary and a backup (alternate) provider. The calendar shows availability for both, you can pick who covers each date, and the system creates the right appointments under the right provider.
**We do not support updating a case for a completed appointment**. Sites must make sure the case is linked correctly **before finalizing the chart note in Air**.
If a site encounters this issue:
1. A completed appointment cannot be archived. Every completed appointment (which is typically intended to bill) will always have an encounter/claim.
2. The site should schedule a **new appointment** on the same day with the same provider, linked to the **correct case**.
3. Import the PDF of the incorrect case into this new appointment.
4. Mark this new appointment as **“for documentation only”** so no duplicate encounters/claims are generated.
5. Once the document is imported, they can apply Scribe to the chart note.
6. Going forward, they will be able to carry forward information from the correct case into future appointments for that case.