> ## Documentation Index
> Fetch the complete documentation index at: https://trainings.air.athelas.com/llms.txt
> Use this file to discover all available pages before exploring further.
# Getting Started with Kiosk
The **Athelas Kiosk** lets practices offer a self-service option for patient check-in and intake form completion. You can choose between a full-service **Check-in Mode** — where patients confirm their information, pay any balances, and check themselves in — or a lighter **Forms Mode** that surfaces only uncompleted intake forms for a paperless experience.
## Creating a Kiosk Login
### Request Kiosk Access
* Reach out to your **Account Manager (AM)** to request kiosk access for your site.
* Once approved, your site is added to the kiosk user list and you can proceed with setup.
### Prepare your hardware & card reader
Before you enable kiosk in Insights, make sure your site has the right setup:
* **Tablet device:**
* Any Android tablet or iPad will work.
* **Optional:** You may also use a kiosk stand for a professional, dedicated setup.
* **Card reader options:**
1. **Use an existing reader** — Any card readers already configured to your account will appear in the kiosk dropdown.
2. **Request a dedicated reader** — If you'd like a separate card reader specifically for kiosk, let us know.
* We'll send you a pre-configured reader tied to your account.
* Cost: **\$250 per reader**, invoiced to your site.
✨**Smart Tip:** Make the card reader decision early and communicate it to your AM. It determines whether you'll be using an existing reader or receiving a dedicated one from us.
### Enable Kiosk in Insights
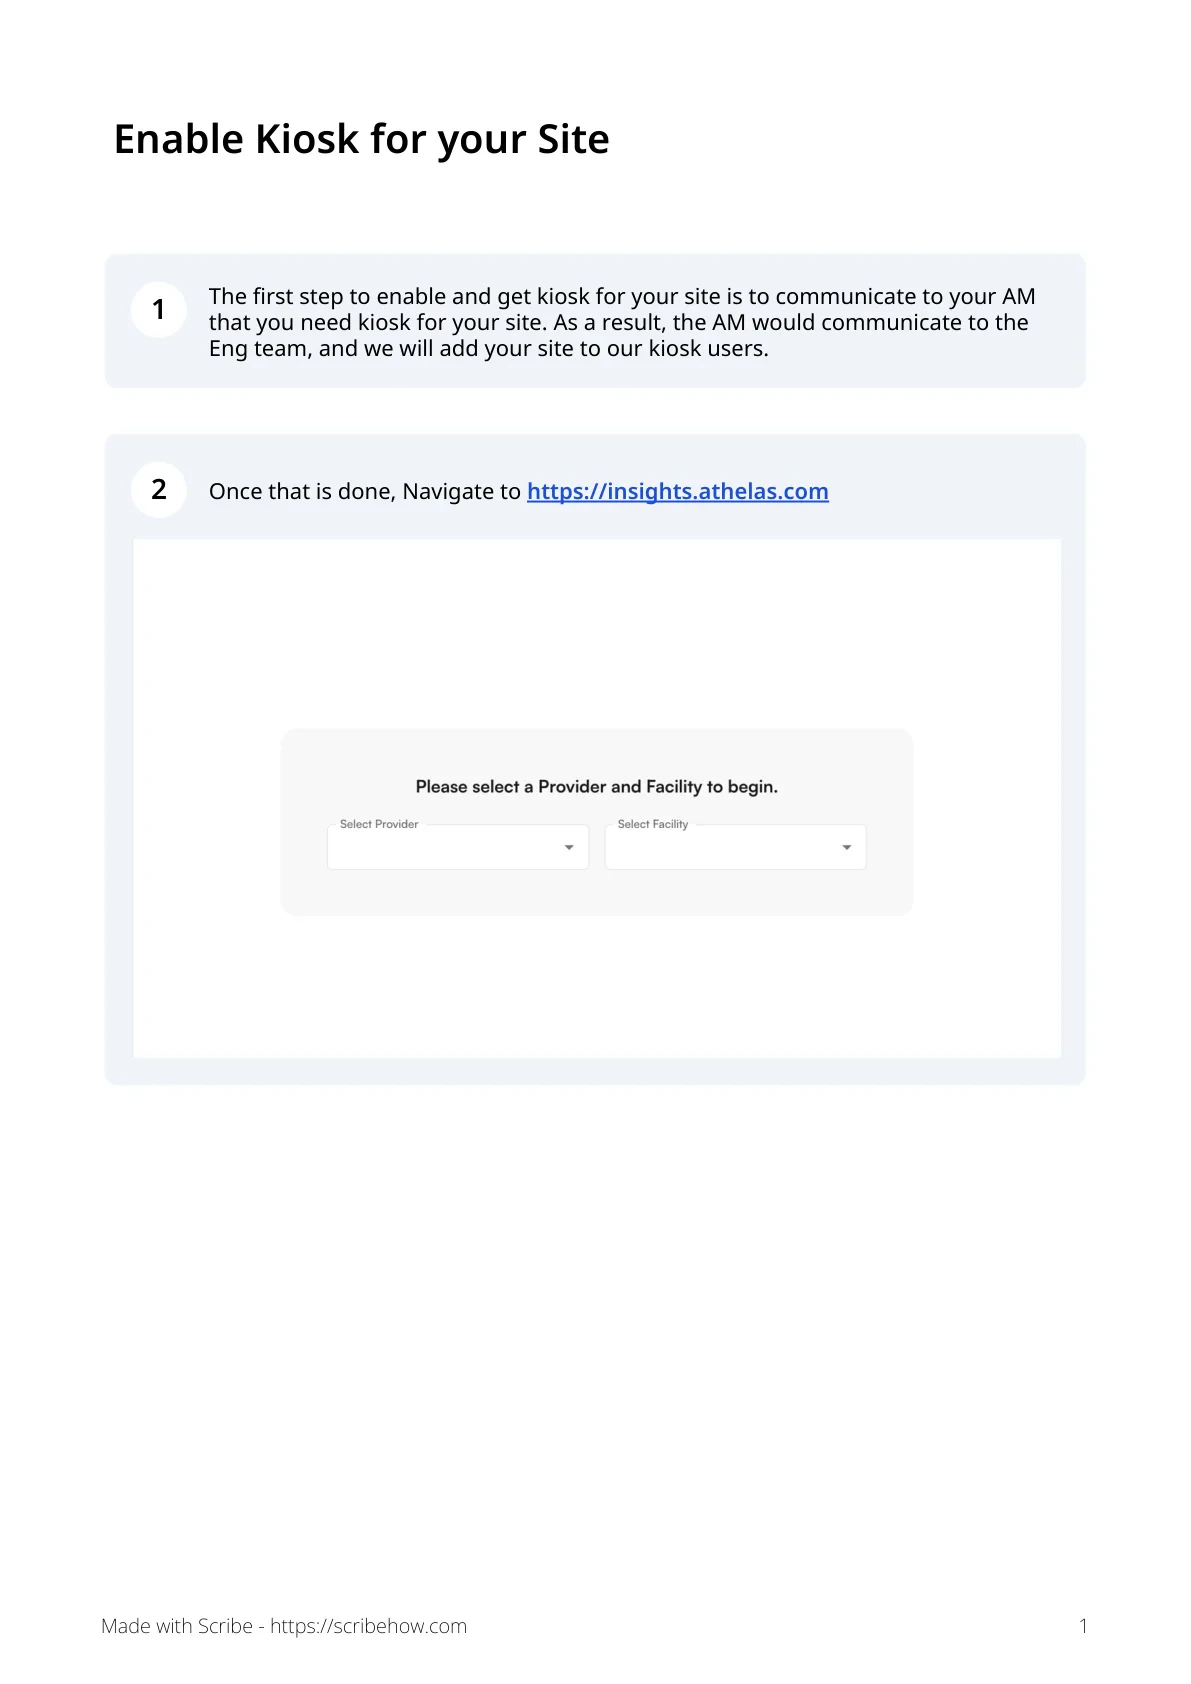
Once your AM has confirmed your site is on the kiosk user list, go to [insights.athelas.com](https://insights.athelas.com) and open **Preferences** from the EHR sidebar.
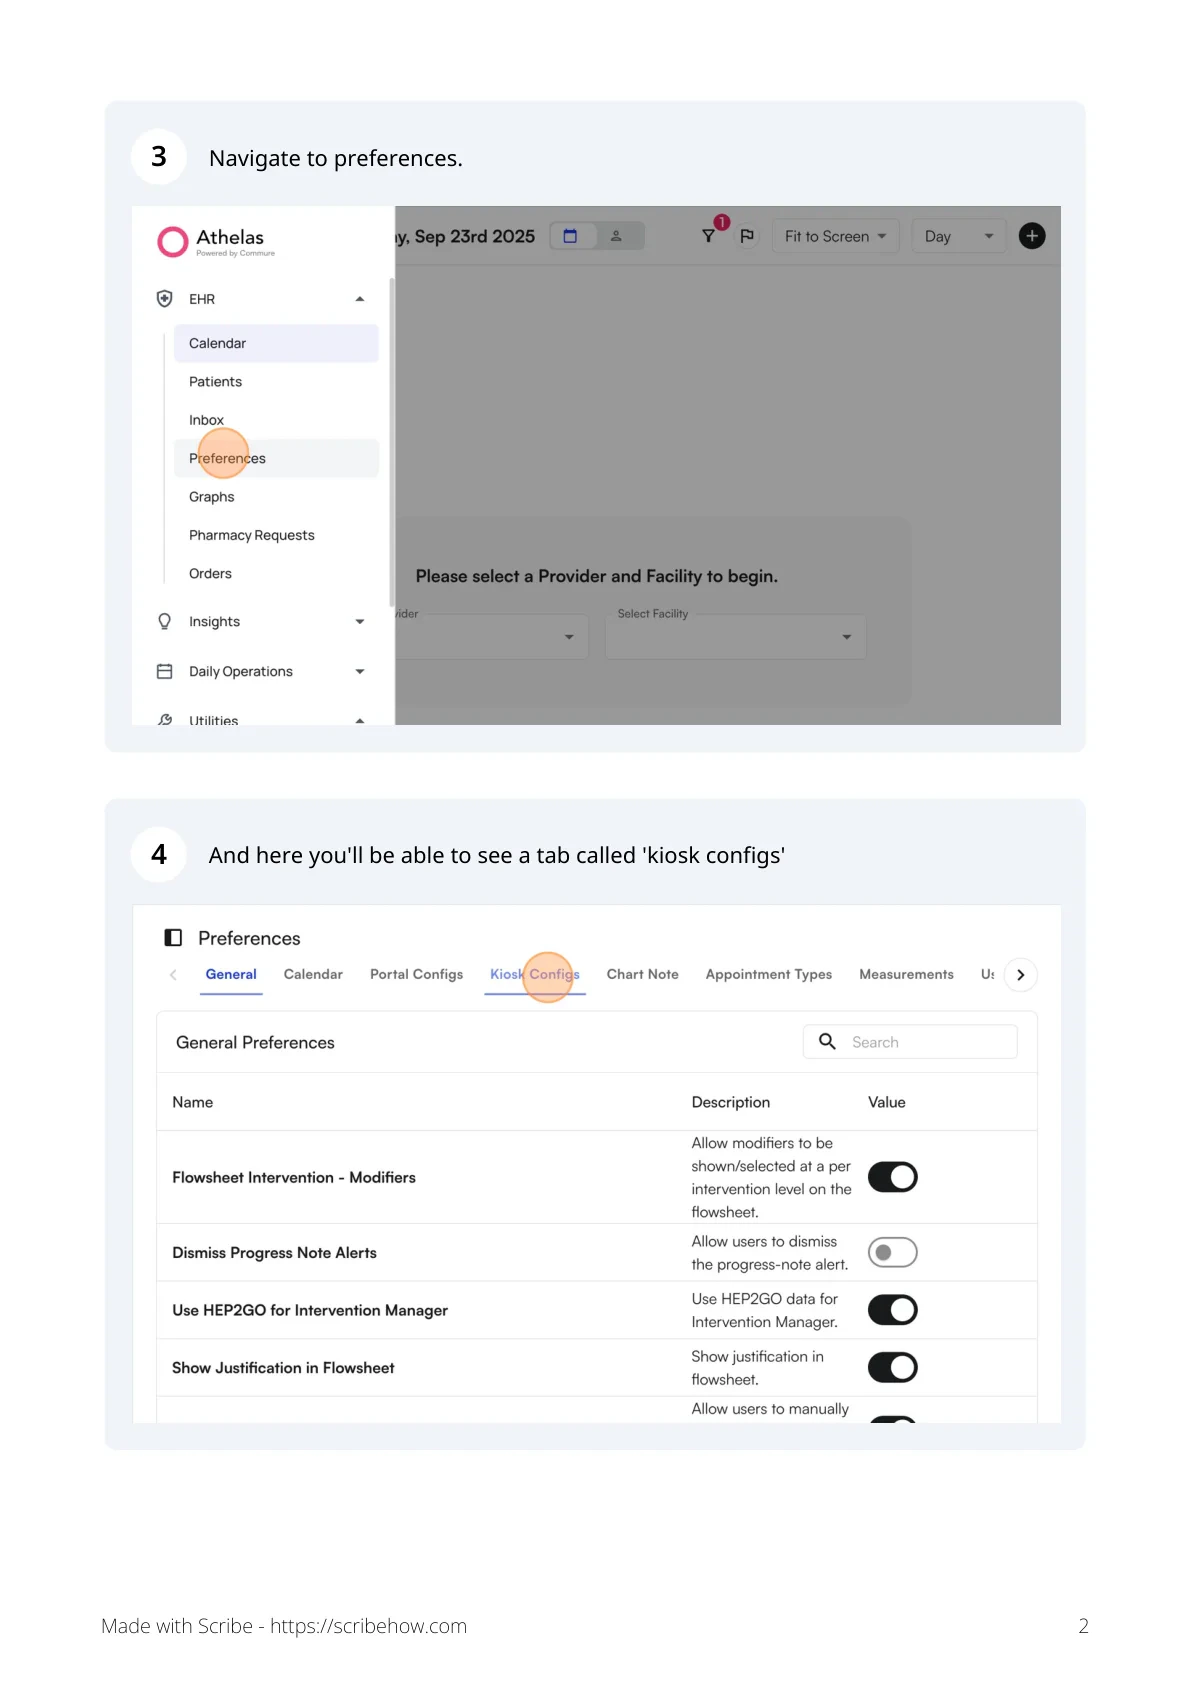
 Inside Preferences, switch to the **Kiosk Configs** tab.
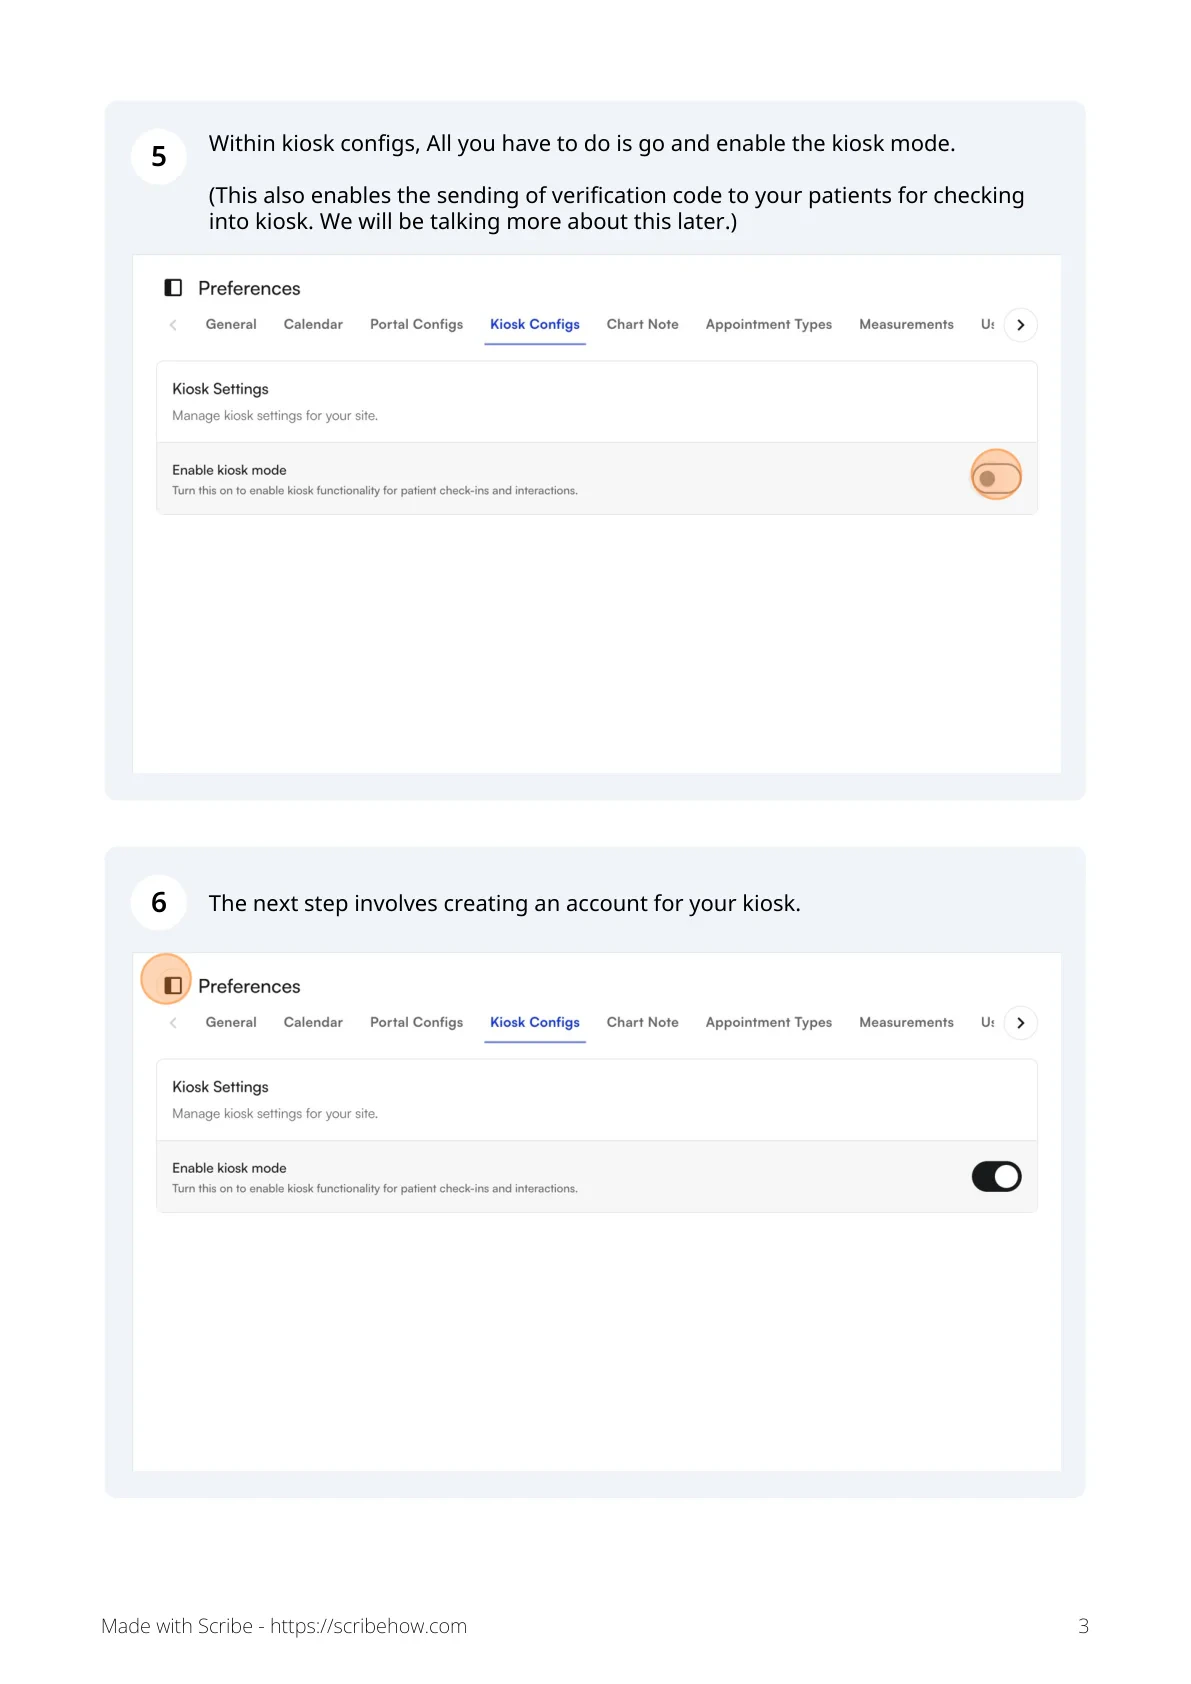
 Toggle **Enable kiosk mode** on. This both turns on kiosk functionality and starts sending the kiosk verification codes that patients use for express check-in.
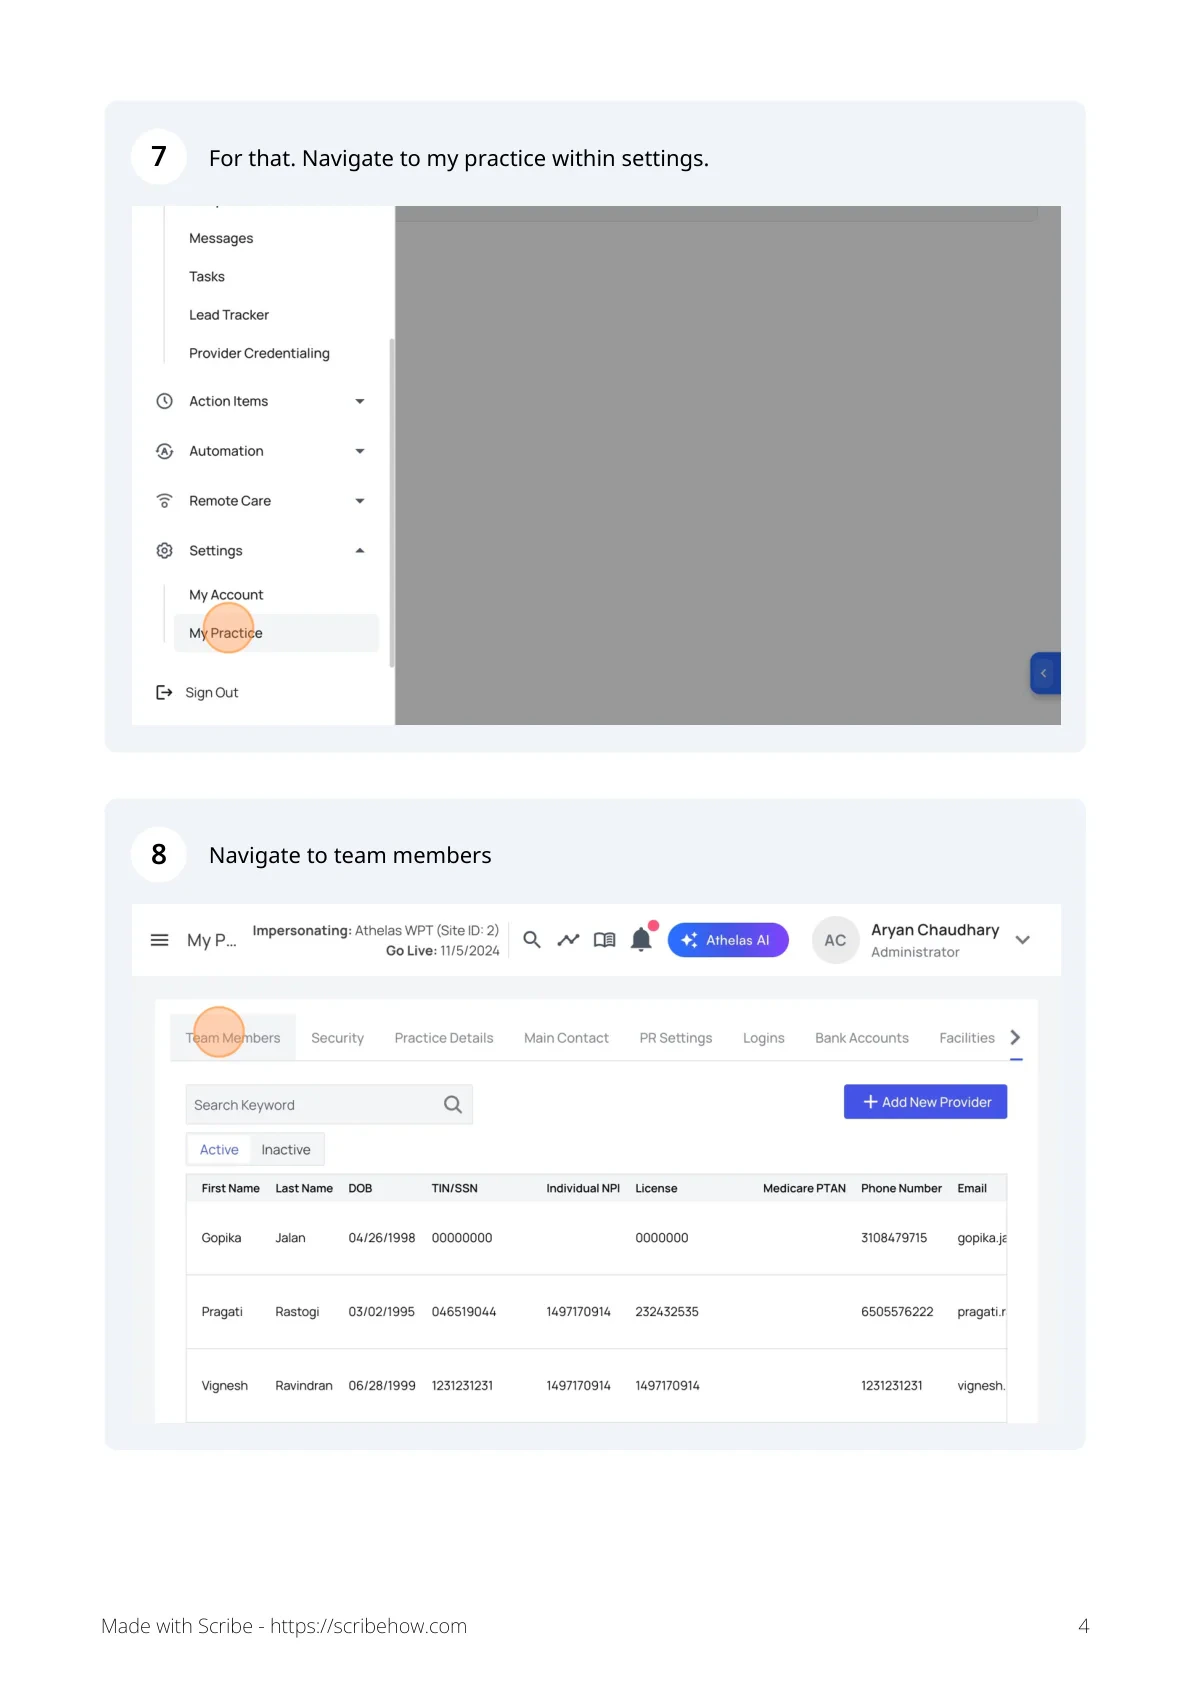
 Next, create the kiosk user. From settings, navigate to **My Practice** and open **Team Members**.
 Click **Add user** and give the user a display name.
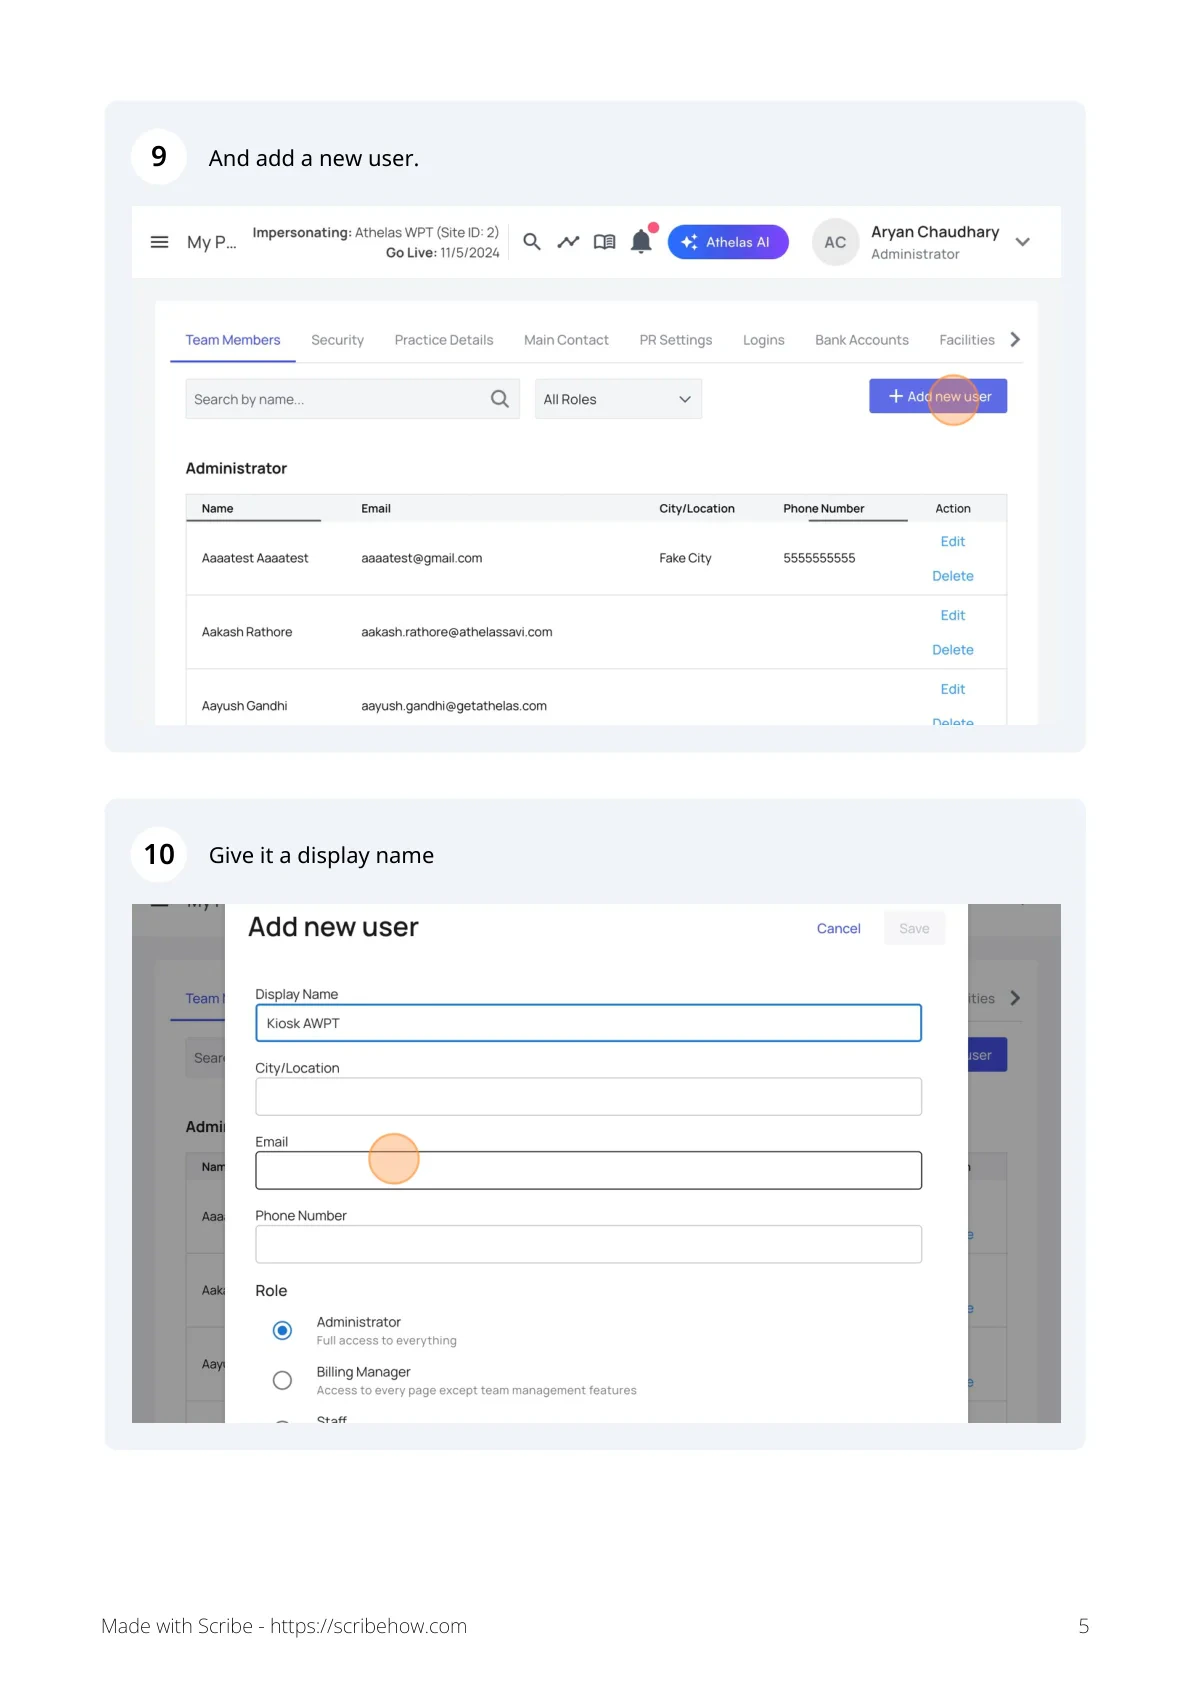 During the beta, the email format is **kiosk+\[site name]@commure.com**. Assign the user the **Admin** role and click **Save**. Our team will then share the kiosk credentials with you.
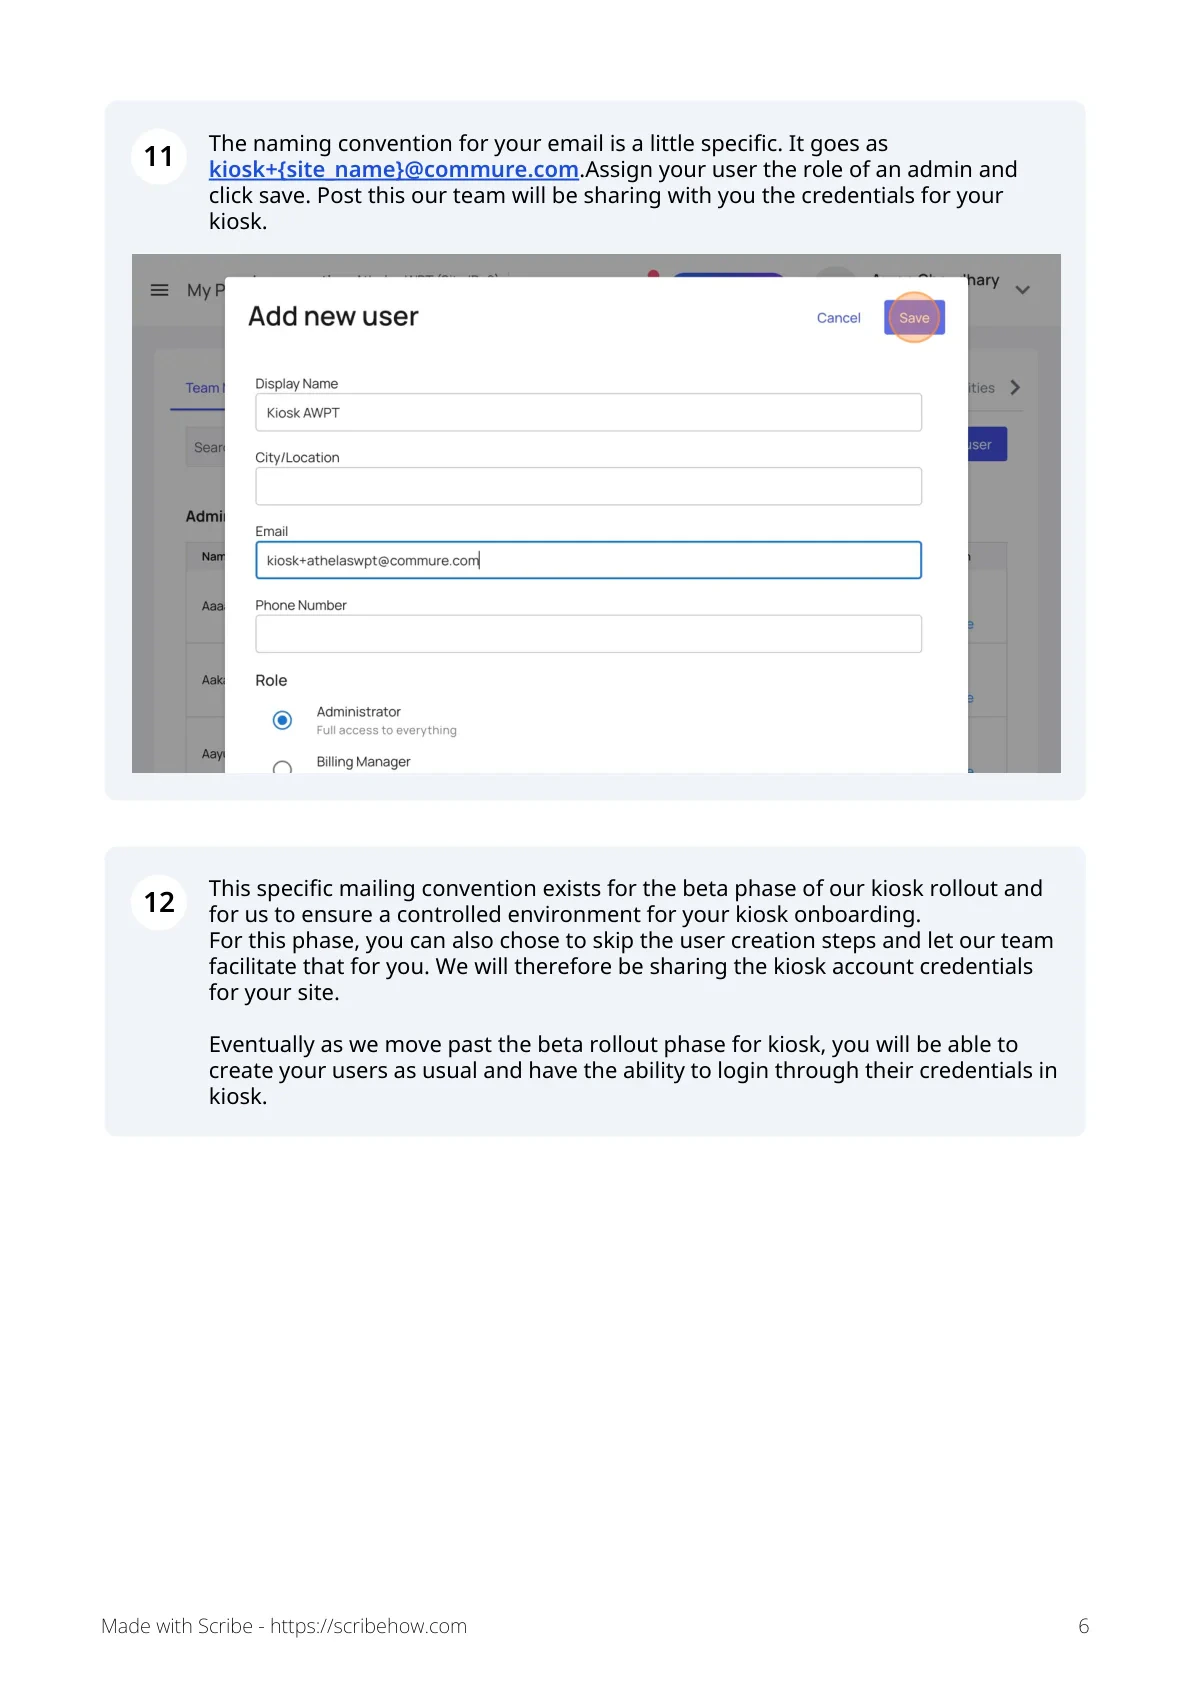 This naming convention exists for the beta phase of the kiosk rollout to ensure a controlled environment for kiosk onboarding. During the beta, you can also skip the user-creation steps and let our team set up the kiosk account for you. After the beta, you'll be able to create kiosk users like any other user and log in with their credentials.
## Using the Kiosk for Check-in Mode
By default the Kiosk is set up for the full **Check-in Mode**, which lets patients review their information, insurance, and any required payments or balance, then check themselves in for the visit.
### Sign in to the kiosk
On the kiosk device, navigate to [kiosk.athelas.com](https://kiosk.athelas.com).
This naming convention exists for the beta phase of the kiosk rollout to ensure a controlled environment for kiosk onboarding. During the beta, you can also skip the user-creation steps and let our team set up the kiosk account for you. After the beta, you'll be able to create kiosk users like any other user and log in with their credentials.
## Using the Kiosk for Check-in Mode
By default the Kiosk is set up for the full **Check-in Mode**, which lets patients review their information, insurance, and any required payments or balance, then check themselves in for the visit.
### Sign in to the kiosk
On the kiosk device, navigate to [kiosk.athelas.com](https://kiosk.athelas.com).
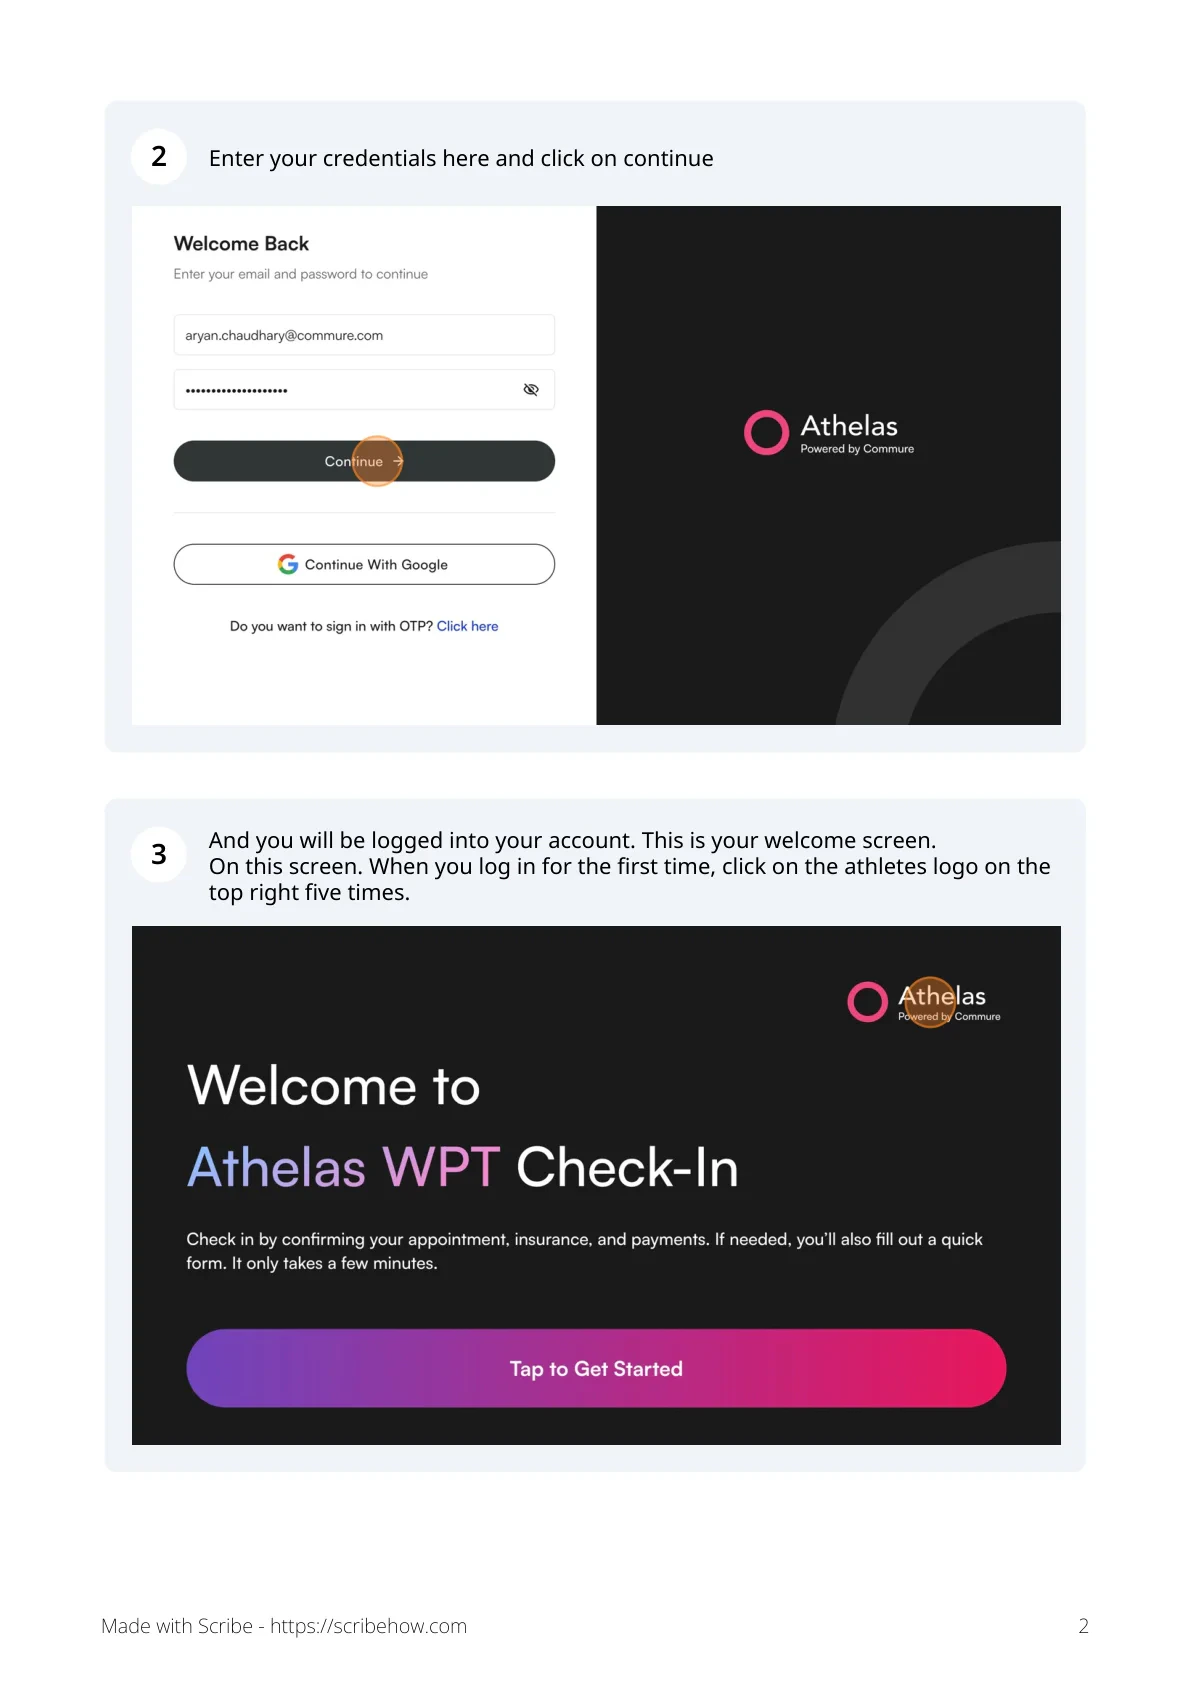
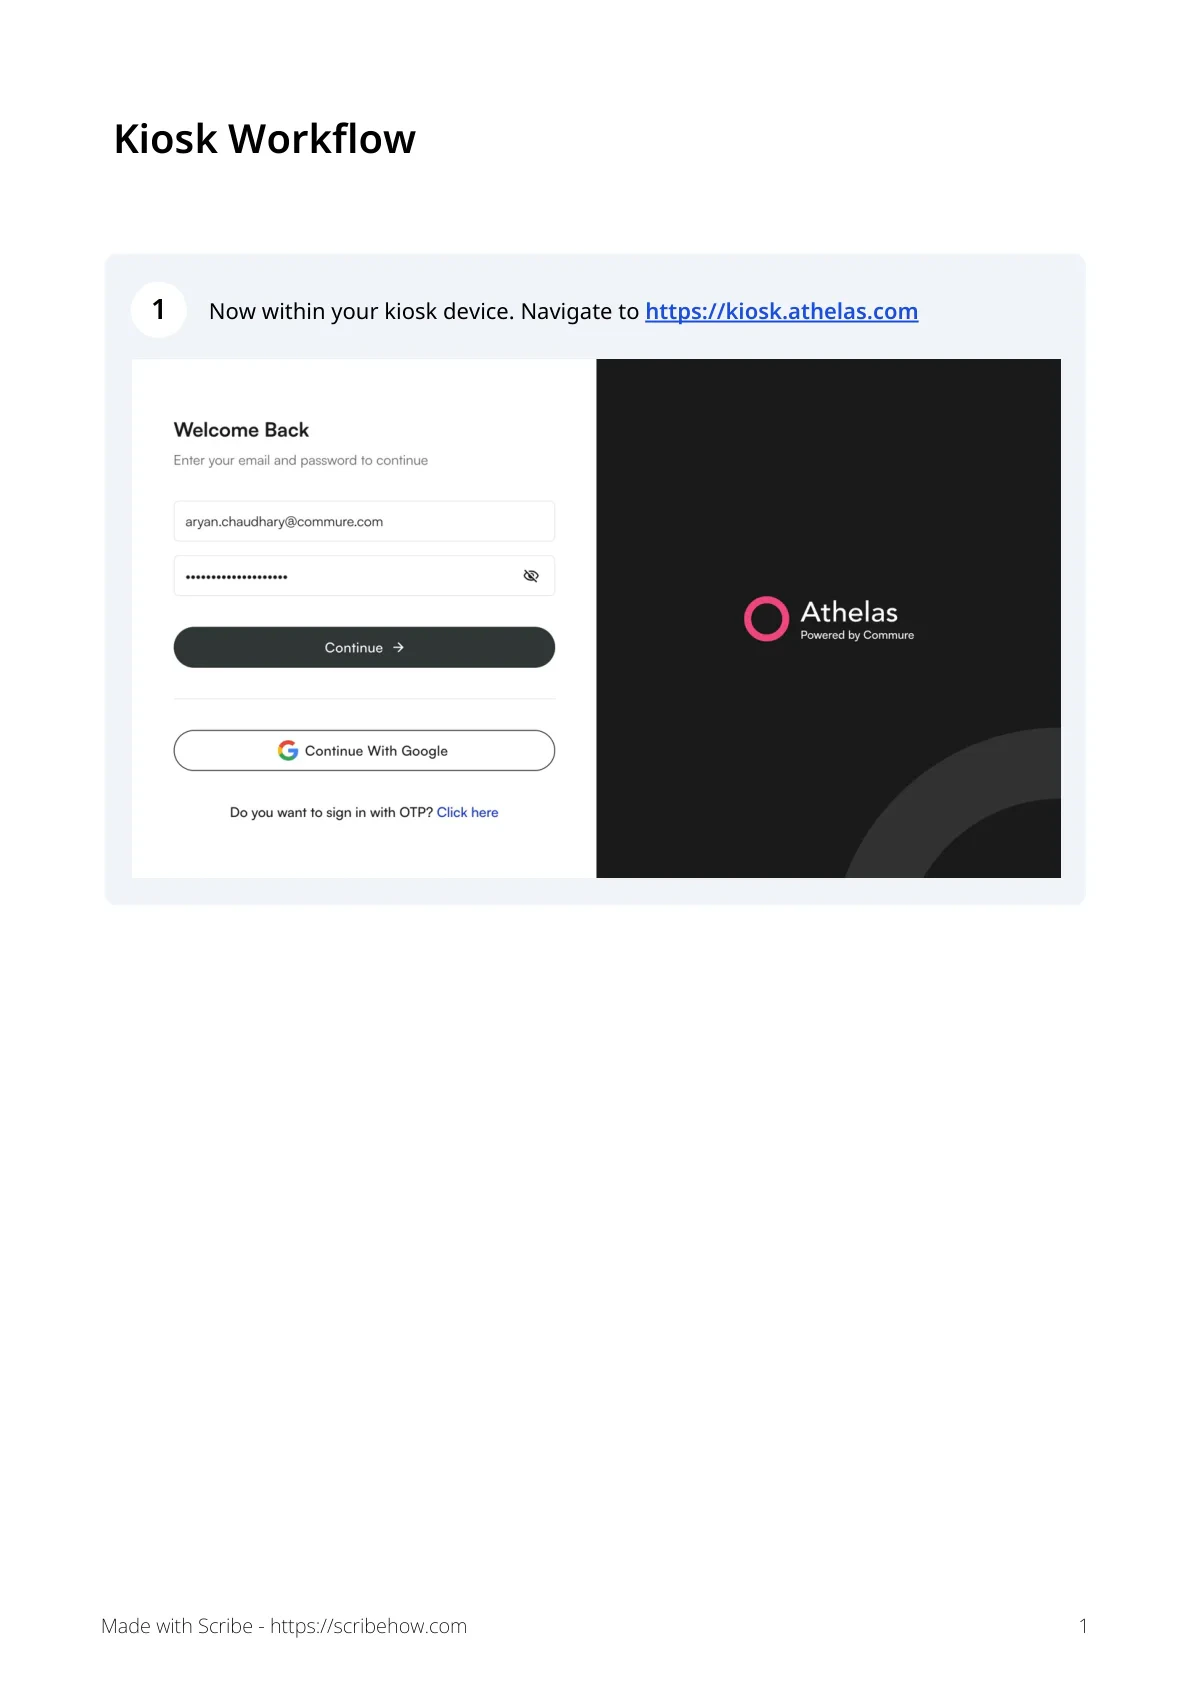 Enter the kiosk credentials and click **Continue** to land on the welcome screen. On first login, **tap the Athelas logo in the top right five times** to open kiosk settings.
 In settings, select the **default card reader** for this kiosk from the dropdown — only readers configured for your site and currently active appear here.
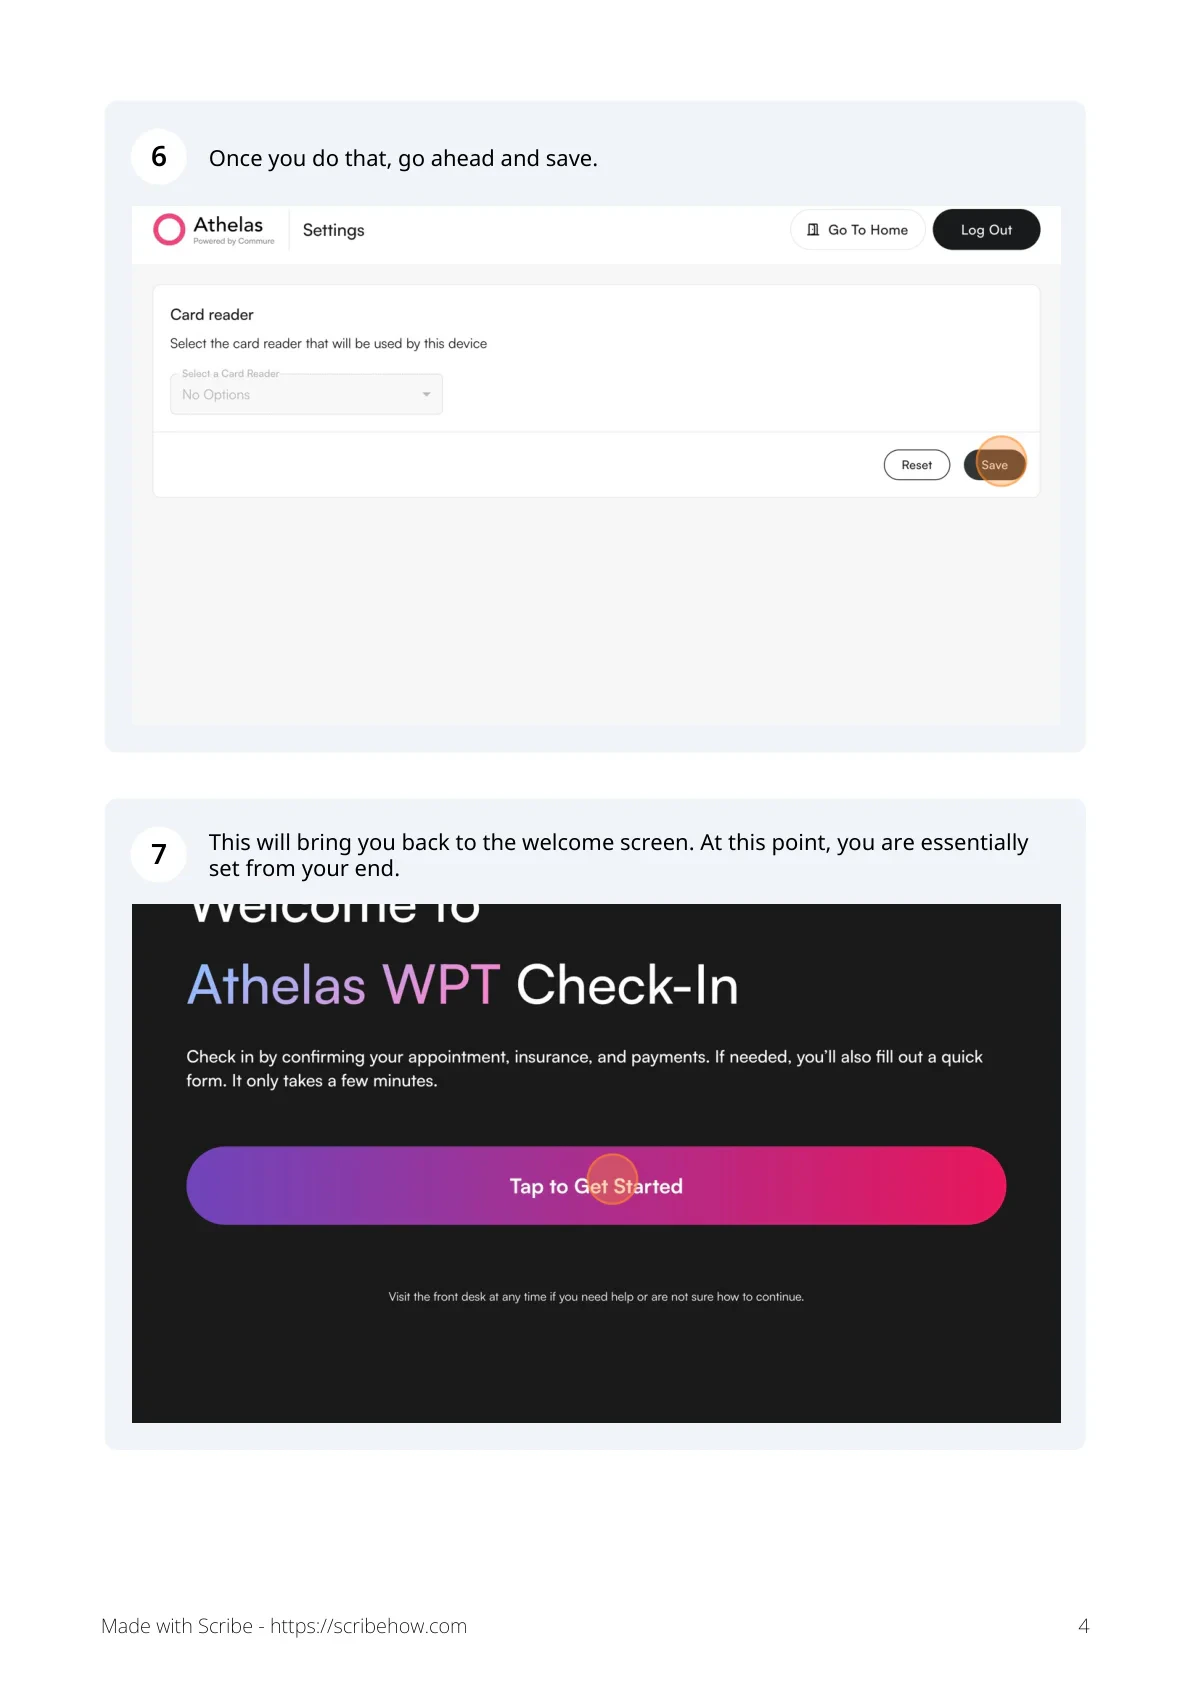
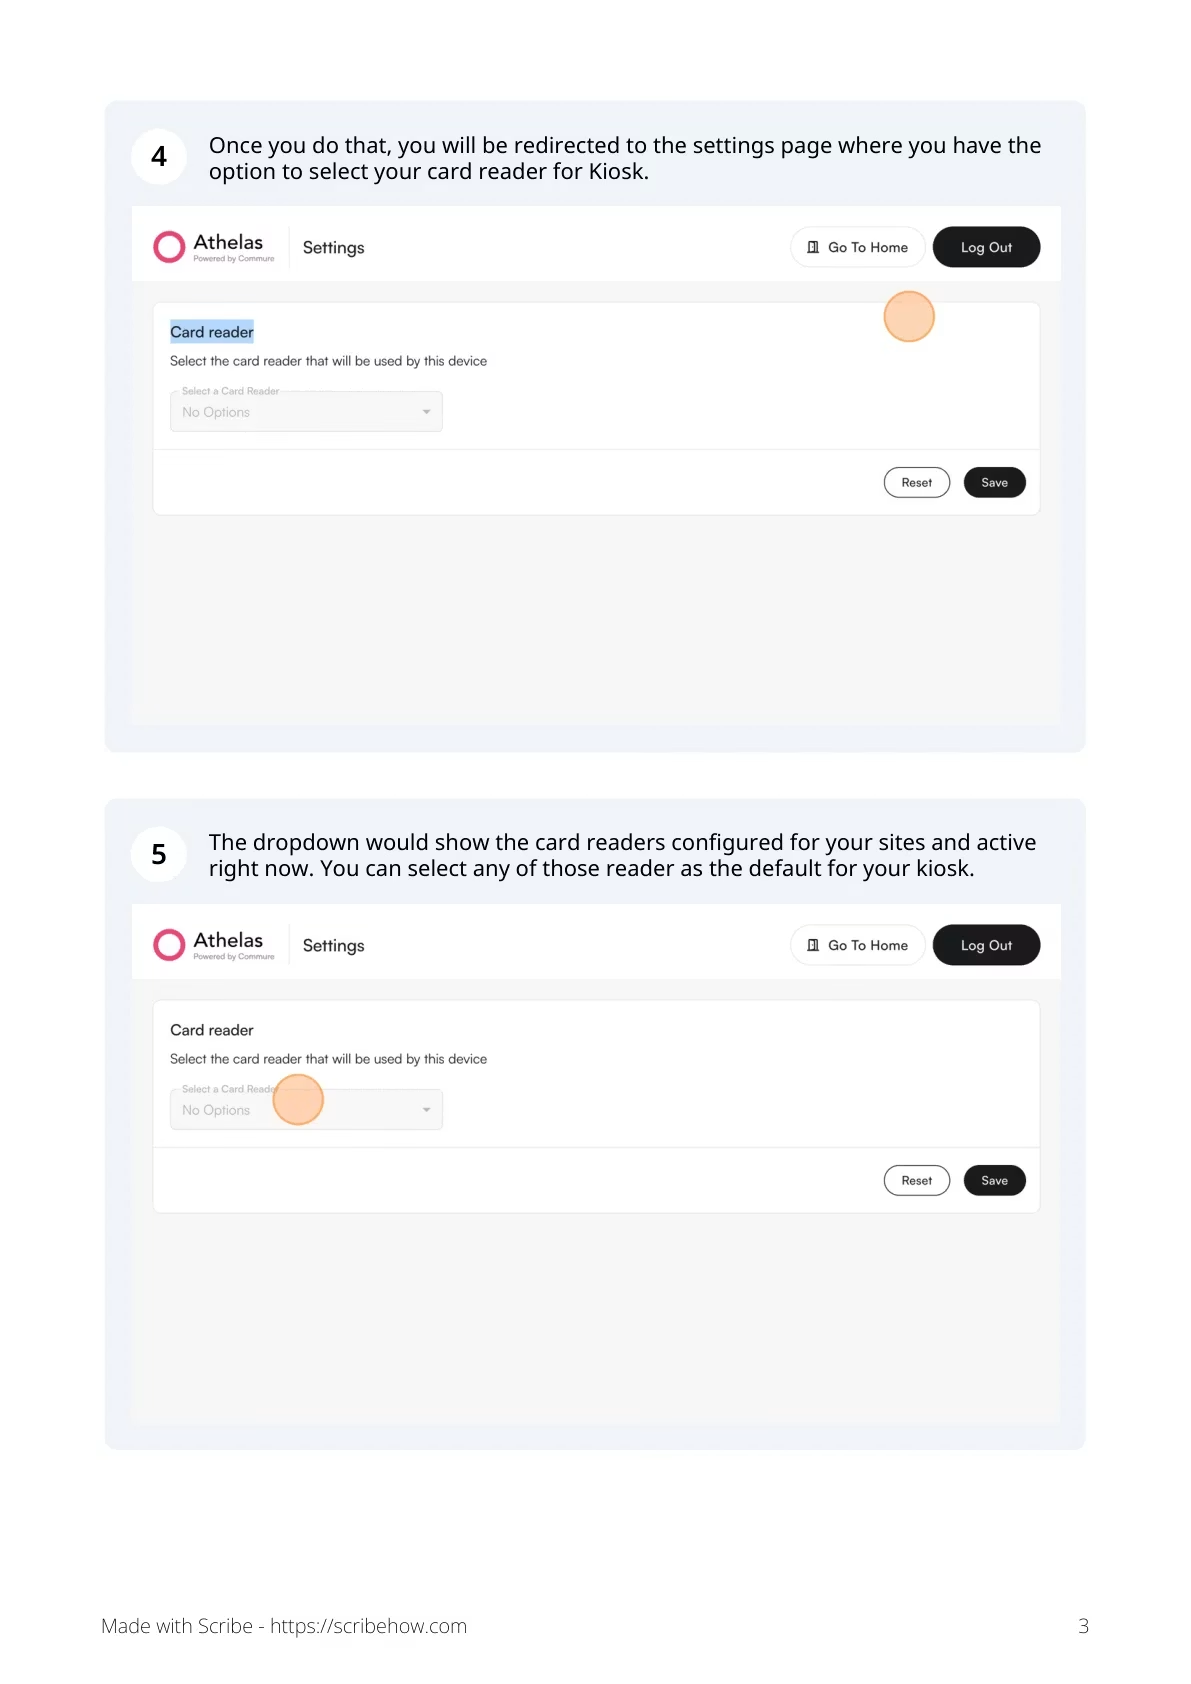 Click **Save** to commit the reader choice. The kiosk returns to the welcome screen — at this point setup is complete on the device.
 ### Patient check-in workflow
The patient taps **Tap to Get Started** on the welcome screen, then chooses between **Express Check-in** and **Check in Manually**.
### Patient check-in workflow
The patient taps **Tap to Get Started** on the welcome screen, then chooses between **Express Check-in** and **Check in Manually**.
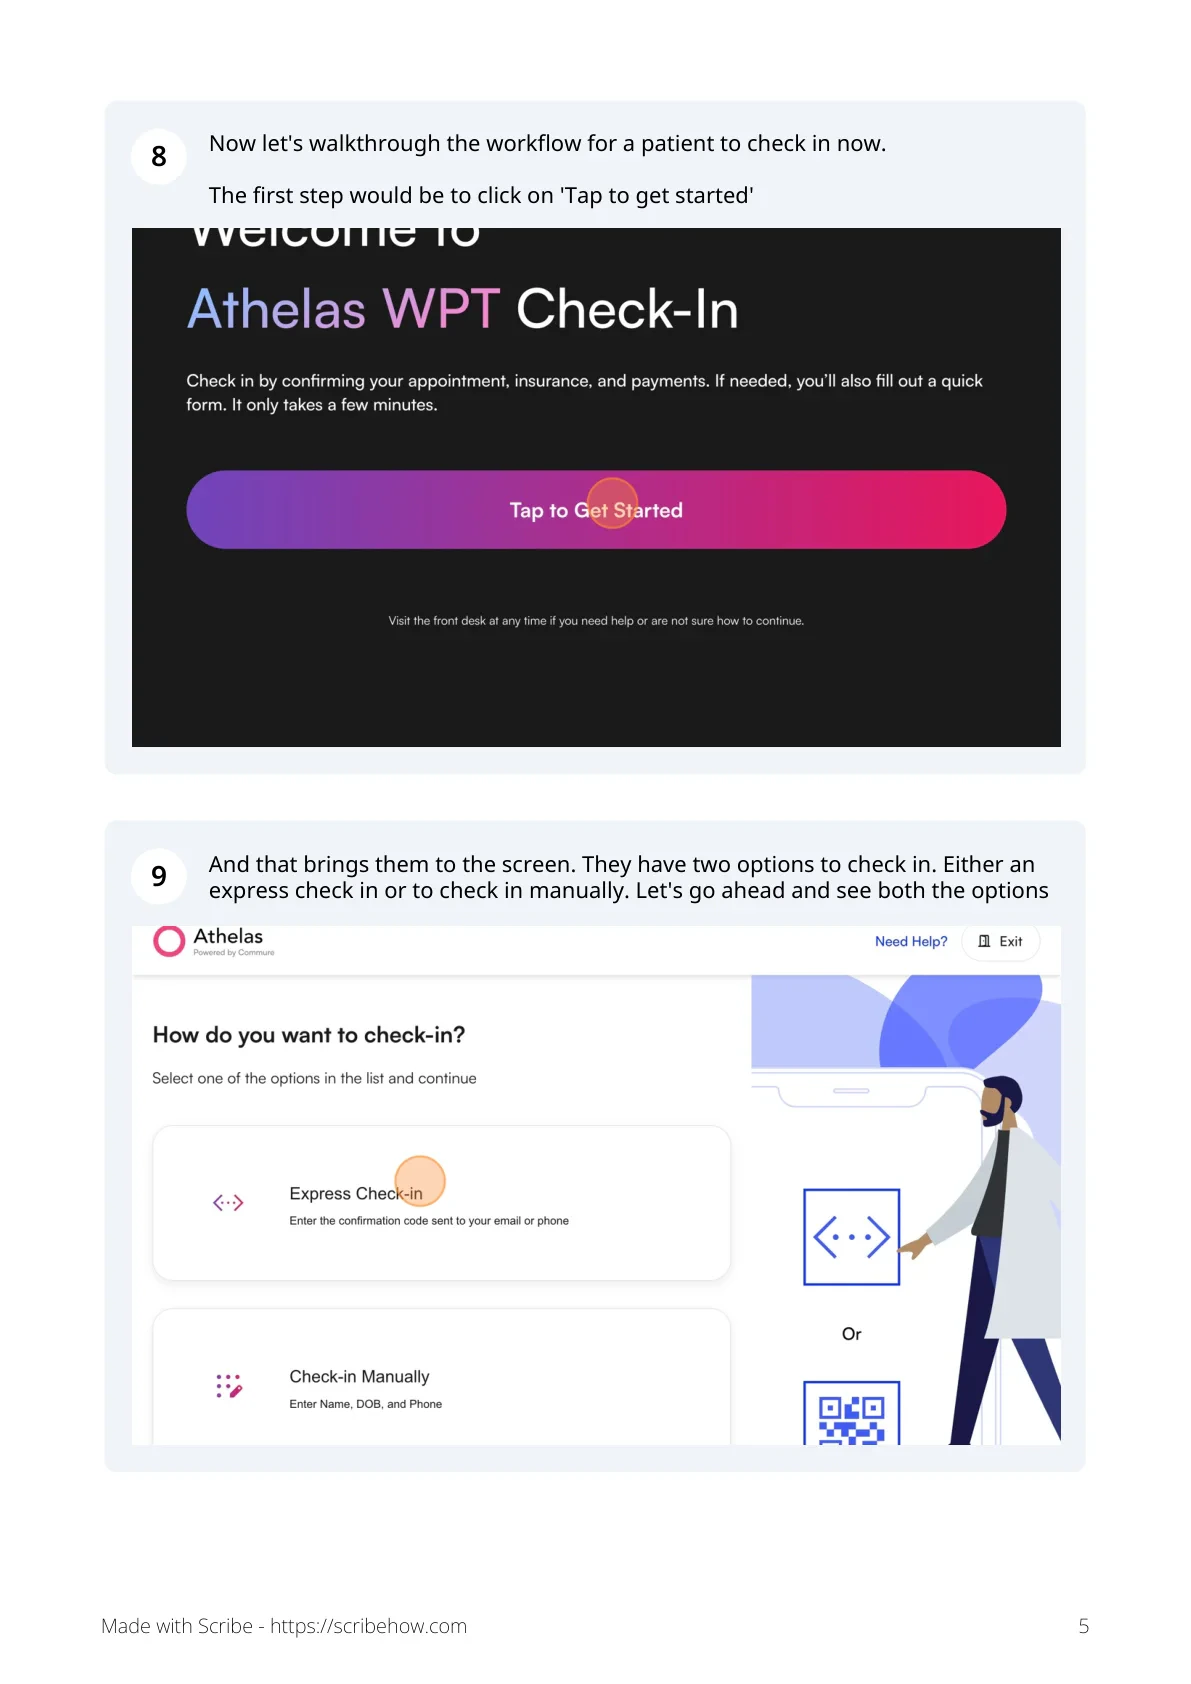 With express check-in, the patient enters the **5-digit code** that was texted to them 90 minutes before their appointment. Enabling kiosk in Insights is what triggers these verification codes.
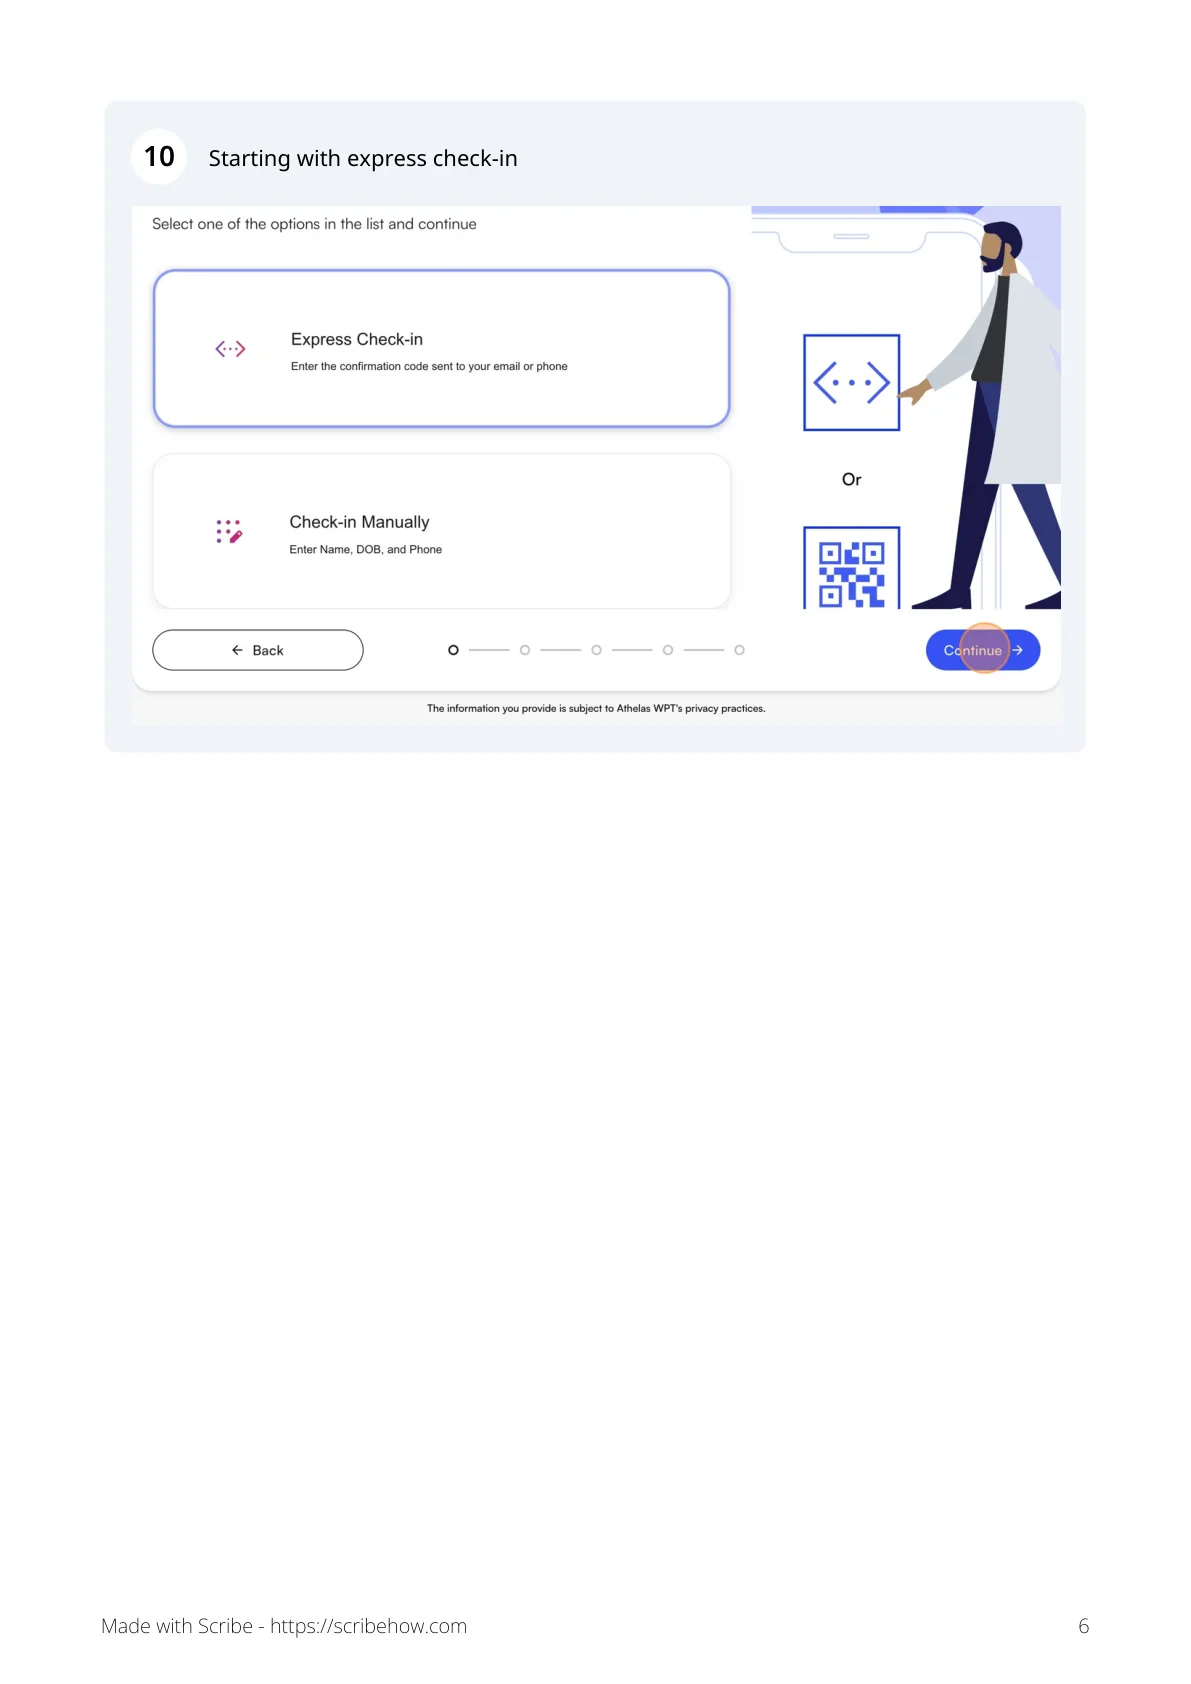
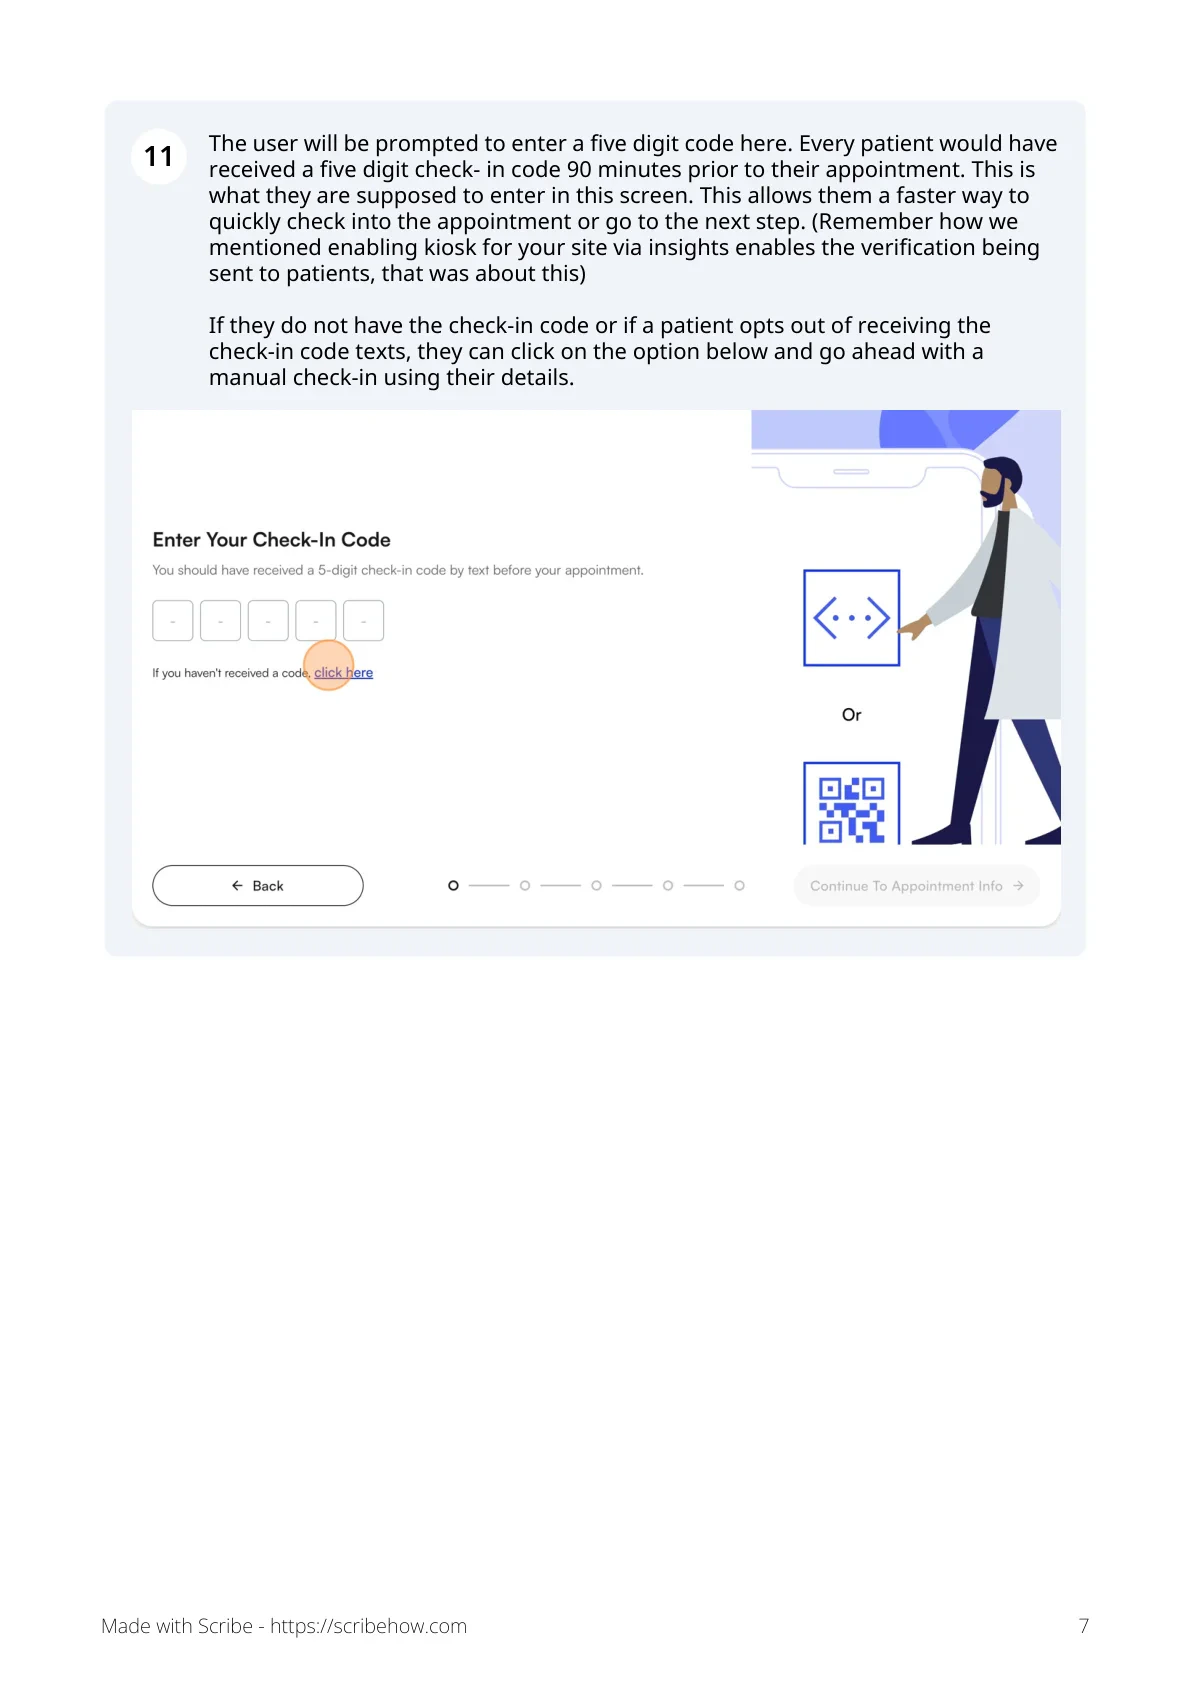 ✨**Smart Tip:** If a patient doesn't have the code or has opted out of receiving check-in code texts, they can fall back to **Check in Manually** to enter their details by hand.
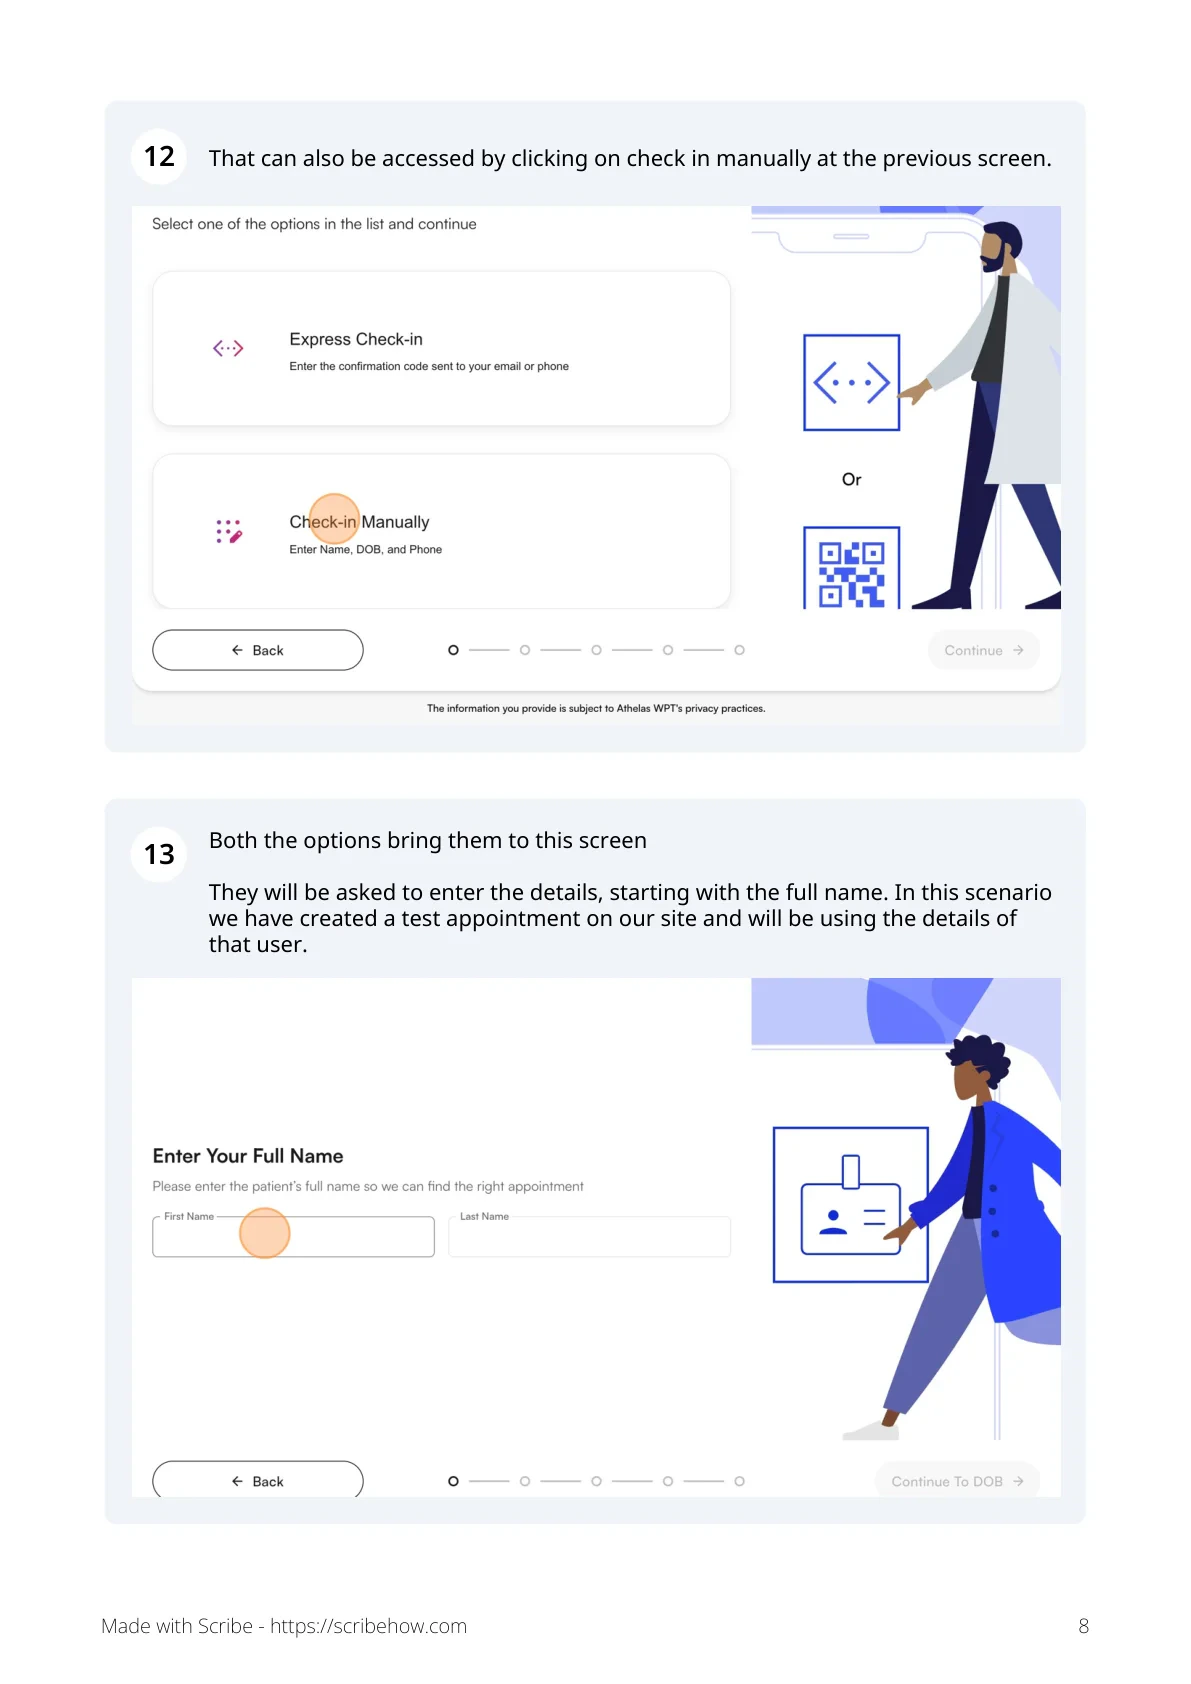
Both options route to the same patient-details screen, starting with the patient's full name.
✨**Smart Tip:** If a patient doesn't have the code or has opted out of receiving check-in code texts, they can fall back to **Check in Manually** to enter their details by hand.
Both options route to the same patient-details screen, starting with the patient's full name.
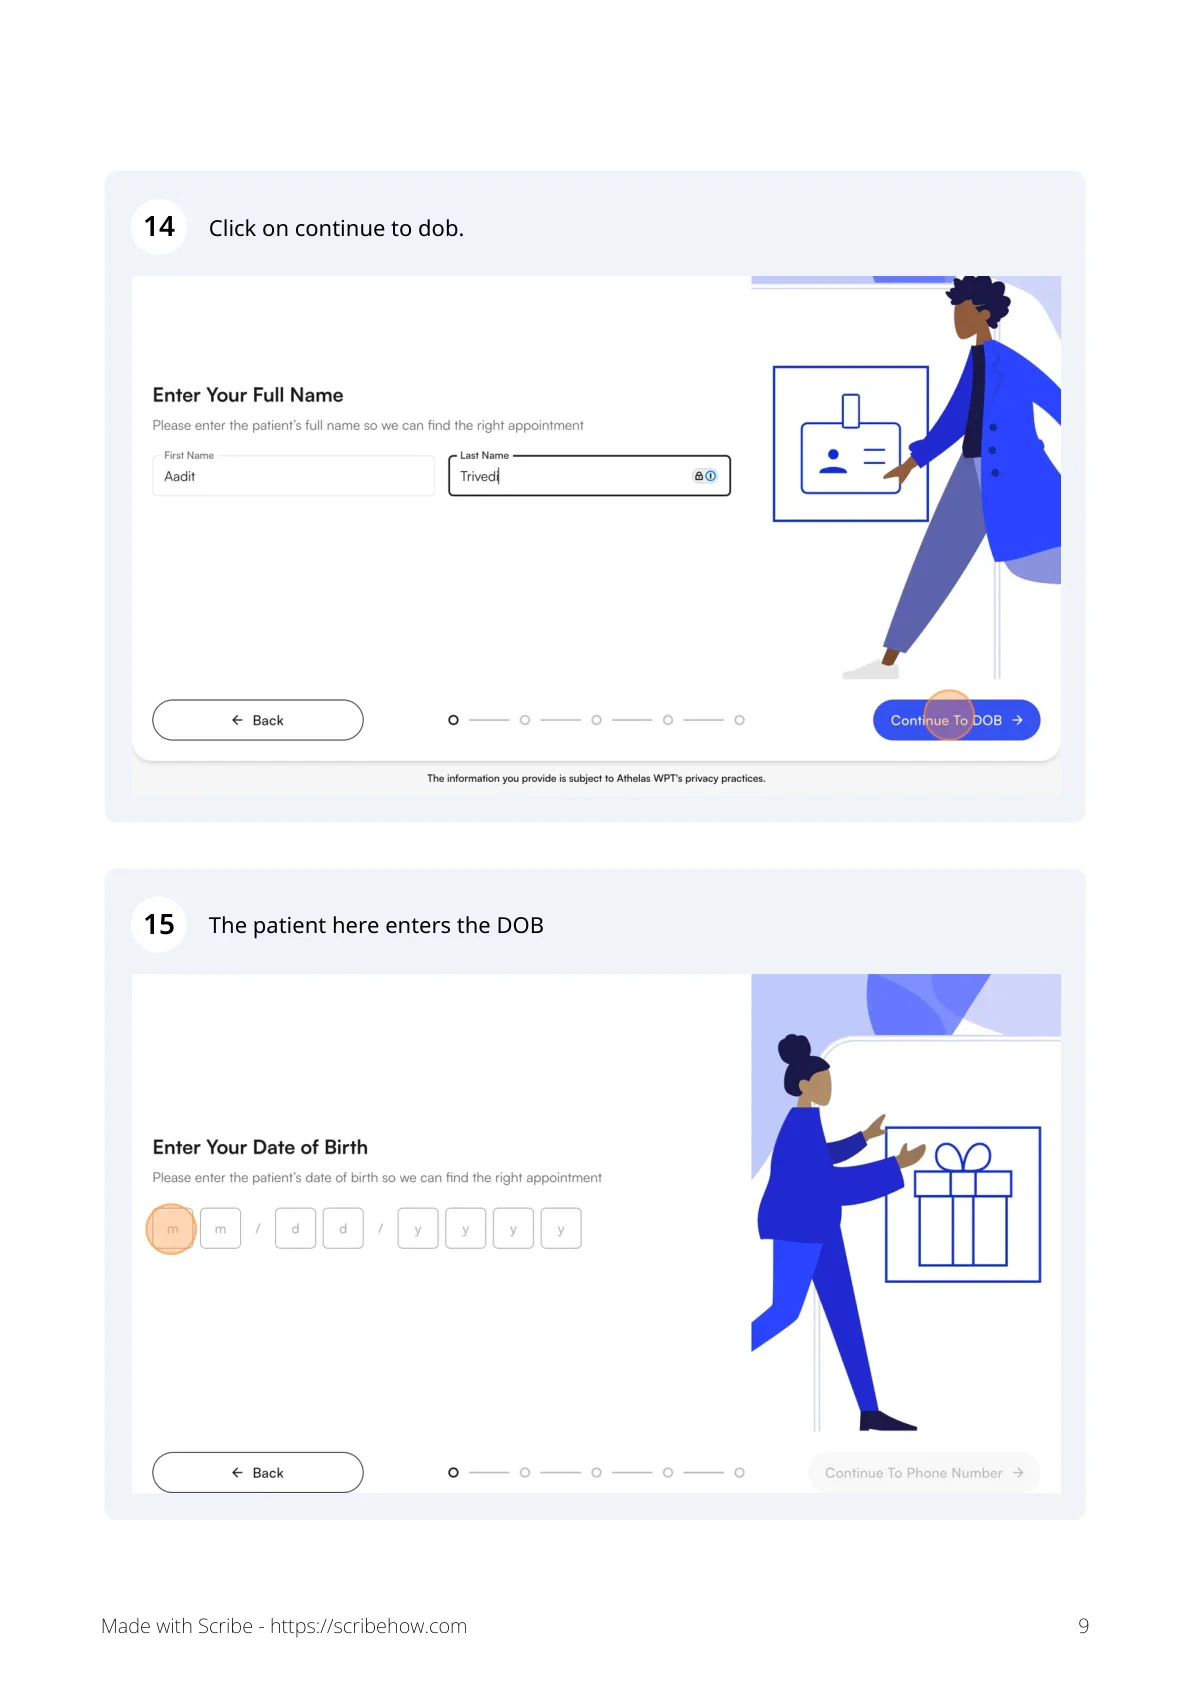
 The patient taps **Continue to DOB** and enters their date of birth.
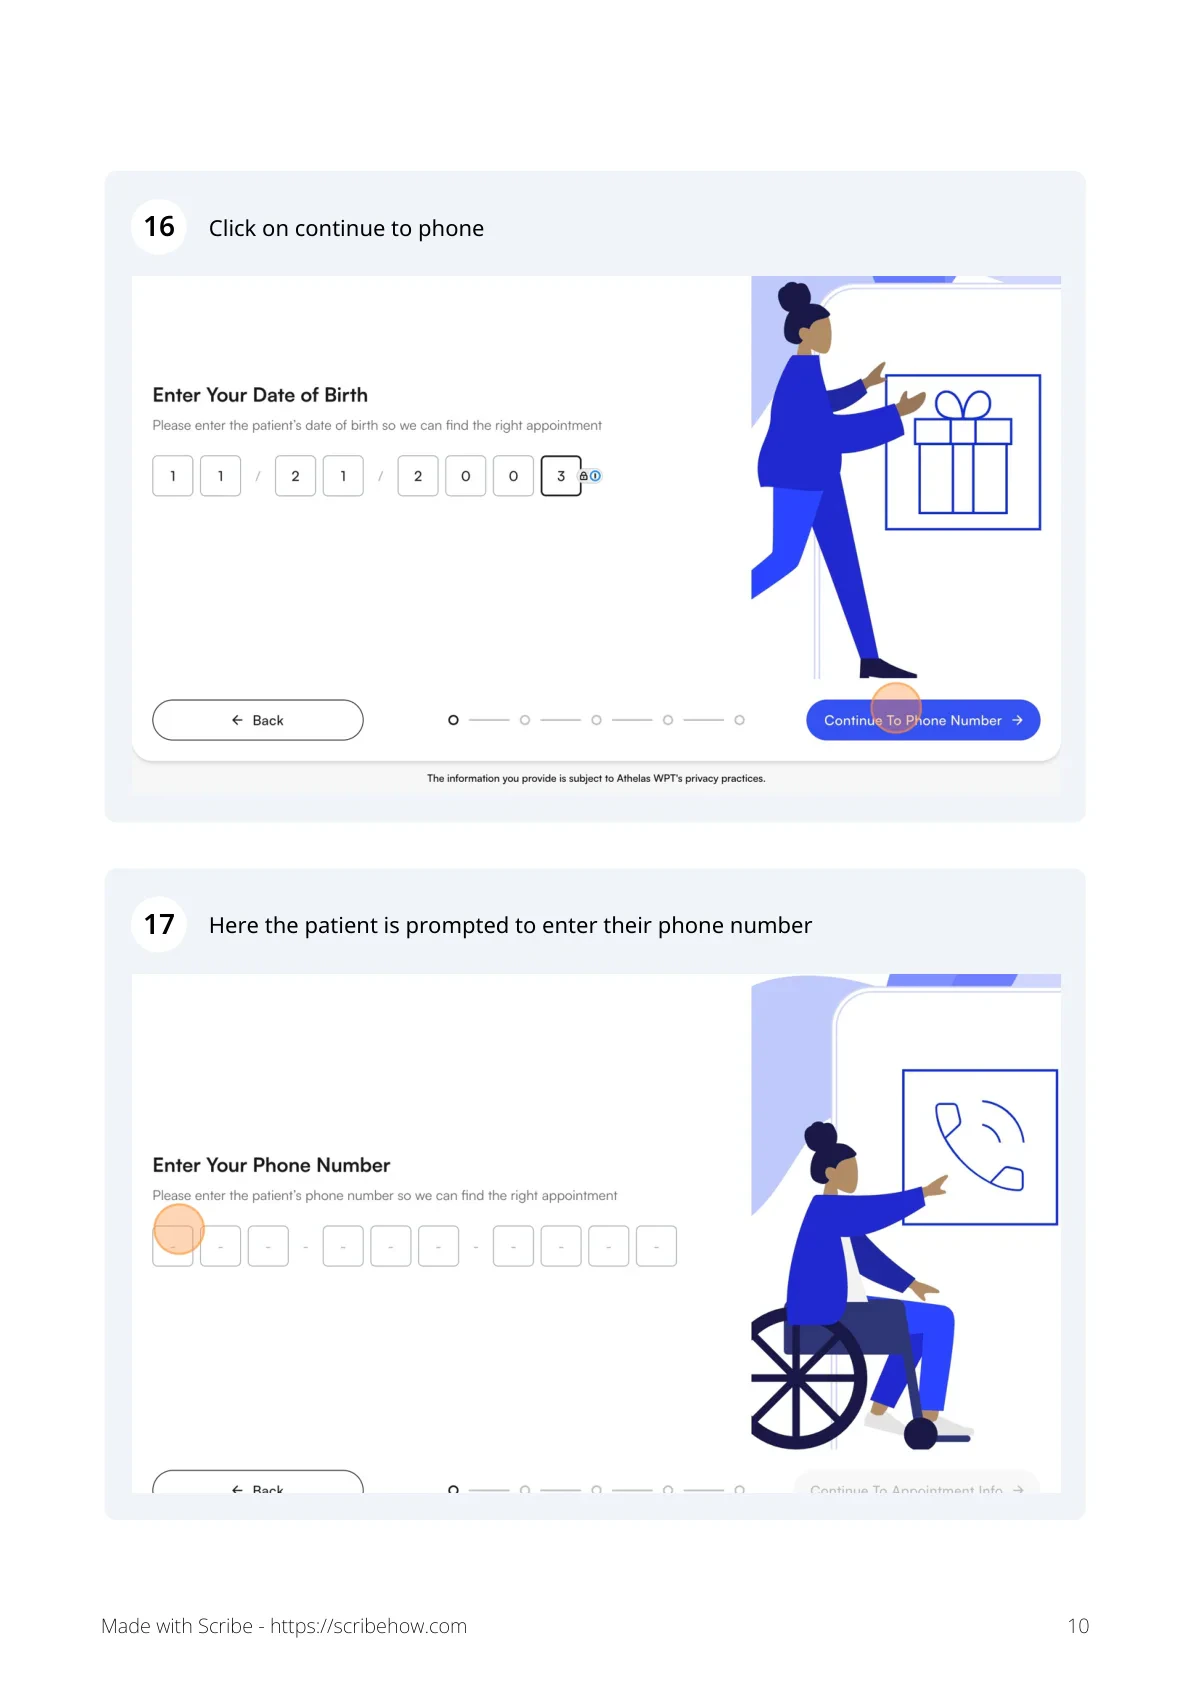
 Tap **Continue to phone** and enter the phone number.
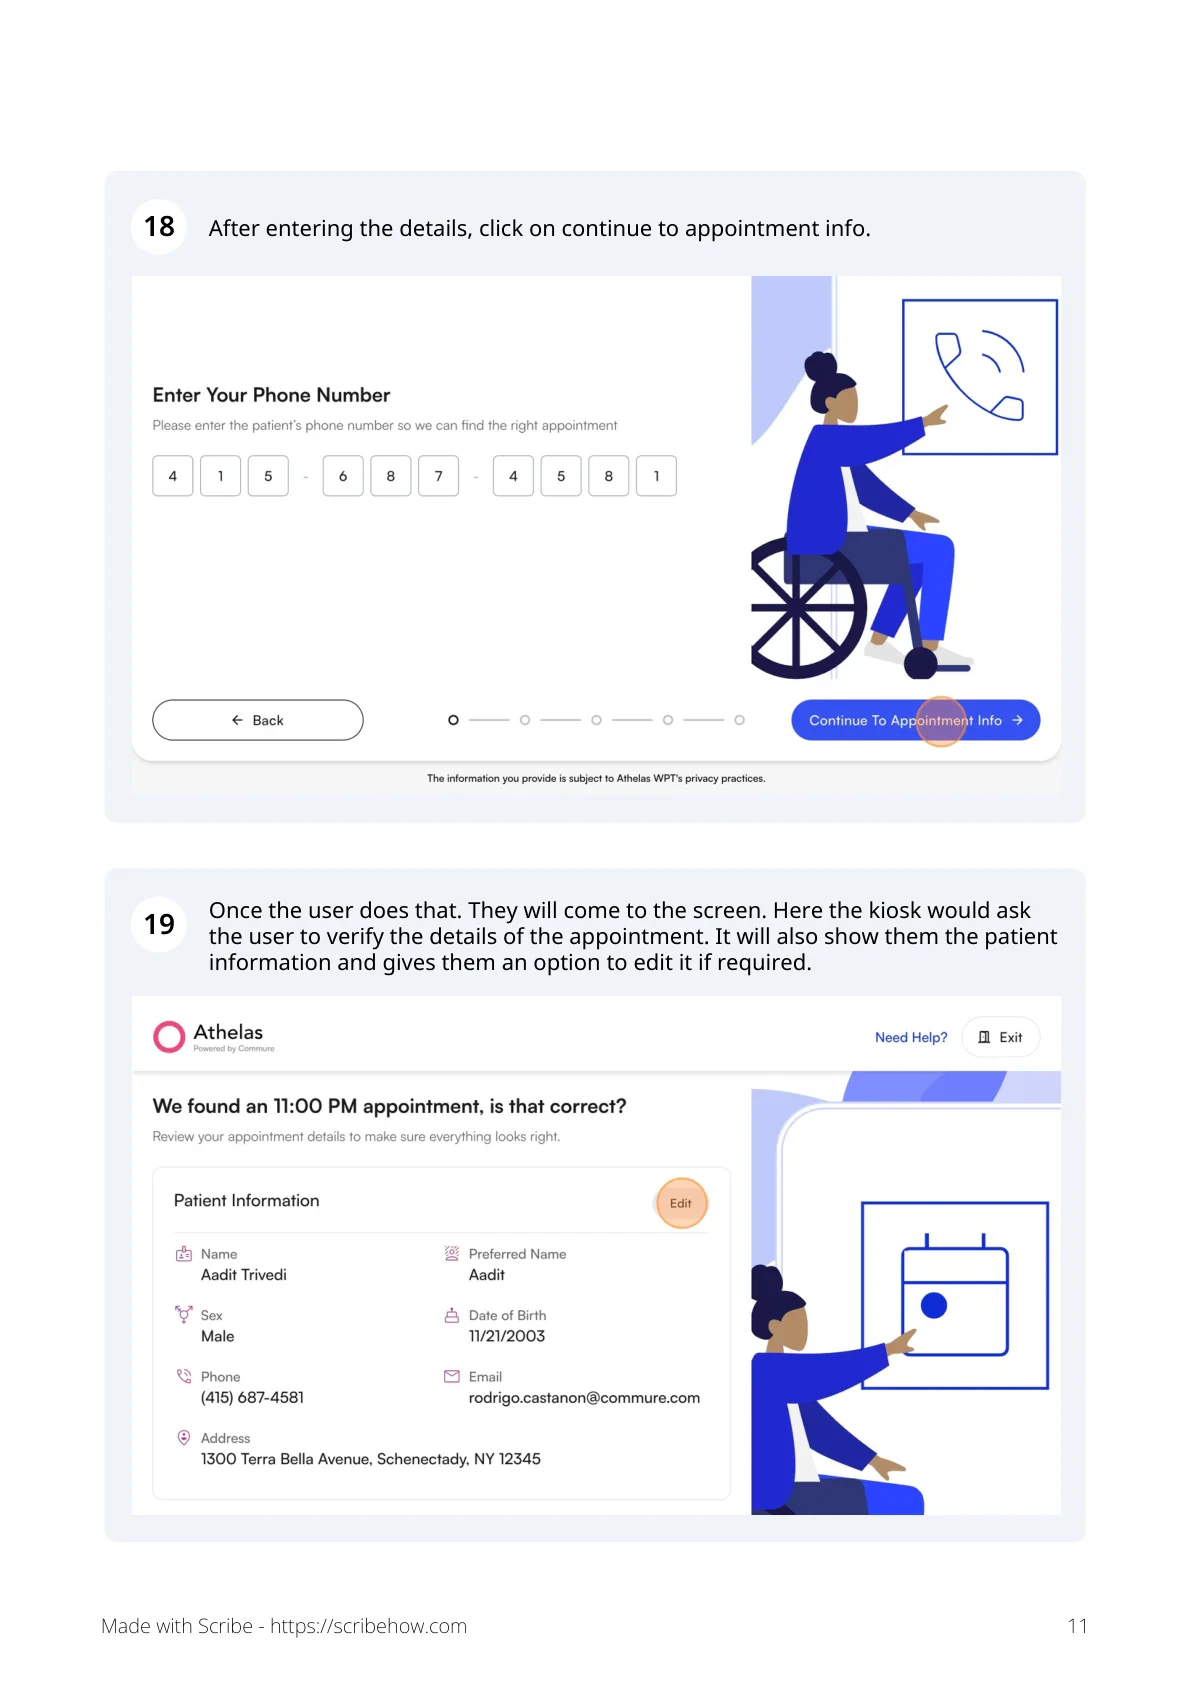
 After **Continue to appointment info**, the kiosk asks the patient to verify the appointment and shows their patient info with an option to edit it.
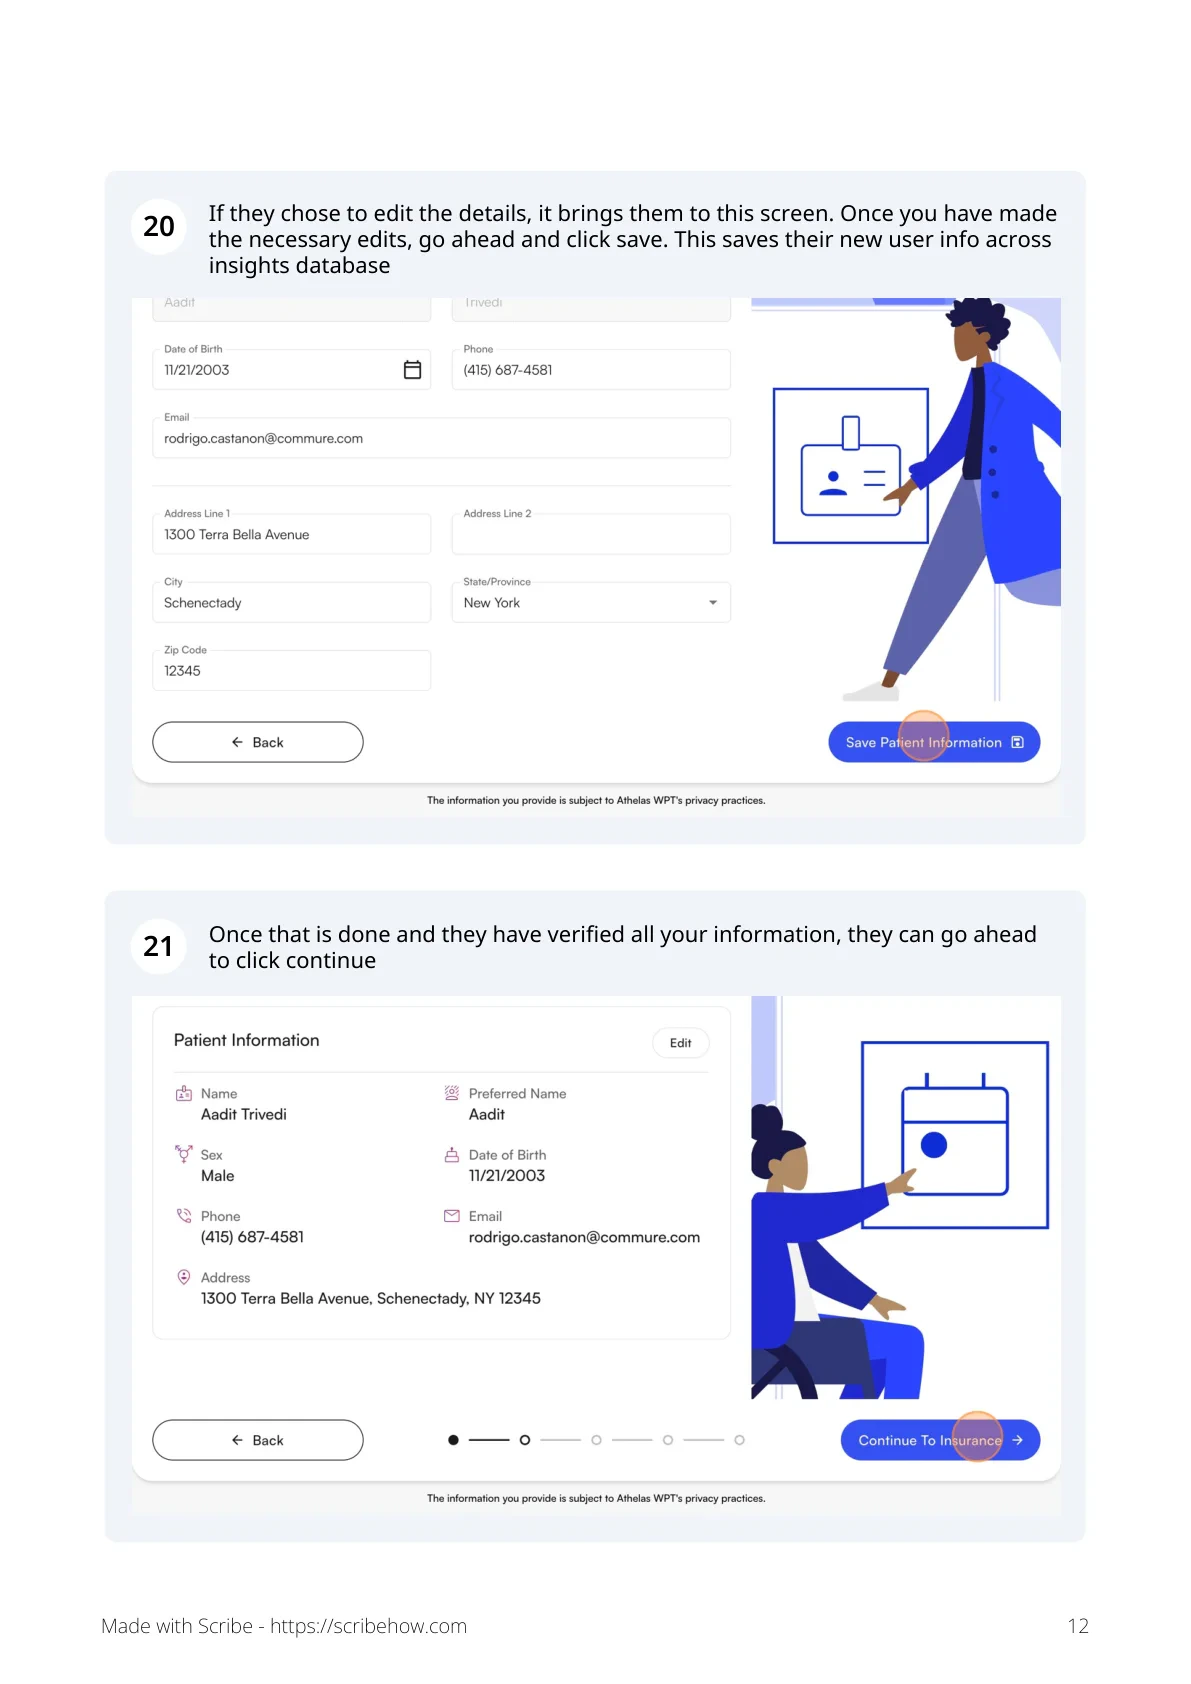
 If the patient chooses to edit, the kiosk opens an editable form. **Save** writes the new info back to the Insights database.
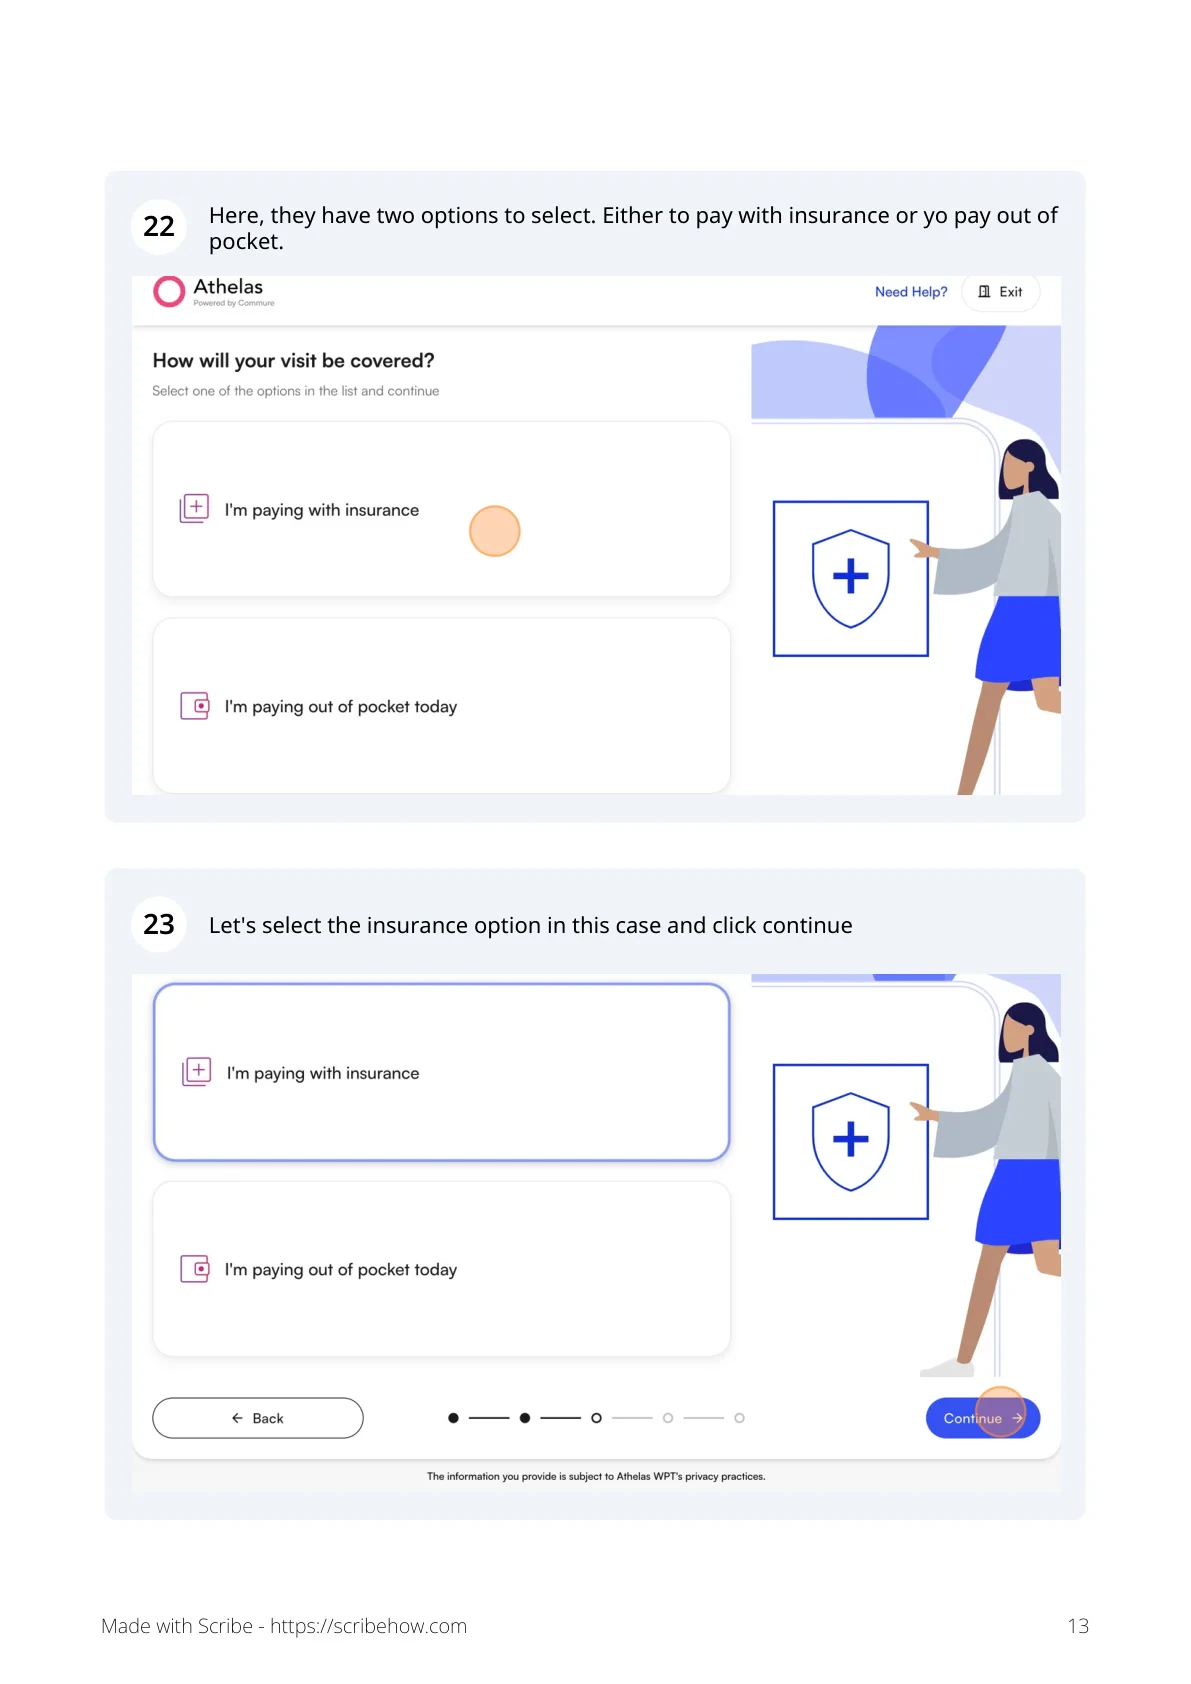
 Once info is verified, the patient picks **Pay with insurance** or **Pay out of pocket** and clicks **Continue**.
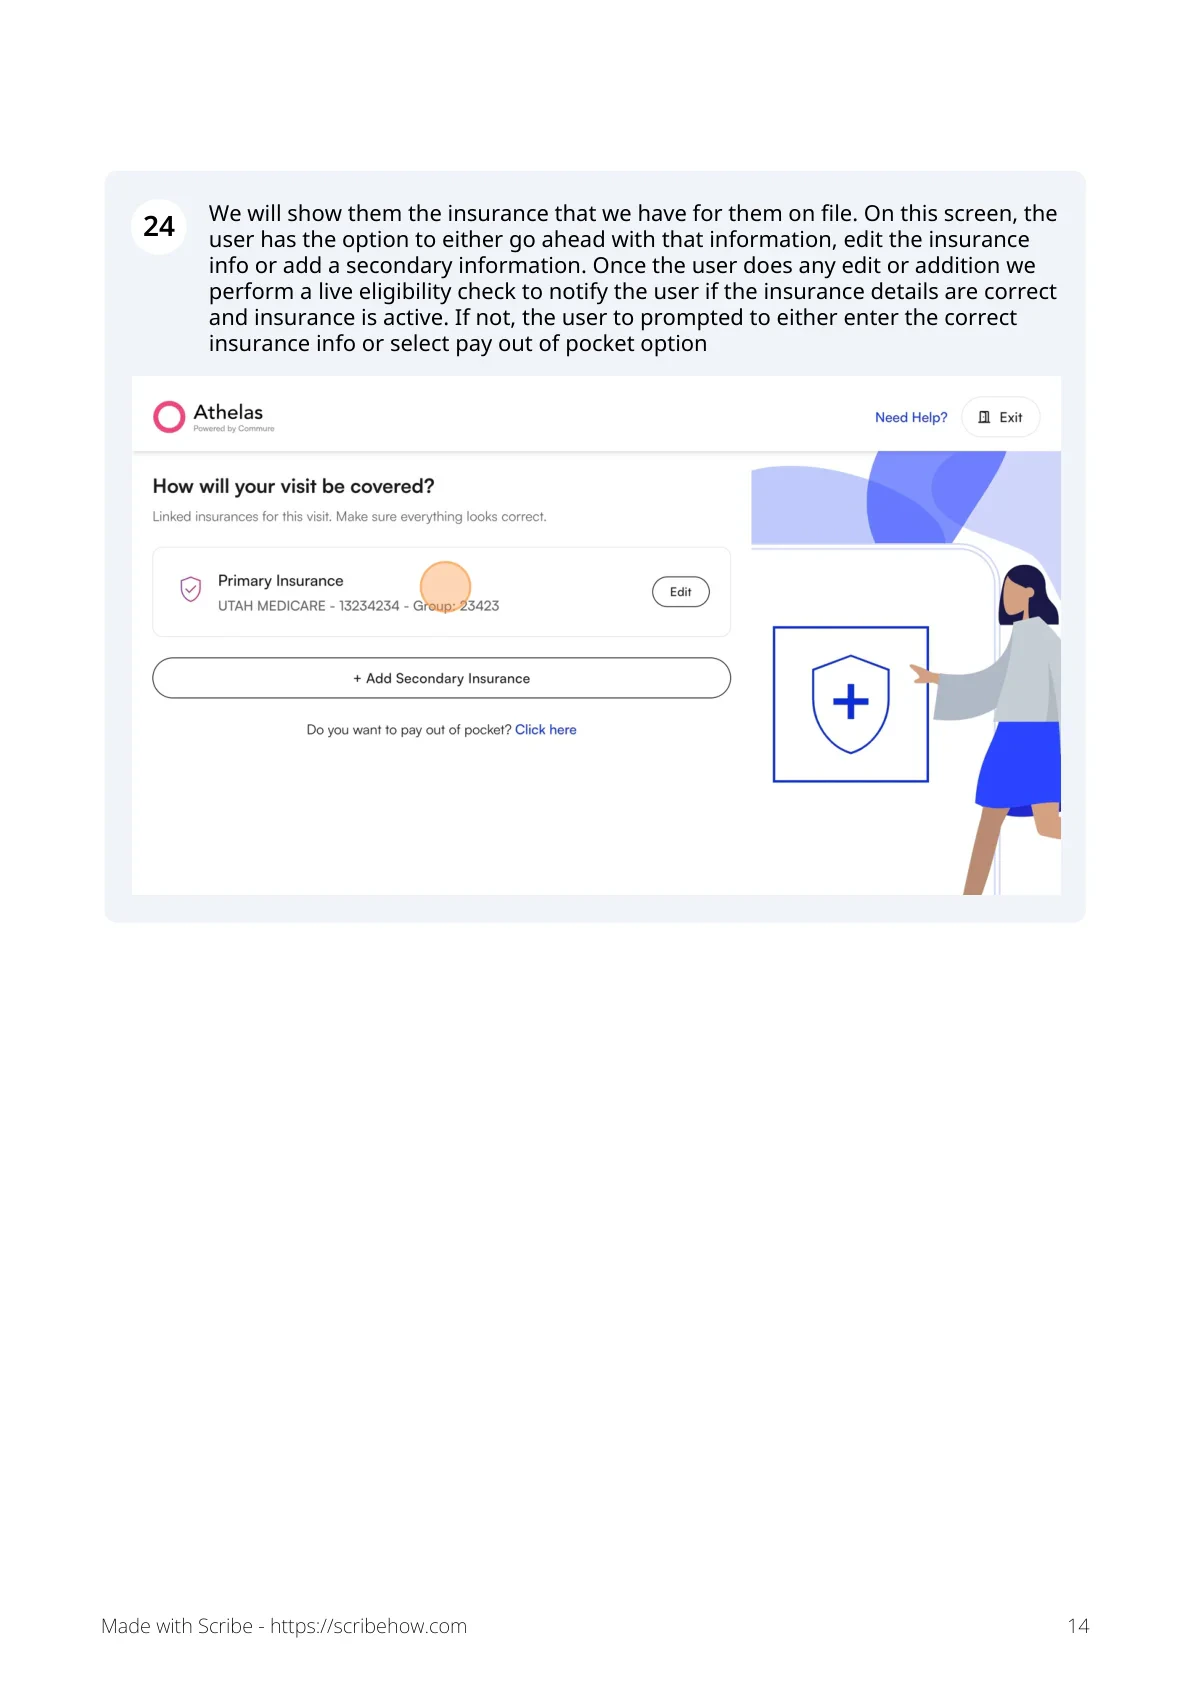
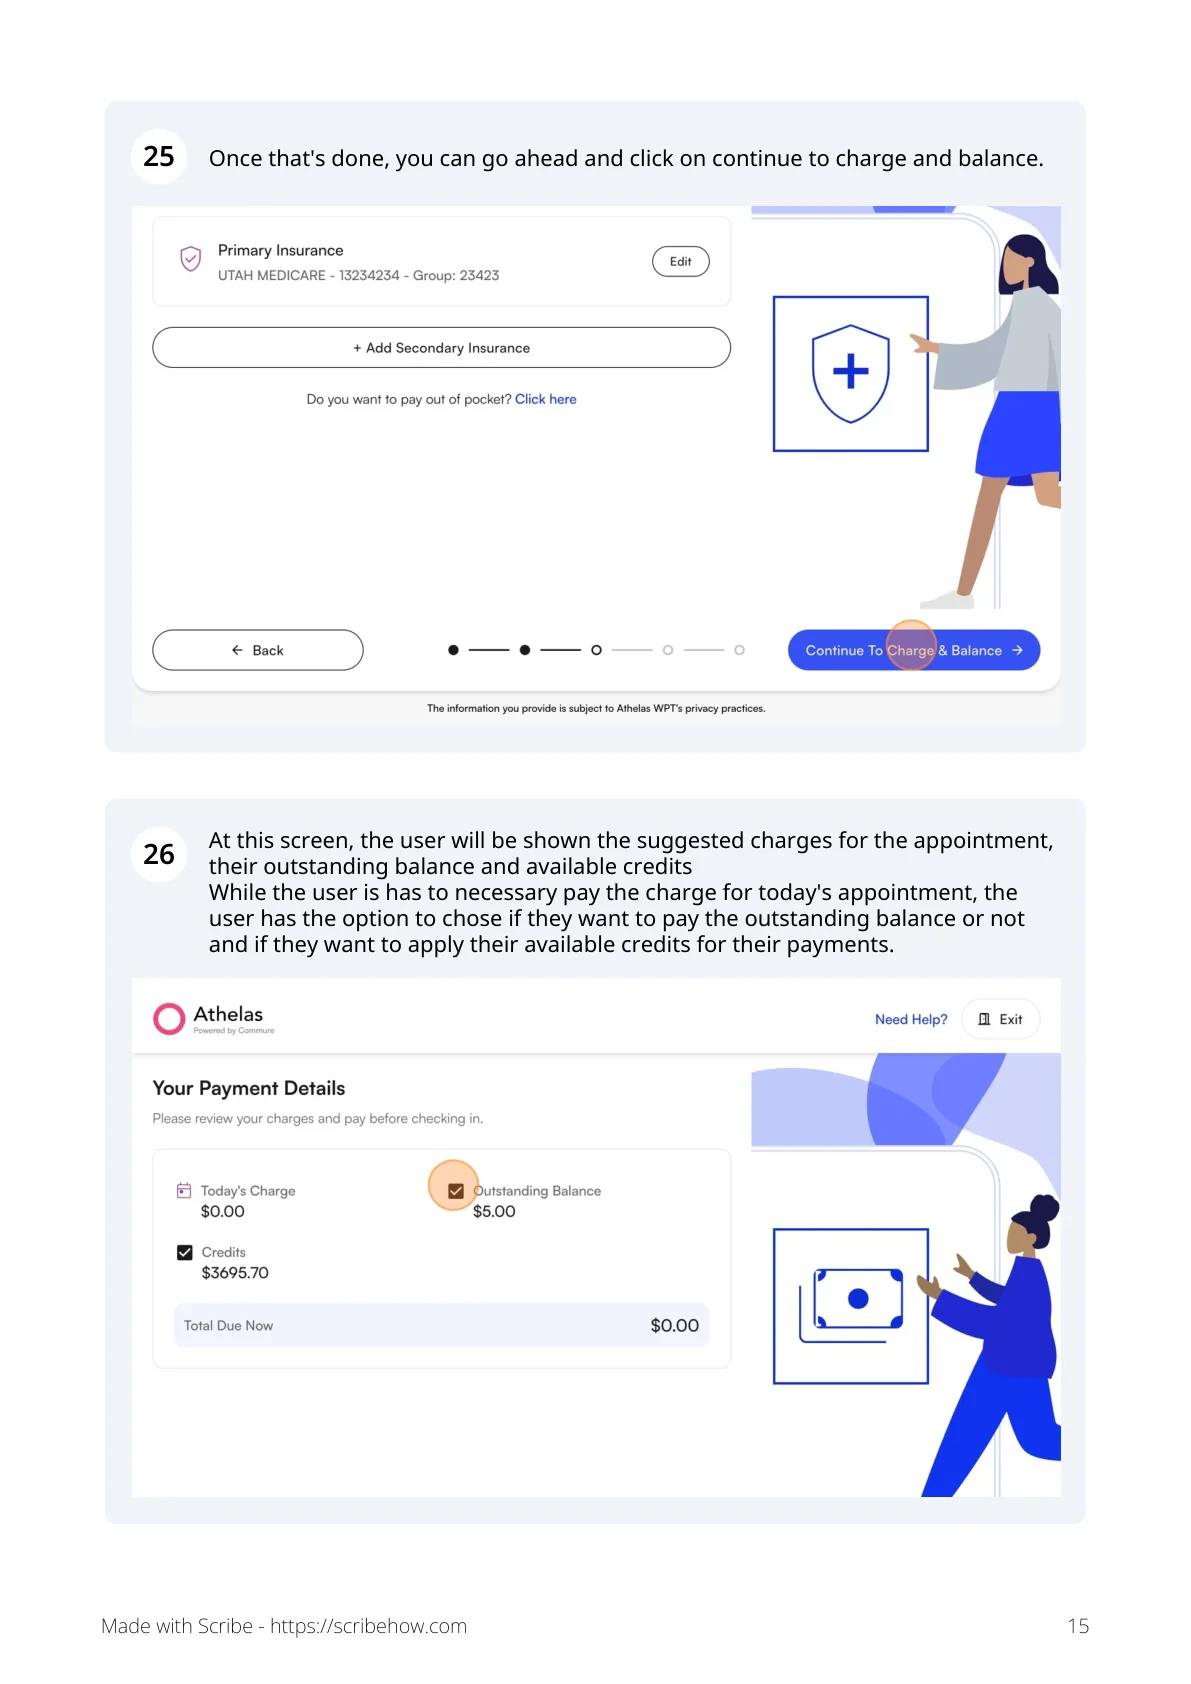
 With insurance selected, the kiosk shows the insurance on file. The patient can keep it, edit it, or add secondary coverage. Any change triggers a **live eligibility check** — if eligibility fails, the patient is prompted to correct the info or switch to out-of-pocket.
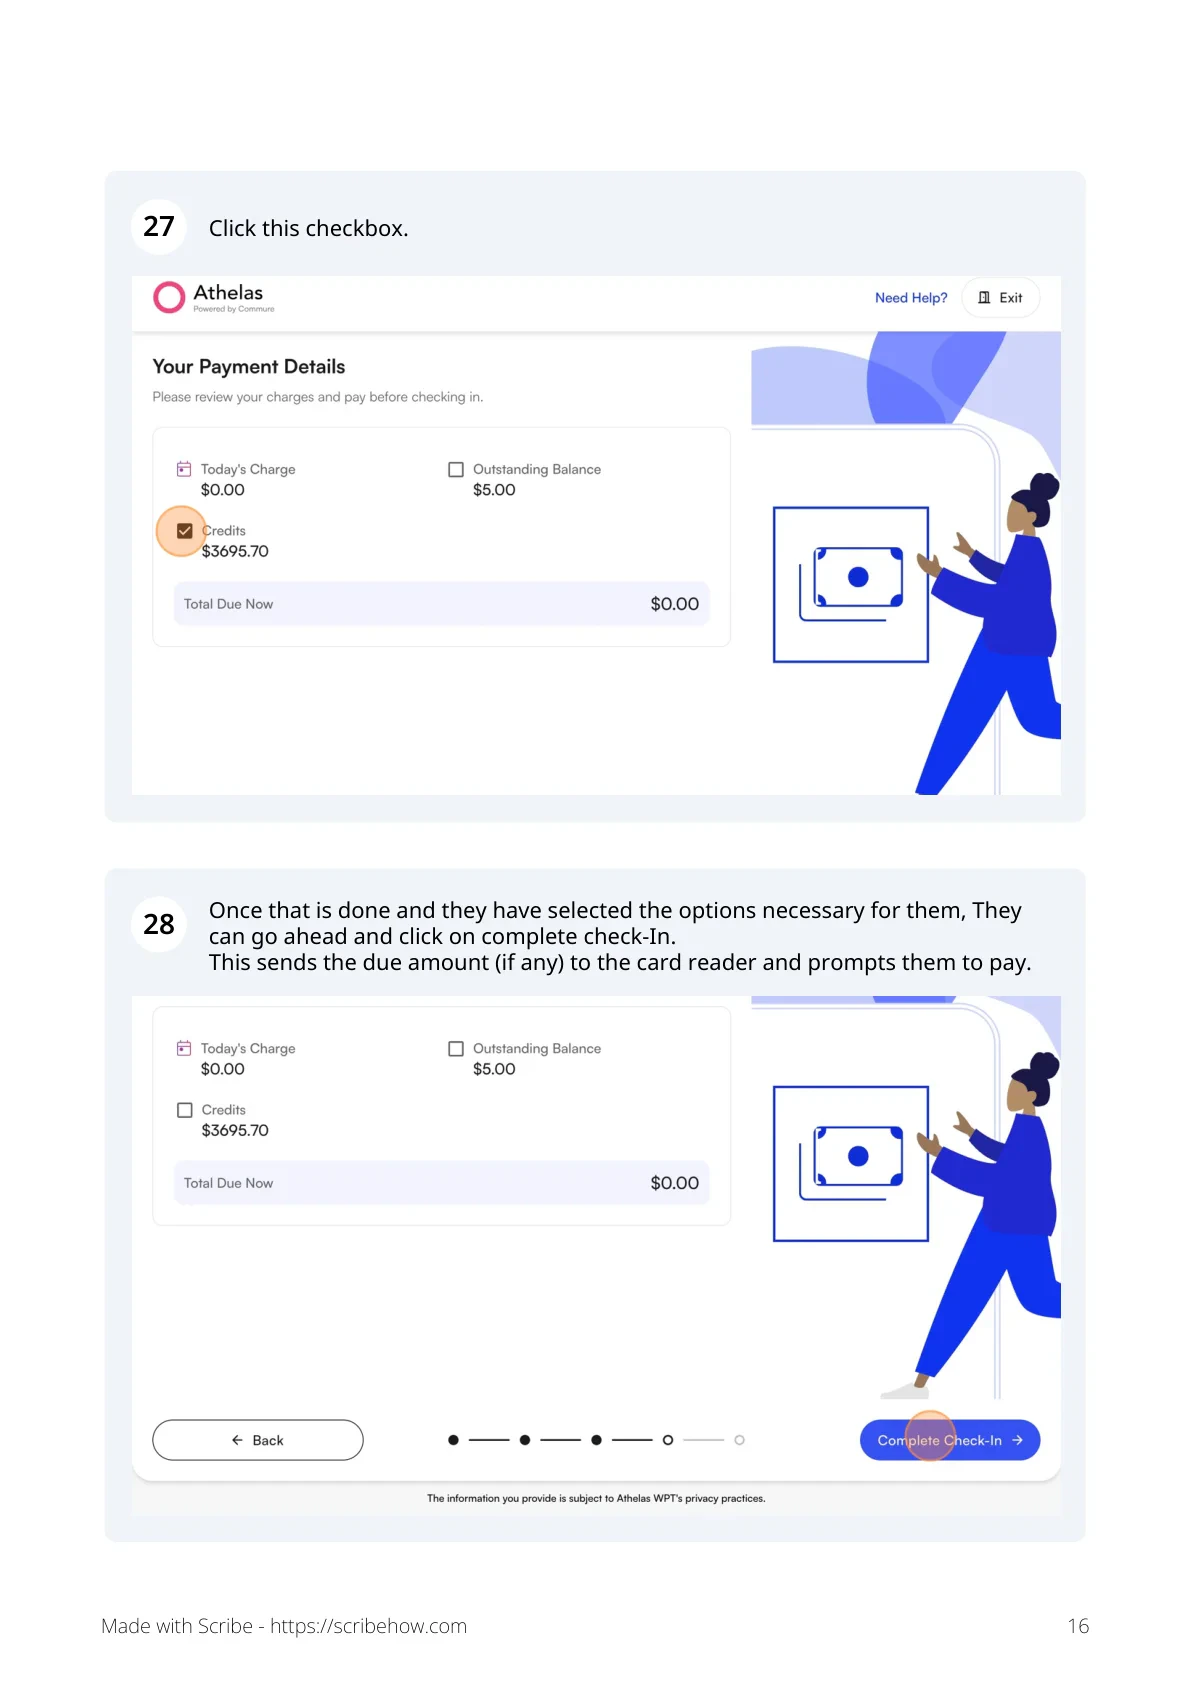
 Tap **Continue to charge and balance** to see suggested charges for today's appointment, the patient's outstanding balance, and any available credits. Today's charge is required, but the patient can choose whether to pay outstanding balance and whether to apply credits.
 After confirming choices, the patient taps **Complete Check-In**. The total amount due is sent to the card reader for payment.
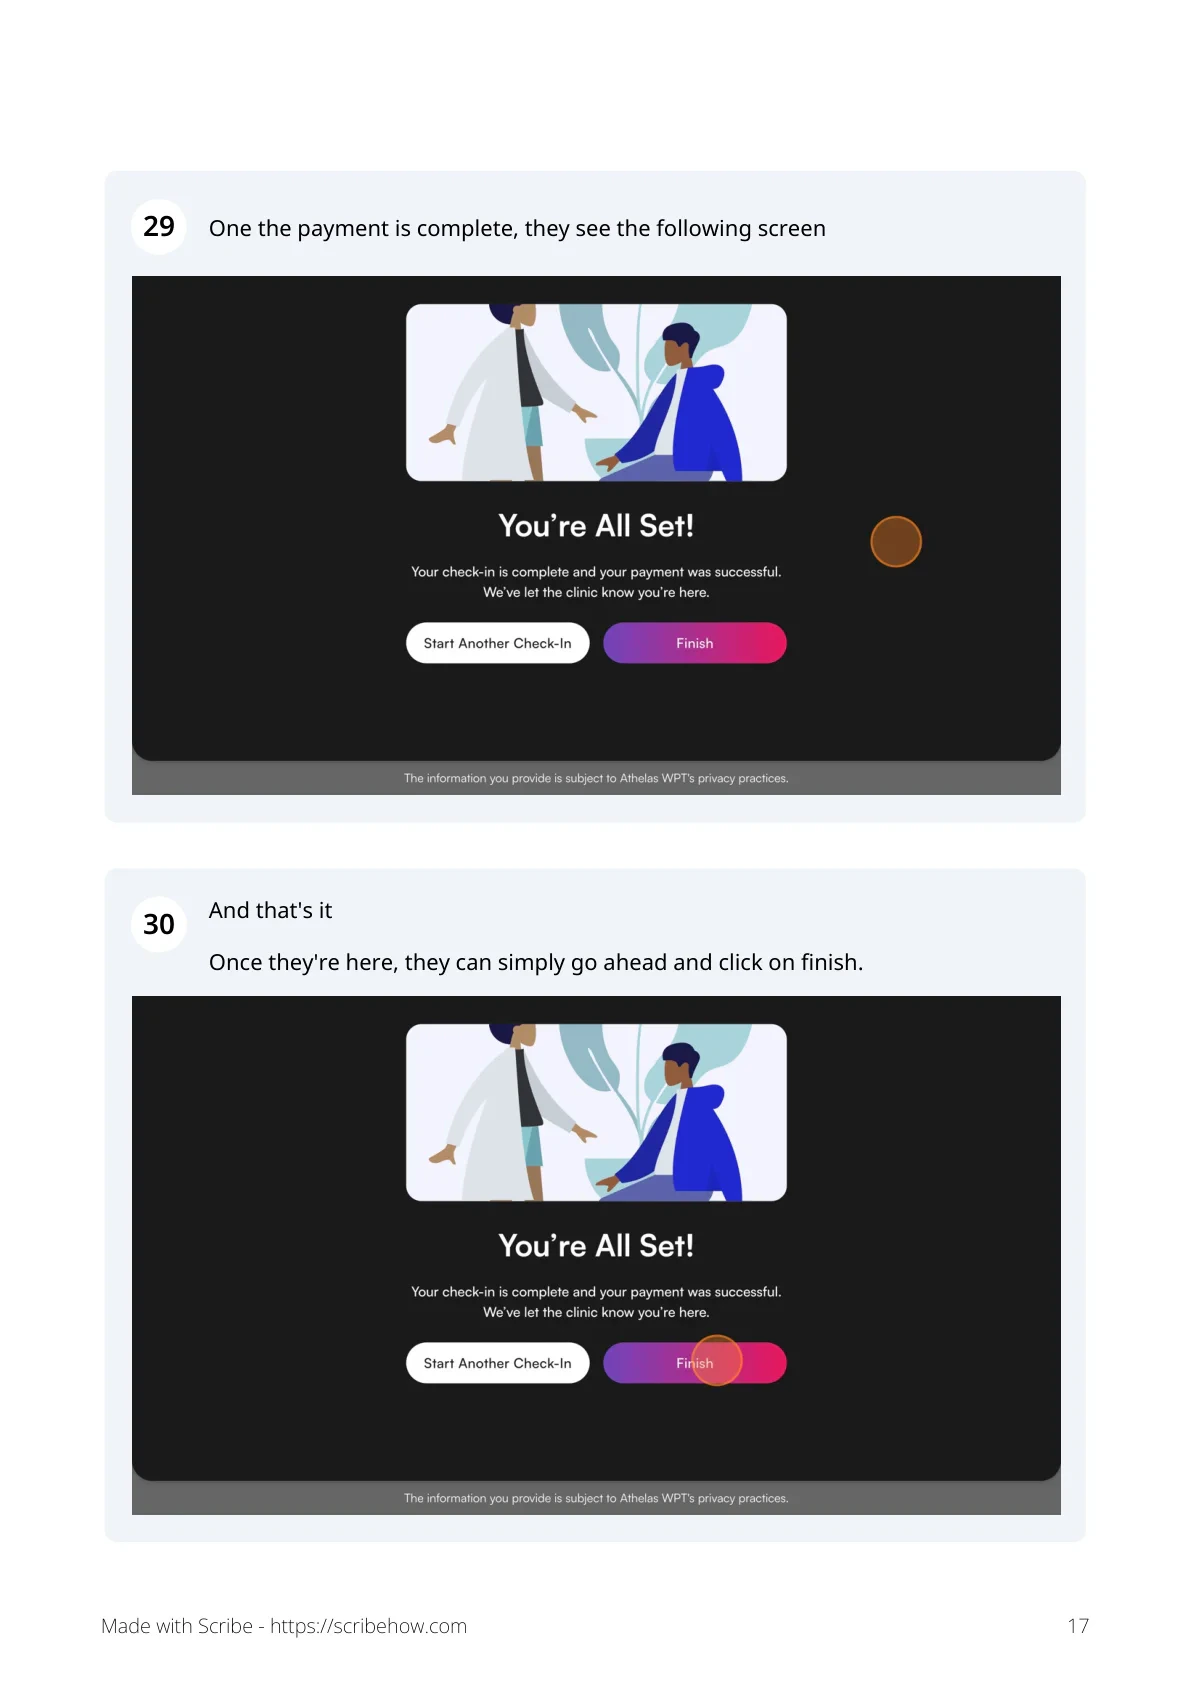
 Once payment clears, the patient sees a confirmation screen and taps **Finish** to return the kiosk to the welcome screen for the next patient.
 ## Using the Kiosk for Forms Mode
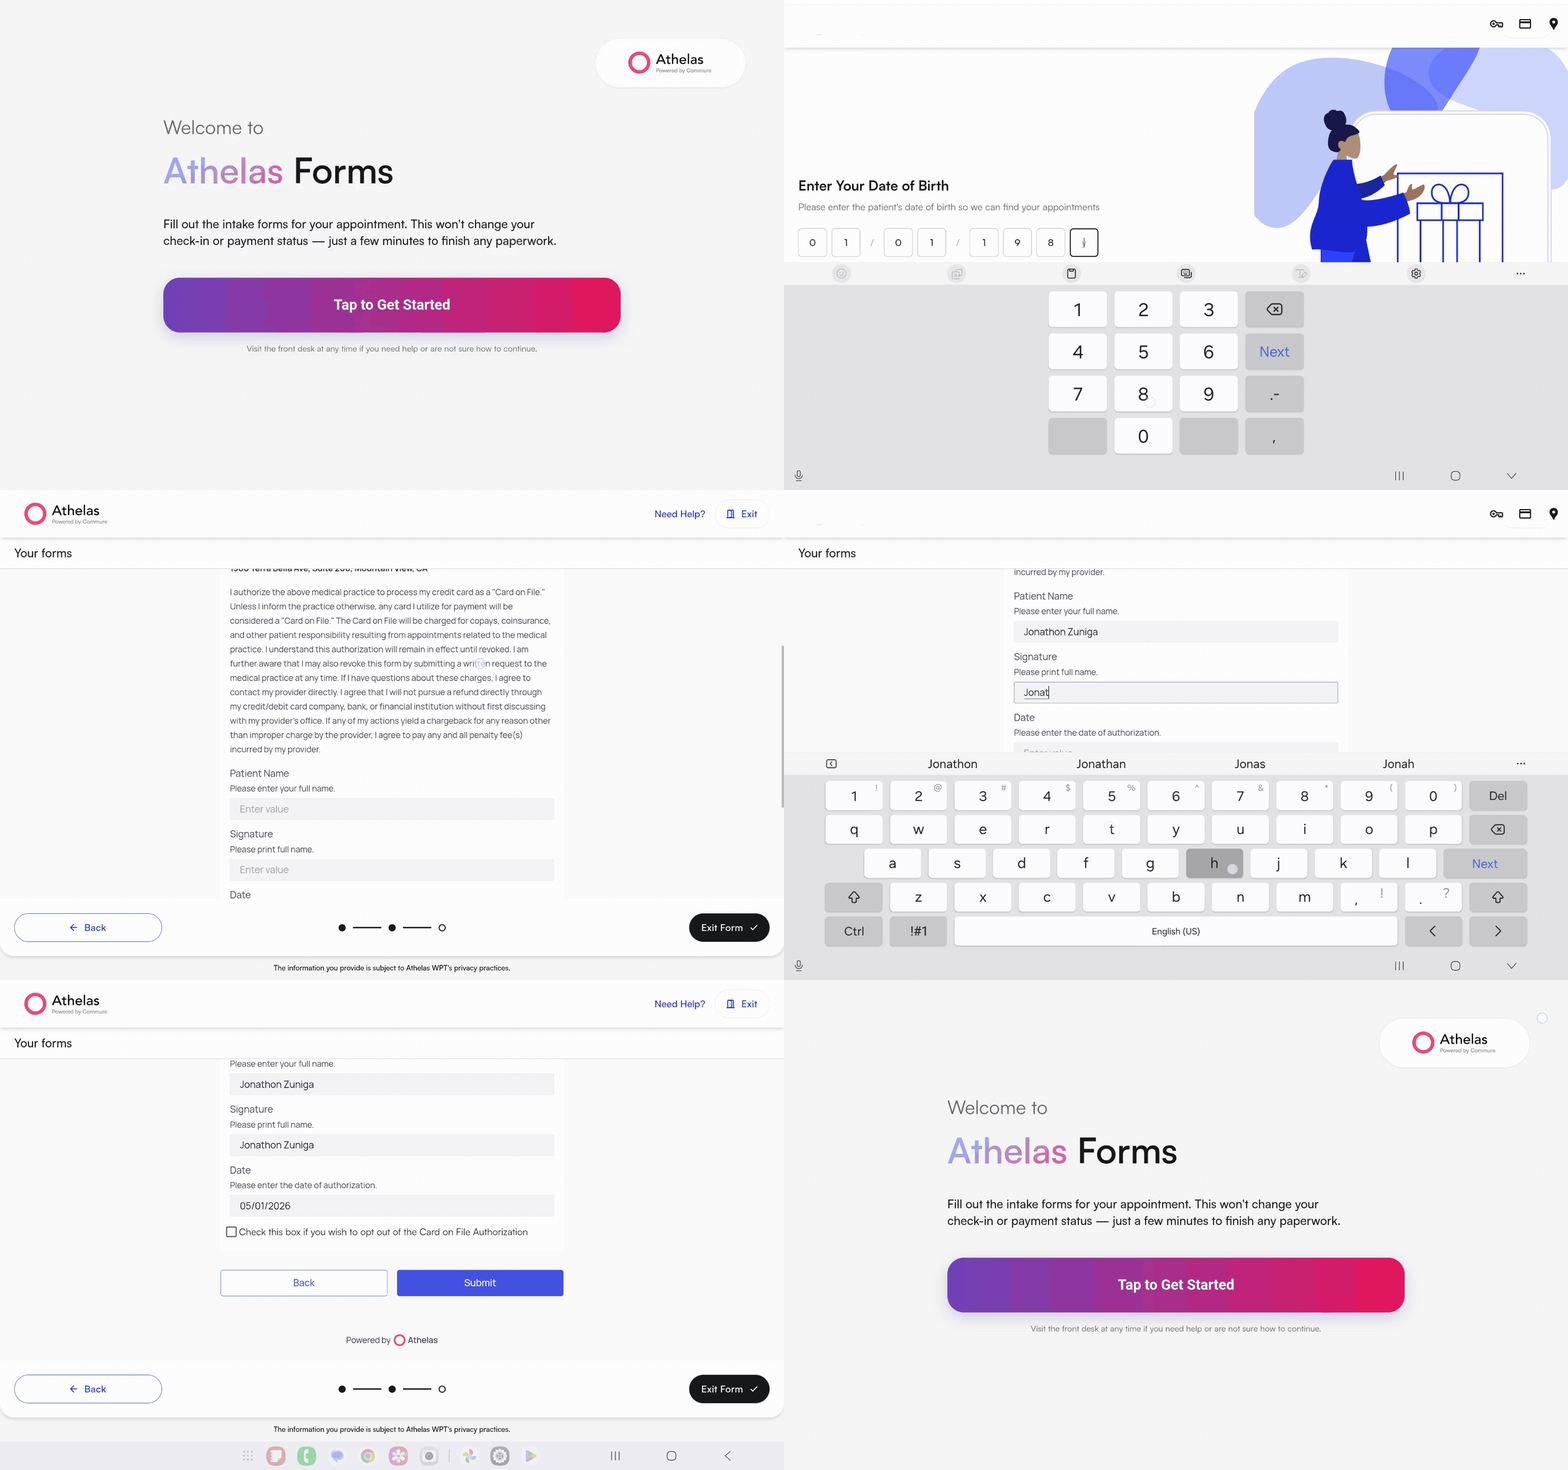
An alternate operating mode for the Kiosk is **Forms Mode** — a lighter-weight flow designed just for patients to complete any uncompleted intake forms.
Forms Mode does **not** check in the patient or allow editing or reviewing any other patient details. Use Check-in Mode if you want patients to confirm information and pay balances.
### Accessing Forms Mode
To access Forms Mode, **tap the practice logo on the Kiosk home screen 5 times** to open the Kiosk settings, then click **Go To Forms** in the header. The kiosk then displays *"Welcome to \[site name] Forms"*.
## Using the Kiosk for Forms Mode
An alternate operating mode for the Kiosk is **Forms Mode** — a lighter-weight flow designed just for patients to complete any uncompleted intake forms.
Forms Mode does **not** check in the patient or allow editing or reviewing any other patient details. Use Check-in Mode if you want patients to confirm information and pay balances.
### Accessing Forms Mode
To access Forms Mode, **tap the practice logo on the Kiosk home screen 5 times** to open the Kiosk settings, then click **Go To Forms** in the header. The kiosk then displays *"Welcome to \[site name] Forms"*.
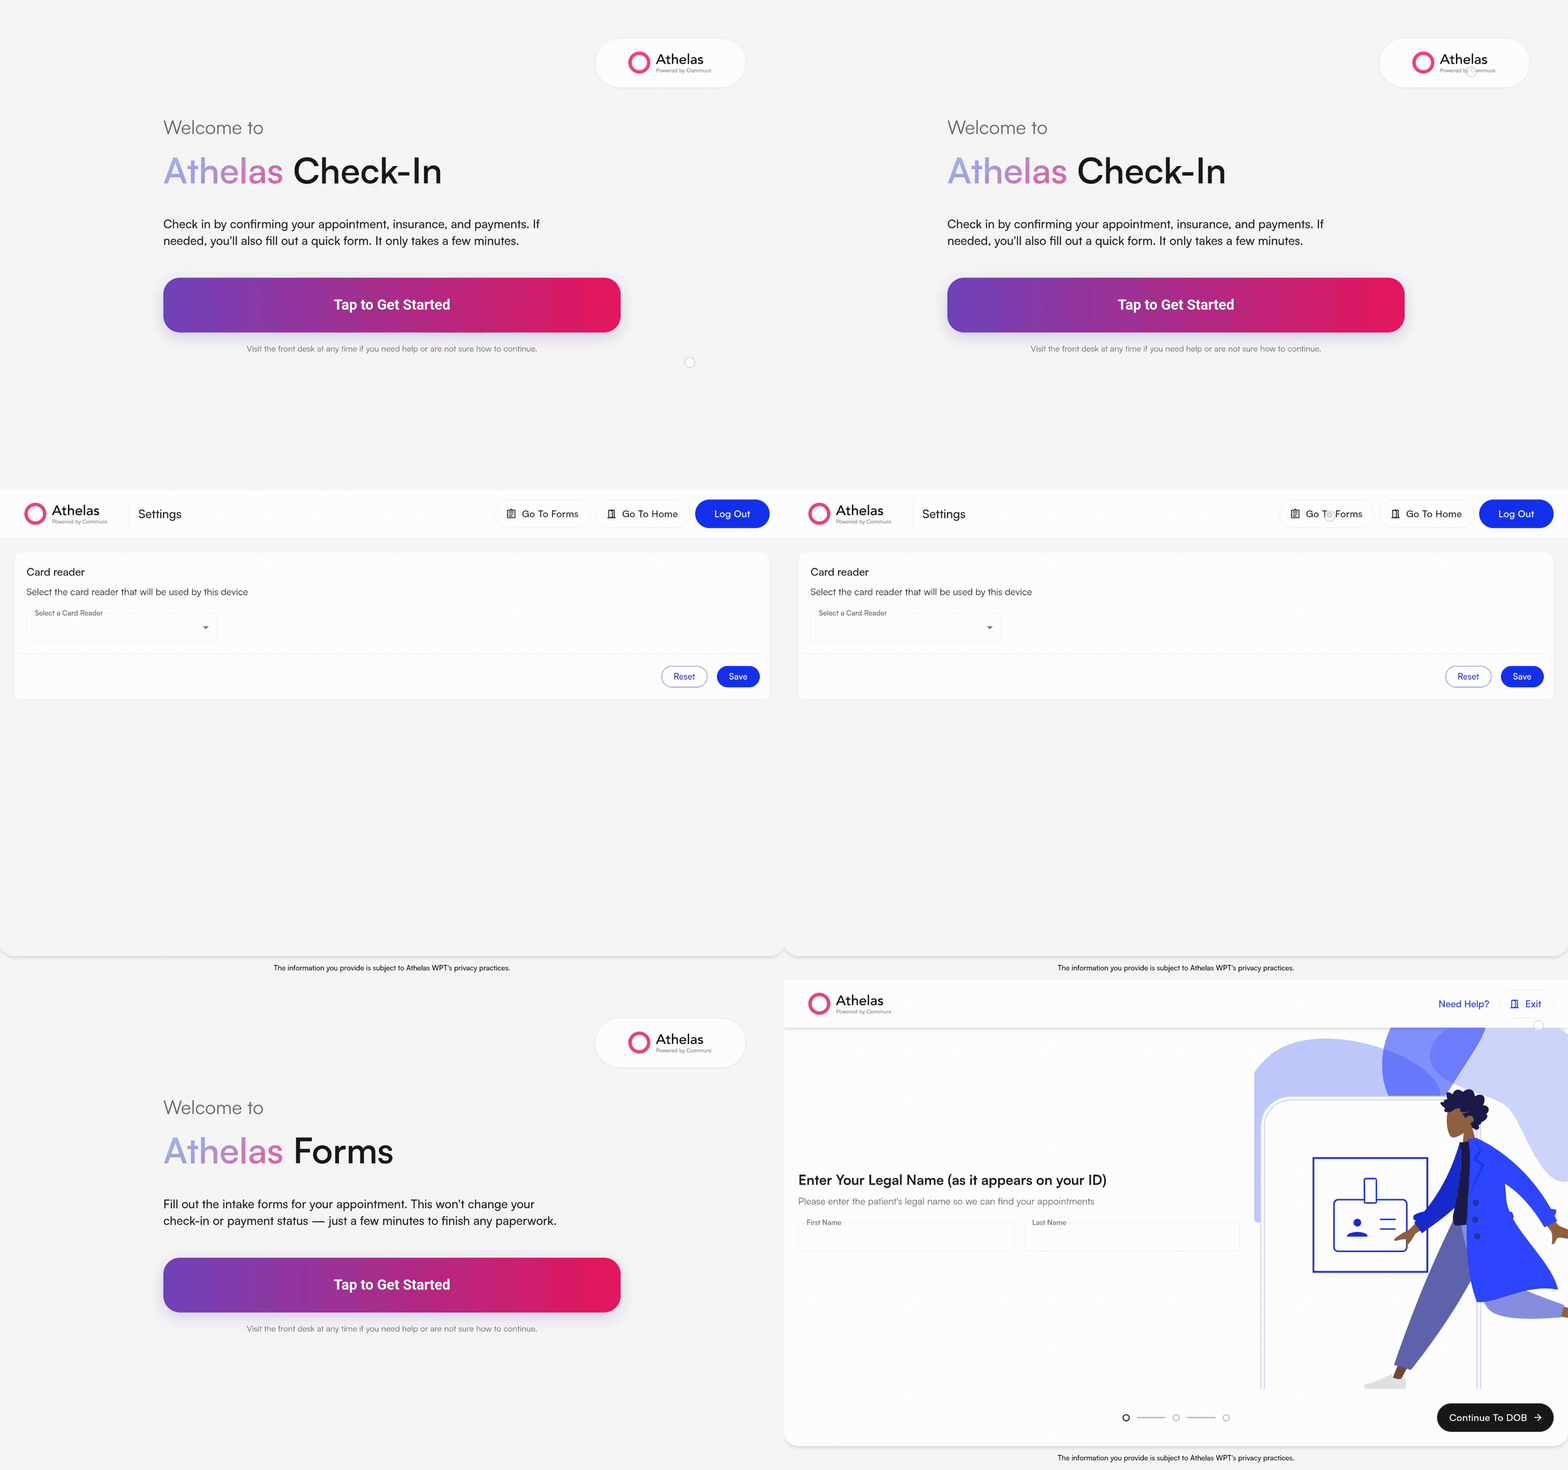 Patients tap to get started, fill in their **name** and **date of birth**, and then see any appointments with outstanding forms. They select the visit they want to complete forms for and work through the intake forms on the tablet.
 ### FAQ
No — any card reader already configured to your account shows up in the kiosk dropdown, so you can reuse one. If you prefer a dedicated reader exclusively for kiosk use, your AM can send a pre-configured one for **\$250**, invoiced to your site.
**Express Check-in** uses the 5-digit verification code that's texted to patients 90 minutes before their appointment — fastest path through the kiosk. **Manual check-in** asks the patient to enter their name, date of birth, and phone number to look up the appointment. Both flows merge after lookup and run through the same verification, payment, and check-in steps.
**Check-in Mode** is the full self-service flow — patients confirm their demographics and insurance, pay any balance, and check themselves in for the visit. **Forms Mode** is a lightweight intake-forms-only flow that does **not** check the patient in or expose any other patient details.
Tap the practice logo on the Kiosk home screen **5 times** to open the Kiosk settings, then choose **Go To Forms** to switch into Forms Mode. To return to Check-in Mode, exit Forms Mode from the same settings panel.
The kiosk prompts the patient to correct the insurance info or switch to **Pay out of pocket**. The patient cannot continue past this step until eligibility is resolved or they select self-pay.
Any Android tablet or iPad will work. A kiosk stand is optional but recommended for a professional, dedicated setup.
### FAQ
No — any card reader already configured to your account shows up in the kiosk dropdown, so you can reuse one. If you prefer a dedicated reader exclusively for kiosk use, your AM can send a pre-configured one for **\$250**, invoiced to your site.
**Express Check-in** uses the 5-digit verification code that's texted to patients 90 minutes before their appointment — fastest path through the kiosk. **Manual check-in** asks the patient to enter their name, date of birth, and phone number to look up the appointment. Both flows merge after lookup and run through the same verification, payment, and check-in steps.
**Check-in Mode** is the full self-service flow — patients confirm their demographics and insurance, pay any balance, and check themselves in for the visit. **Forms Mode** is a lightweight intake-forms-only flow that does **not** check the patient in or expose any other patient details.
Tap the practice logo on the Kiosk home screen **5 times** to open the Kiosk settings, then choose **Go To Forms** to switch into Forms Mode. To return to Check-in Mode, exit Forms Mode from the same settings panel.
The kiosk prompts the patient to correct the insurance info or switch to **Pay out of pocket**. The patient cannot continue past this step until eligibility is resolved or they select self-pay.
Any Android tablet or iPad will work. A kiosk stand is optional but recommended for a professional, dedicated setup.