> ## Documentation Index
> Fetch the complete documentation index at: https://trainings.air.athelas.com/llms.txt
> Use this file to discover all available pages before exploring further.
# Encounter Details Page
### At a Glance
The Encounter Details page is one of the most important and heavily used pages in Insights. From here you can create encounters, update their insurance information, service lines, modifiers, etc., and even submit/resubmit/forward the associated claim(s) or simply save to complete later.
### Feature Walkthrough Video
This video goes through the full process of creating an encounter and submitting a claim from the Encounter Details page. Scroll down for full written details of the page.
####
#### Encounter Details Page Header
You can filter the list of encounters by working status, provider, patient, and so forth. You can also access the complete Prior Authorizations working list for your practice, download a CSV of encounters based on the filters you’ve set, and create a new encounter from here.
#### Editing an Existing Encounter
Upon opening the Encounter Details page, you’ll see a list of all encounters.
When you click into an encounter, an editing window will appear.
You may click into any section and edit it, then review and submit/resubmit/forward or save. See the new encounter creation walkthrough below for more details.
If you simply want to view the information about the patient, insurance, providers, etc., you may of course do so and then simply click the `X` in the upper right corner to close the editing window.
***Once you manually edit an encounter, that encounter will no longer automatically receive updates from your EHR.***
#### How to Bulk Edit Encounter Working Status
You can select multiple encounters in the [Encounter Details page](https://insights.athelas.com/encounter-details) and update their **working status** (e.g. ‘Open,’ ‘In Progress,’ ‘Blocked,’ or ‘Not Intended to Bill’) in bulk.
Check out this quick video for a demonstration.
####
#### Walkthrough Encounter Creation and Section Information
Let’s create a new encounter as an example case. Note that the same process would apply if you were editing an encounter, but many fields would already be filled in with existing information.
Click `Create Encounter`.
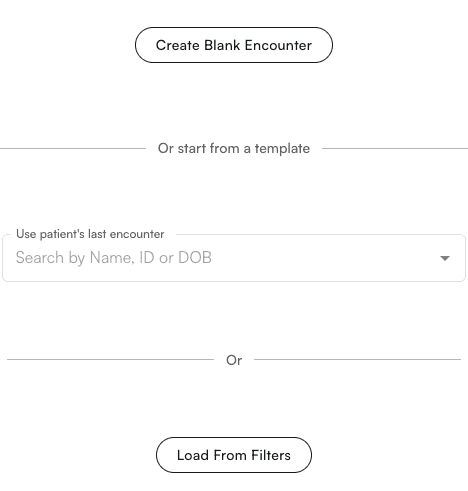
A window will appear, inviting you to create a blank encounter or start from a template based on an existing patient’s previous encounter.
You can also choose to `Load from Filters`, which is an excellent way to automatically enter known basic information. For example, you could set filters for the patient, provider, and facility, then select `Load from Filters`. All of that information would populate in the appropriate fields.
**For this demonstration, we'll click **`**Create Blank Encounter**`**.**
You can also create an encounter based on previous encounters. ***Use encounter templates based on a patient’s last encounter wisely and often!** They greatly expedite data entry and reduce the possibility of human error.*
An editing window will pop up with informational sections organized as shown below.
### Encounter Information
#### Patient
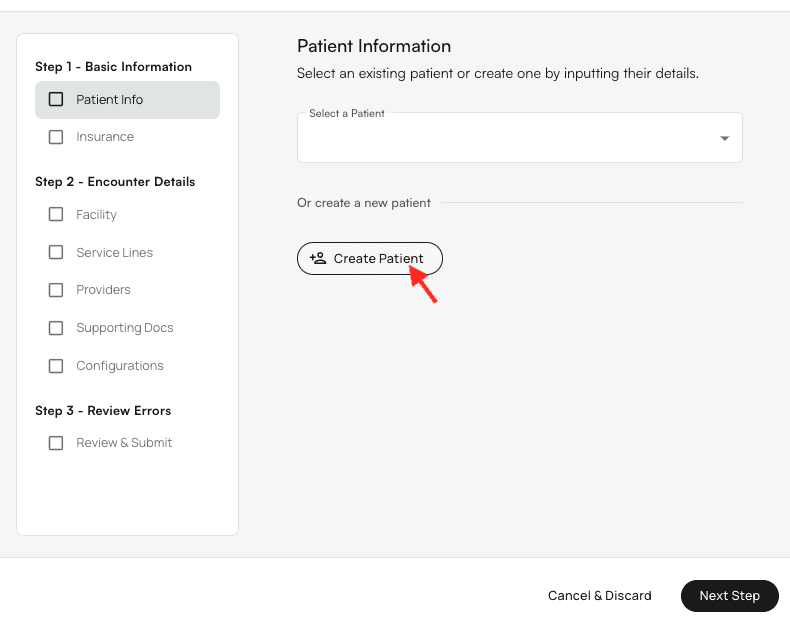
This section allows you to use existing patient information, or to `Create Patient`. We’ll choose `Create Patient`.
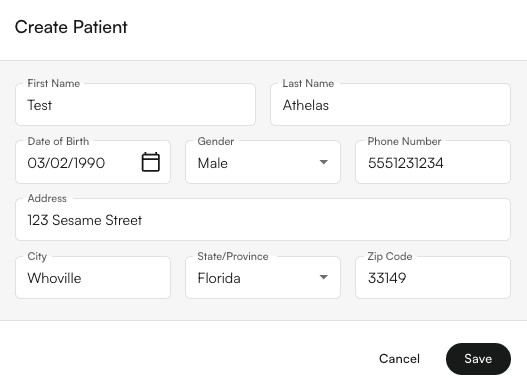
Next, we’ll fill in the patient’s basic information and click `Save`.
Now we’ll see the new patient’s information populate the Patient section.
Click `Next Step` when everything looks correct.
#### Insurance
In the encounter’s Insurance section, you can add or update **primary, secondary, and tertiary insurance information**.
***Notes on Insurances Listed in the Dropdown Menus***
* *The options that pre-populate these lists come directly from information that Athelas has extracted from your EHR.*
* *The initial list only shows insurances previously **associated with this patient**.*
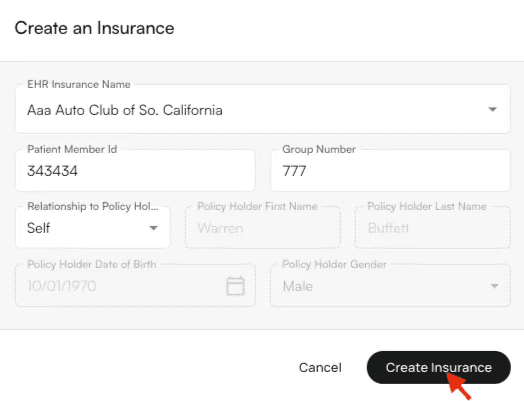
* *If you click *`*Create Insurance*`* in one of the dropdown menus (primary, secondary, or tertiary), you can select from all known insurances associated with your practice. Fill in the new insurance information and click *`*Create Insurance*`*. This will now be a selectable option in the Insurance menus for this patient.*
* \*If you need a new insurance to appear here, please contact our account management team. \*
**Notes on Professional vs. Institutional Insurances**
Note the **CMS-1500** and **UB-04** indicators in the header. These indicators appear when the selected insurance requires a specific claim type and will receive the corresponding form.
In the example above, *UB* will receive a **UB-04** form, while *Blue Cross* will receive a **CMS-1500** form. See each insurance’s ‘Payer Type’ information noting which is which.
**Based on your selection of institutional and/or professional insurances, appropriate fields will be shown or hidden throughout the rest of these sections.**
*What is the difference between professional and institutional claims?*
*The services billed on **professional** claims are tied directly to the individual healthcare provider's actions – consultations, surgeries, therapy sessions, etc. **Institutional** claims bill for the use of the facility– room stays, use of medical equipment, and so on.*
#### Providers
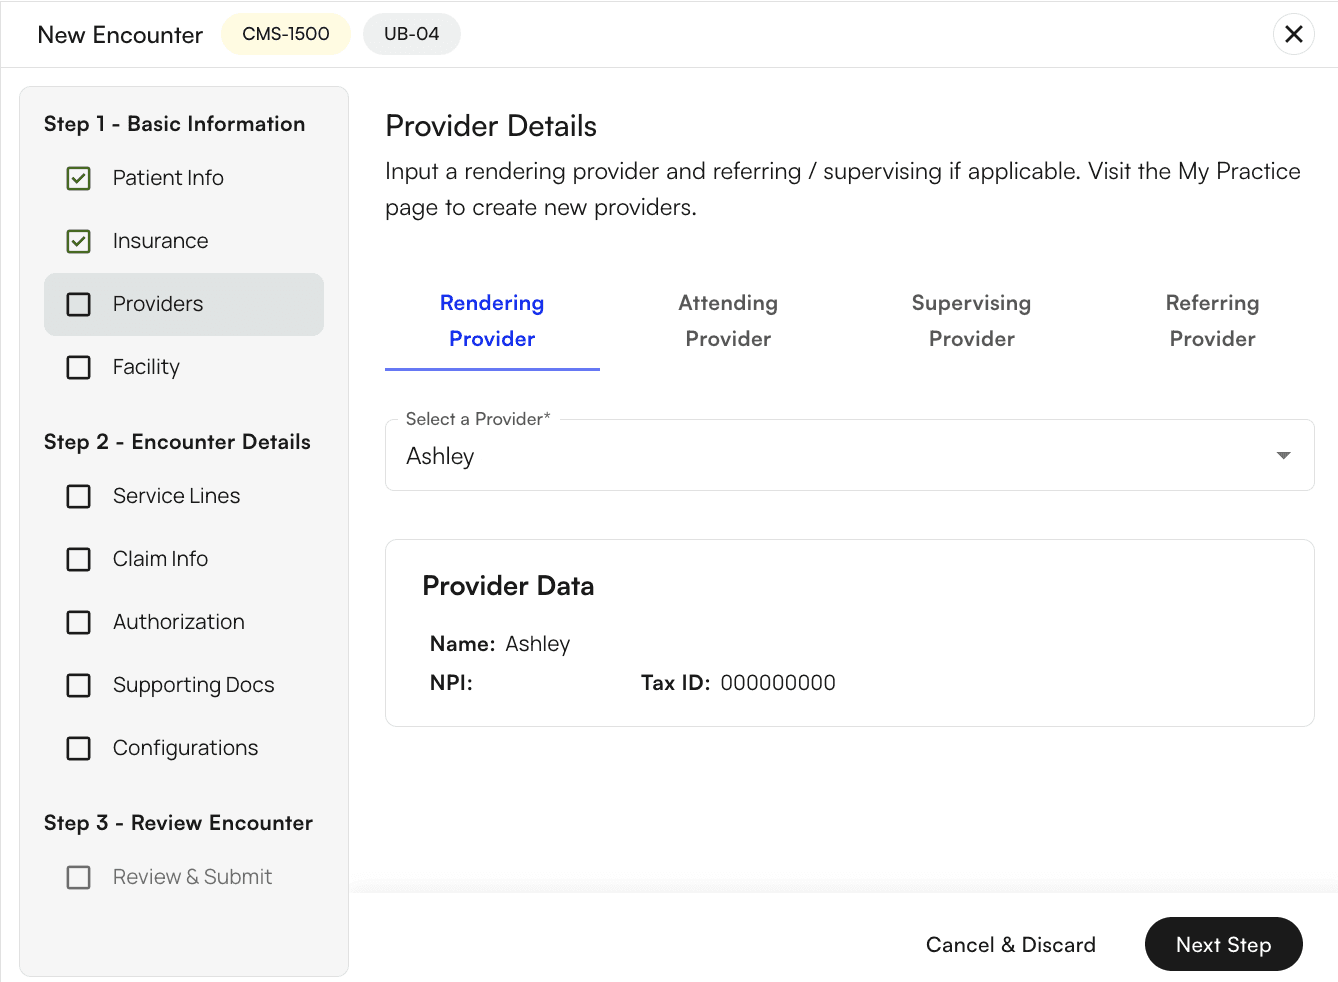
Input the **rendering**, **attending**, **referring**, and **supervising provider** if applicable (these provider fields may change depending on whether a CMS-1500 and/or UB-40 forms will be filed for this encounter).
You can either visit the [My Practice page](https://insights.athelas.com/v2/my-practice) to create new providers, or you can simply type a provider’s NPI number into the search field and their information will populate, as shown below. Note that we source this information directly from the NPI registry, but you can update this information if necessary.
#### Facility
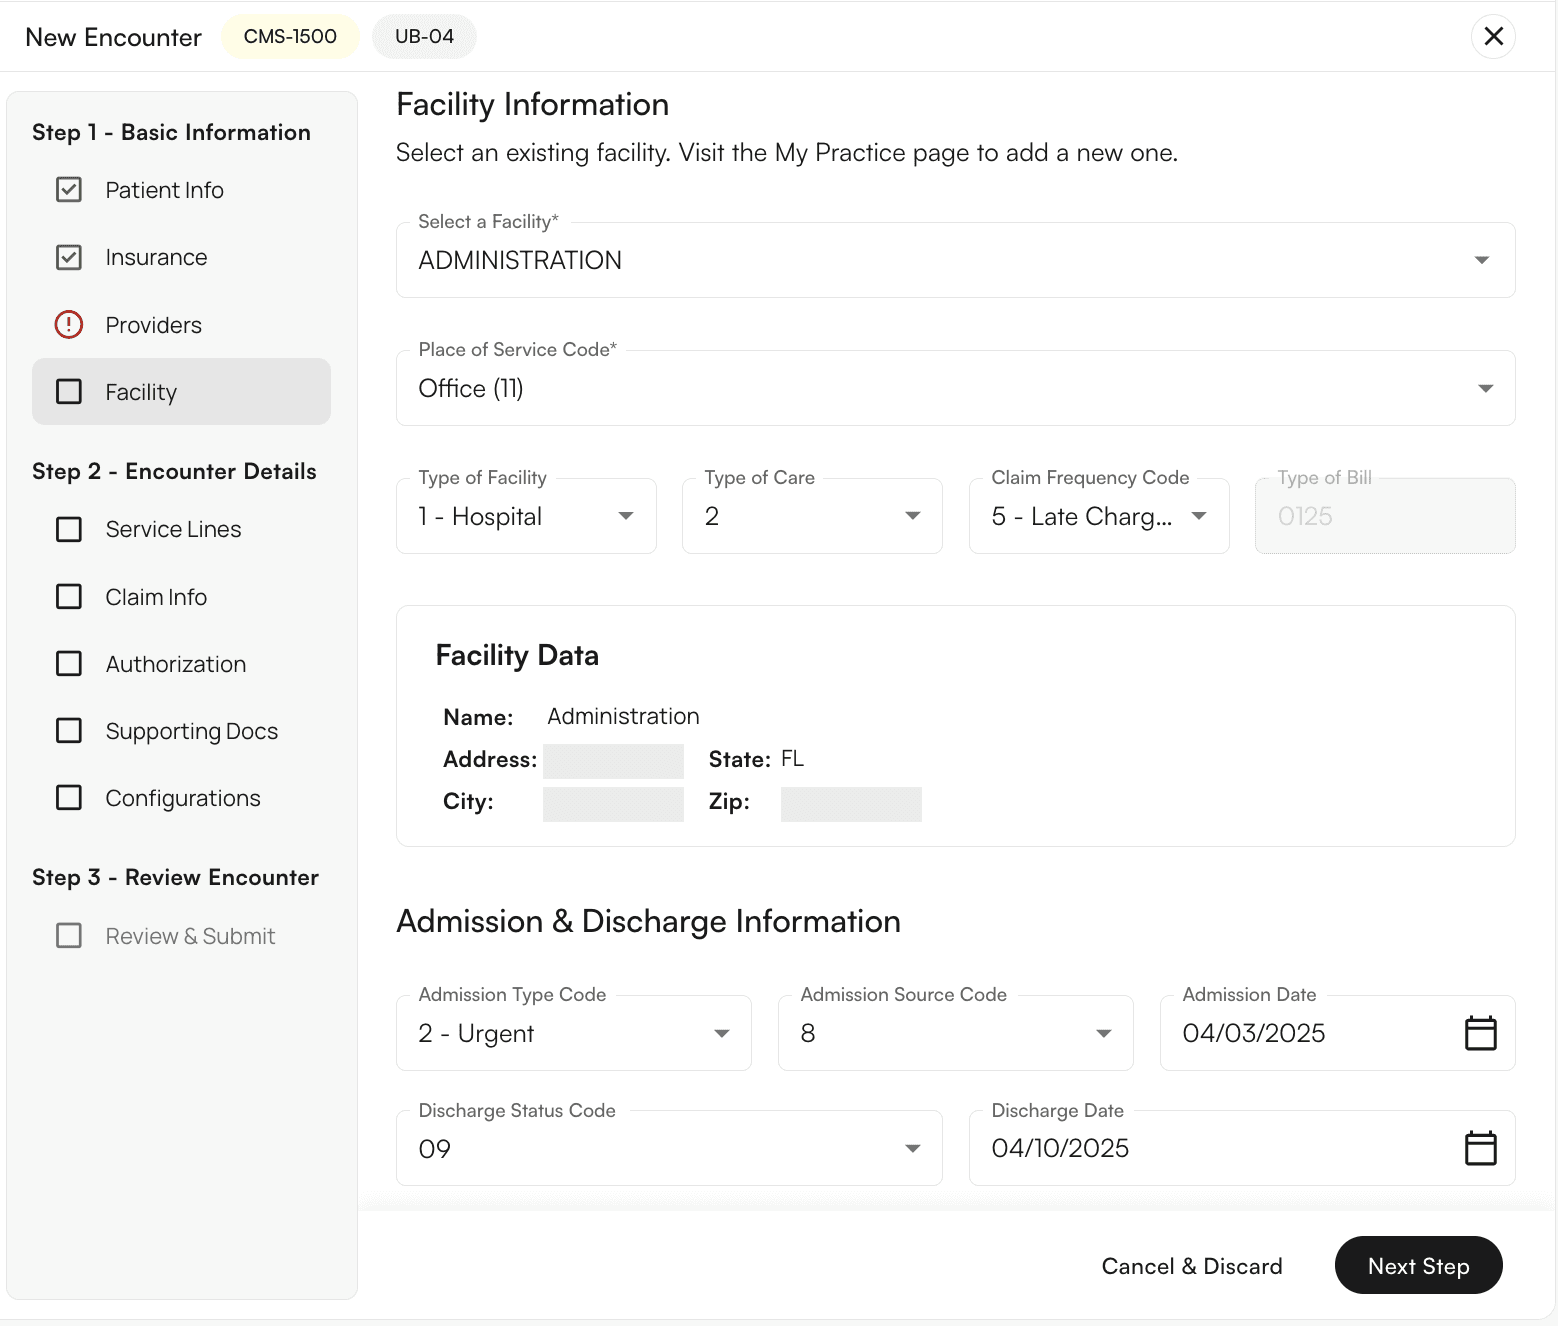
Facility, Place of Service code, type of facility, type of care, and claim frequency code may all be entered here. Type of bill is automatically determined by the information you input in these optional fields.
Admission and discharge data should be entered here as well.
To add a new facility, go to the [My Practice page](https://insights.athelas.com/v2/my-practice).
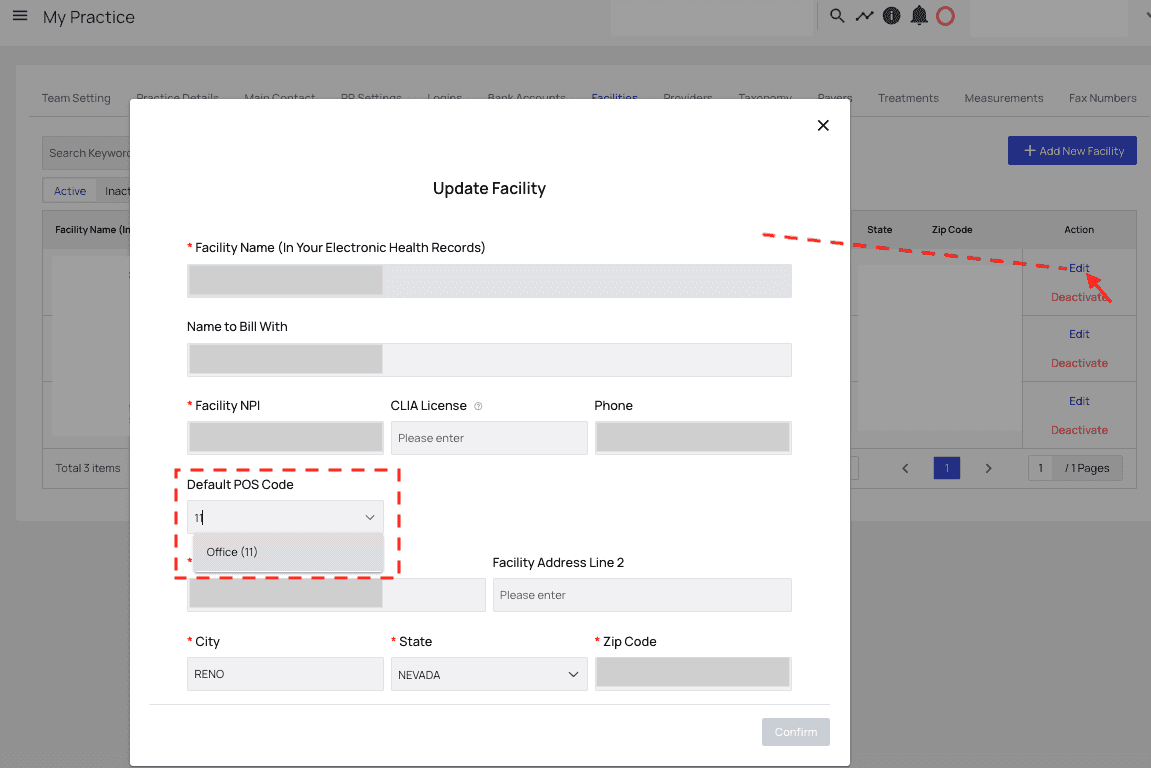
**Pro Tip**: You can set a default Place of Service (POS) code option for each of your facilities from the My Practice page, either upon creation or when you edit them, shown below.
Click `Next Step`.
#### Service Lines
This section allows you to add or update dates of service, templates (detailed below), ICD-10 codes, and service lines.
The claim charge amount is automatically calculated as a sum of all service line charges.
Encounters for which a UB-40 form is required will display the **Revenue Code** column in the table of service lines, as shown in the example above. Those codes come from directly from guidelines set by your practice or EHR.
For example, if your practice is a FQHC, then Wraparound Claims are billed with revenue code 0519.
If revenue code errors are detected upon review of the encounter, Insights will prompt you to update any known and suggested codes with one click, as shown below.
*Contact our support team at *[*support@getathelas.com*](mailto:support@getathelas.com)* for help with mapping revenue codes.*
#### Templates
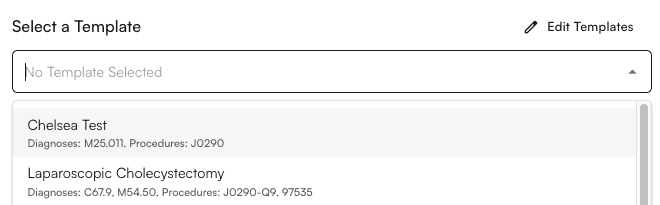
Access service line templates here. They’ll help you speed up data entry and reduce opportunities for human error.
If you click `Edit Templates` a window will appear in which you can create and delete templates.
If you need to make a small adjustment to a template, you’ll need to create a new one entirely. We recommend also deleting the old one to avoid confusion.
**If you’d like to create a service line template, you’ll need to first fill out all service lines in the next section.**
Your new template will then be created based on those service lines and you’ll be prompted to give it a name before clicking `Confirm`.
#### Diagnosis Codes
Start typing to find the diagnosis code you want to add, then click to select it.
***You can also search using colloquialisms** to find the code you need.*
*For example, you could type ‘ACL’ and then select from a list of codes pertaining to anterior cruciate ligament injuries.*
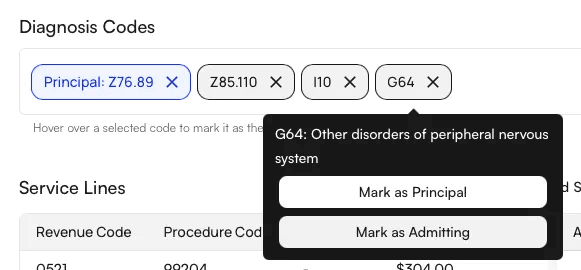
When one of the payers entered on the `Insurances` page has a preferred billing type of UB-04, then you will be able to differentiate between Admitting, Principal, and other relevant diagnoses in this section.
#### Service Lines
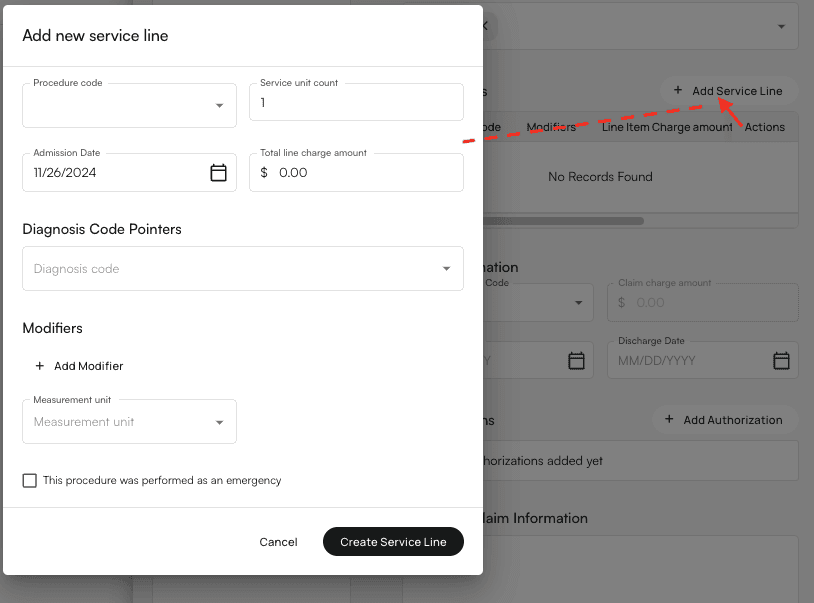
When you click `Add Service Line`, a window will appear.
Fill in the details of the service line here, including procedure code, diagnosis code pointers, modifiers, and so forth (UB-40 encounters will also show a field for revenue code).
You can also check the box to indicate if the procedure was performed as an emergency (which will update section 24c on the CMS-1500 form).
Once everything looks correct, click `Create Service Line`.
**Notes About Service Lines**
* Procedures from your practice’s self-pay fee schedule will appear here only if the visit/DoS was self-pay
* Charges for CPT codes that auto-populate are based on insurance information and your practice's fee schedule, but you can overwrite them if necessary.
**Claim Information**
You have the option to add data on occurrences (if an insurance requiring a UB-40 claim has been selected in the Insurances section), illness date, and any additional claim information in this section.
For **Workers’ Comp or automobile billing type** encounters, a date of injury field will also appear here.
**Authorizations**
This is where you can add any prior authorizations.
For this example, we’ll click `Add Authorization`. This will bring up a window in which we can create and edit either a pre-certified authorization or a referral.
Note that you can switch between viewing the list of Pre-Certifications and Referrals by clicking the corresponding button in the top left corner.
For this example, we’ll create a pre-certified authorization.
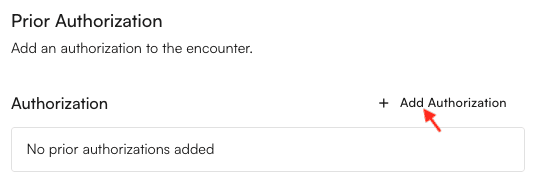
Click `Add Authorization`.
A new window will appear. Fill in the information and click `Create`.
Indicate whether this is a pre-certification or a referral. Then fill in all required fields and click `Create`.
*Rather than only tracking prior auth by visit count, you can choose to track it either by visit count or by a particular CPT code and a unit count, if applicable.*
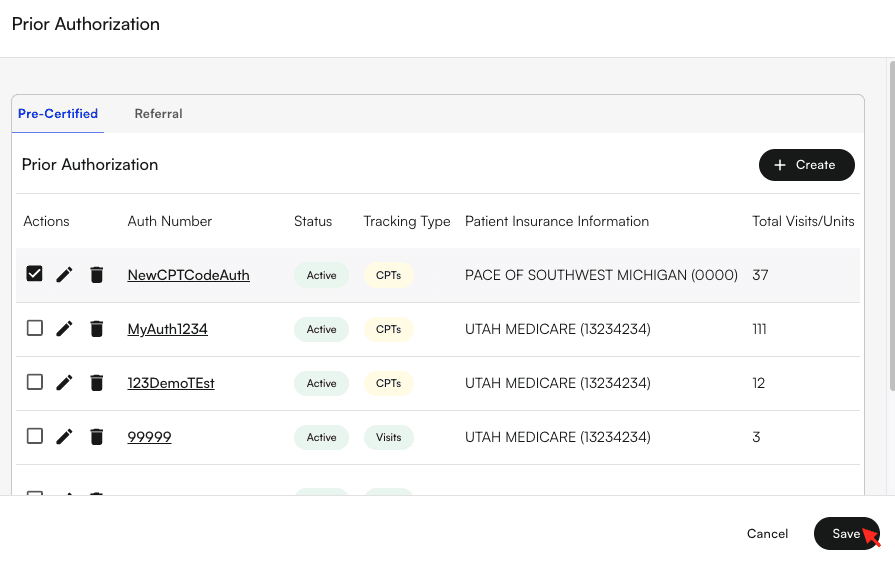
You’ll see your new prior authorization in the previous window, where it has been automatically selected. Click `Save`.
*Note that if a referral is specified as a prior authorization, you will be unable to edit the referring provider in the following Providers section.*
#### Supporting Documentation
Upload any supporting documentation here.
Note that previously submitted documentation for this encounter is neither visible nor downloadable here. Follow the steps below to view and download previously submitted documentation.
**From the** [**Claim Details page**](https://insights.athelas.com/v3/claim_level_view), click into the encounter in question, then click the `Submissions` tab.
You will see both the claim submissions and any additional documents.
Click `View` at the right end of the corresponding row to view that documentation, as shown in this screenshot.
#### Configurations
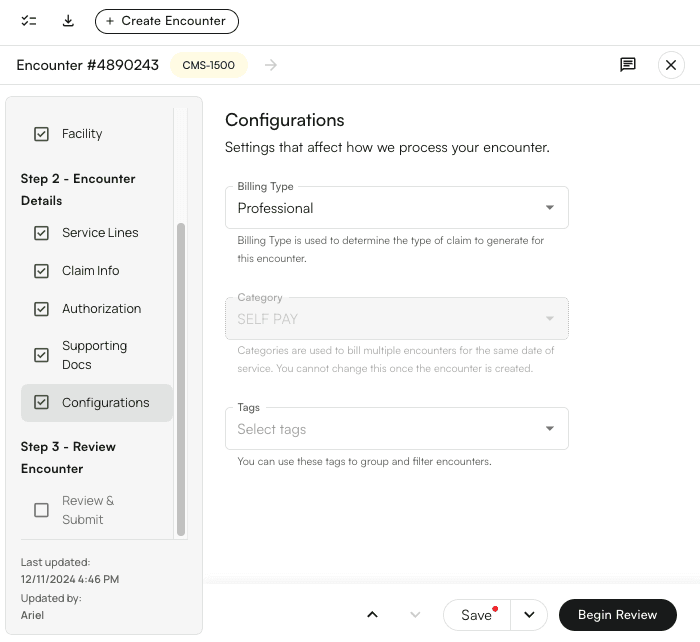
Configure rules for this encounter.
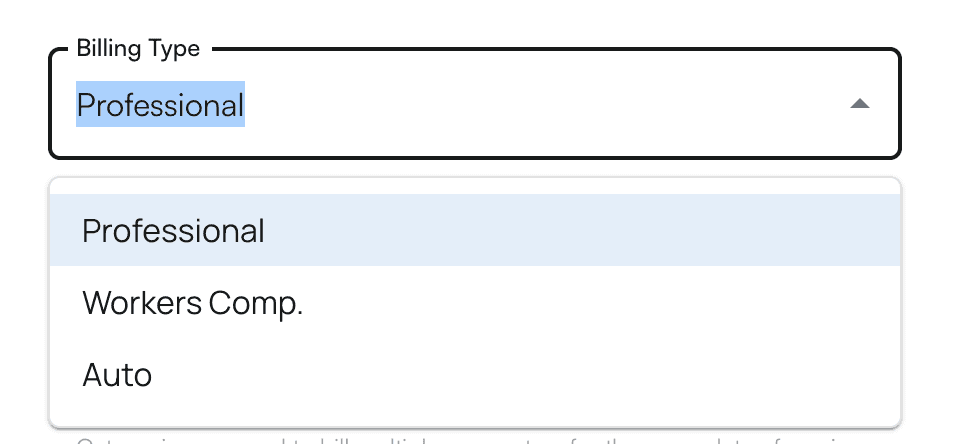
**‘Billing Type’** is the kind of claim you want to produce — Professional, Workers’ Comp, or Auto.
***Pro Tip***
***You can submit multiple claims for the same patient on the same date of service!***
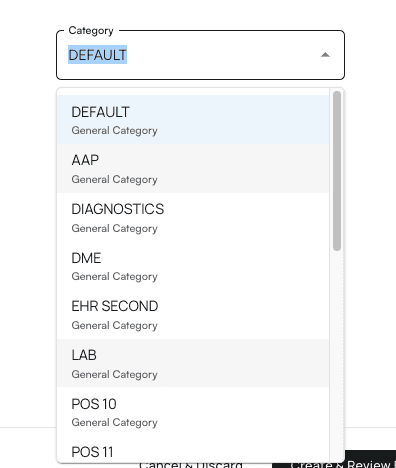
*The **‘Category’ section** will be available for modification if you’re creating a new encounter in such a situation. This extra level of distinction ensures that the encounters are unique, otherwise our system will prevent the perceived duplicate from being queued for submission.*
*As these categories are global and cannot be altered, don’t fret too much about which category you choose. Just select the closest match. It simply needs to be different than other categories already associated with other such encounters.*
Finally, you can add any **Tags** you like to the encounter. Tags can be used to informally categorize encounters so that you can filter for them later.
To create a new tag, simply type it in and then select `+ Create`.
To edit or delete tags, click `Manage Tags`.
If you’ve reached a stopping point, you can choose to **save** your work in one of the following ways.
*These save statuses are for your team’s own flow and understanding, so feel free to use them as you see fit. Generally, this is what each status is intended to indicate:*
* **Open**
* No one has touched this encounter yet. Go ahead and get it started so your practice can get paid!
* **In Progress**
* Someone is working on this encounter.
* **Blocked**
* Someone is working on this encounter but has run into an obstacle that may require more time, or Athelas’ help. For example, perhaps the claim can’t be submitted because a prior authorization needs to be updated, or the provider’s notes are incomplete.
* **Archived**
* This encounter is not currently being prepared for submission.
Once everything looks good, click `Begin Review`.
####
#### Review / Submit
After clicking `Begin Review` in the **Configurations** section, Insights will ensure that the encounter details are free of technical errors that could lead to claim rejection or denial.
If pre-submission errors or suggestions for edits are found, as shown in the example above, they will appear with explanations along with a link to `Jump to section` so that you can address the issue quickly.
*The ‘**Suggested Edits**’ tab offers an additional layer of actionable direction for avoiding potential denials. The information provided here comes directly from CMS’ National Corrective Coding Initiative (NCCI). We can see in the example below that certain CPT codes cannot be billed together, and only one of the listed modifiers should be used on a given CPT code instead of multiple.*
*Keep in mind that the ‘**Suggested Edits**’ are just that — suggestions, based on CMS guidelines, but suggestions nonetheless. You may find cases such as the example below, in which some codes were flagged by the system, but they are indeed payable by the payer. In this case, it is fine to go ahead and submit without making those suggested further changes.*
After all errors have been addressed, click `Re-Review` to find out whether more corrections are required, or if the encounter is now ready for submission.
If it can be submitted successfully, click `Close & Submit Encounter`.
*If you’re updating an encounter and there are no errors or suggested edits, select the closing option that best suits your needs (*`*Resubmit to Primary*`*, *`*Forward to Secondary*`*, etc.)*
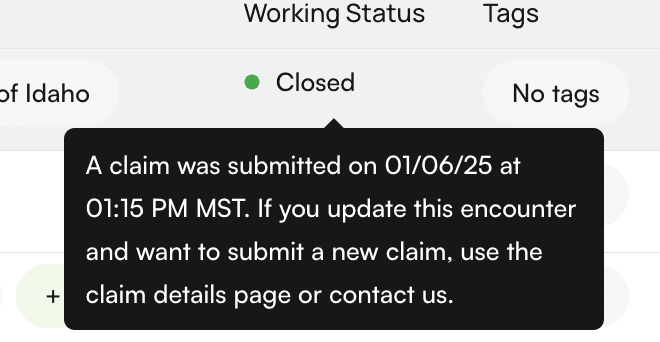
This will set your encounter status to ‘Closed.’ Then, when you hover the status on the Encounter Details page, a tooltip will indicate when it will be submitted.
####
#### Mobile-Friendly Encounter Details Page
The Encounter Details page is mobile-friendly. This is particularly notable for providers who work out of multiple facilities, as they can easily create and update encounters on the go.
**Features In Development:**
* Add default values when creating encounters
* Hide/show certain fields on encounter creation
* Create dental encounters
* Ability to see when the most recent/next extraction pulls will be
 You can filter the list of encounters by working status, provider, patient, and so forth. You can also access the complete Prior Authorizations working list for your practice, download a CSV of encounters based on the filters you’ve set, and create a new encounter from here.
#### Editing an Existing Encounter
Upon opening the Encounter Details page, you’ll see a list of all encounters.
You can filter the list of encounters by working status, provider, patient, and so forth. You can also access the complete Prior Authorizations working list for your practice, download a CSV of encounters based on the filters you’ve set, and create a new encounter from here.
#### Editing an Existing Encounter
Upon opening the Encounter Details page, you’ll see a list of all encounters.
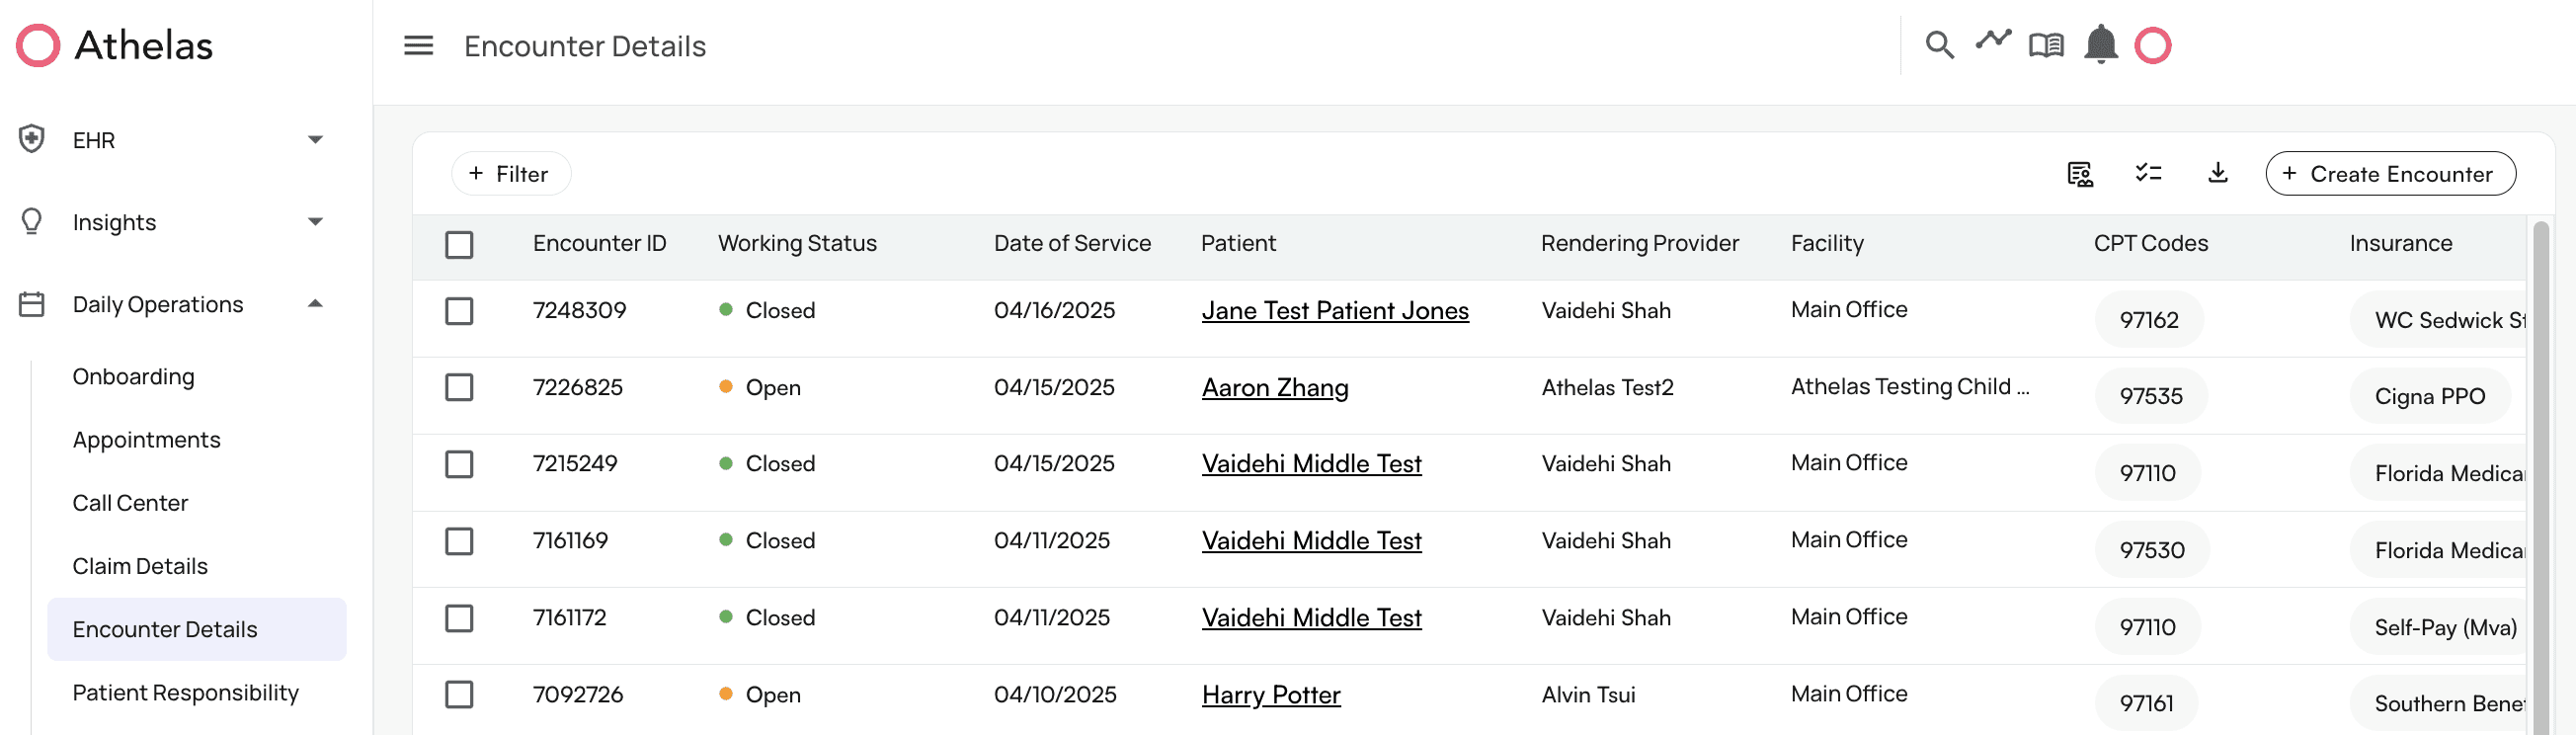 When you click into an encounter, an editing window will appear.
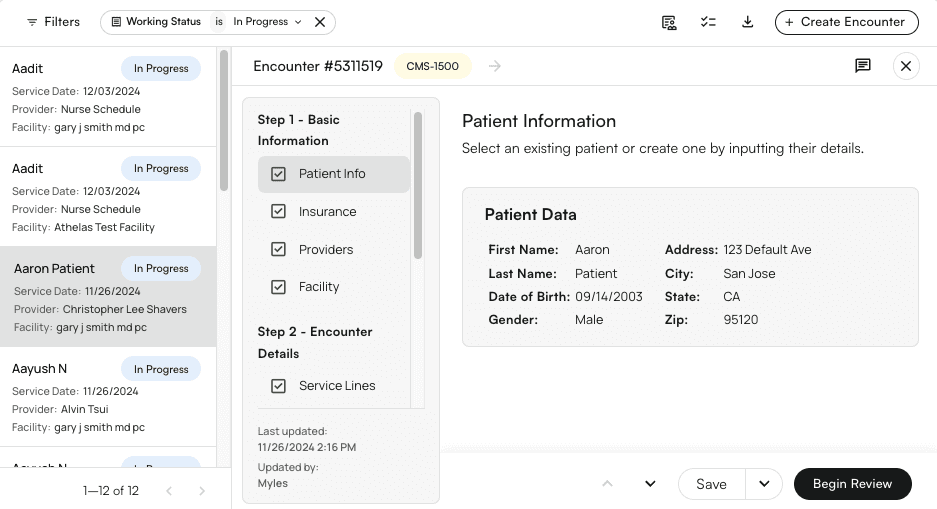 You may click into any section and edit it, then review and submit/resubmit/forward or save. See the new encounter creation walkthrough below for more details.
If you simply want to view the information about the patient, insurance, providers, etc., you may of course do so and then simply click the `X` in the upper right corner to close the editing window.
***Once you manually edit an encounter, that encounter will no longer automatically receive updates from your EHR.***
#### How to Bulk Edit Encounter Working Status
You can select multiple encounters in the [Encounter Details page](https://insights.athelas.com/encounter-details) and update their **working status** (e.g. ‘Open,’ ‘In Progress,’ ‘Blocked,’ or ‘Not Intended to Bill’) in bulk.
Check out this quick video for a demonstration.
####
#### Walkthrough Encounter Creation and Section Information
Let’s create a new encounter as an example case. Note that the same process would apply if you were editing an encounter, but many fields would already be filled in with existing information.
Click `Create Encounter`.
You may click into any section and edit it, then review and submit/resubmit/forward or save. See the new encounter creation walkthrough below for more details.
If you simply want to view the information about the patient, insurance, providers, etc., you may of course do so and then simply click the `X` in the upper right corner to close the editing window.
***Once you manually edit an encounter, that encounter will no longer automatically receive updates from your EHR.***
#### How to Bulk Edit Encounter Working Status
You can select multiple encounters in the [Encounter Details page](https://insights.athelas.com/encounter-details) and update their **working status** (e.g. ‘Open,’ ‘In Progress,’ ‘Blocked,’ or ‘Not Intended to Bill’) in bulk.
Check out this quick video for a demonstration.
####
#### Walkthrough Encounter Creation and Section Information
Let’s create a new encounter as an example case. Note that the same process would apply if you were editing an encounter, but many fields would already be filled in with existing information.
Click `Create Encounter`.
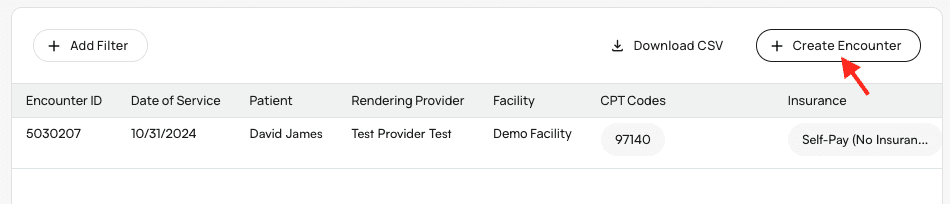 A window will appear, inviting you to create a blank encounter or start from a template based on an existing patient’s previous encounter.
You can also choose to `Load from Filters`, which is an excellent way to automatically enter known basic information. For example, you could set filters for the patient, provider, and facility, then select `Load from Filters`. All of that information would populate in the appropriate fields.
**For this demonstration, we'll click **`**Create Blank Encounter**`**.**
You can also create an encounter based on previous encounters. ***Use encounter templates based on a patient’s last encounter wisely and often!** They greatly expedite data entry and reduce the possibility of human error.*
A window will appear, inviting you to create a blank encounter or start from a template based on an existing patient’s previous encounter.
You can also choose to `Load from Filters`, which is an excellent way to automatically enter known basic information. For example, you could set filters for the patient, provider, and facility, then select `Load from Filters`. All of that information would populate in the appropriate fields.
**For this demonstration, we'll click **`**Create Blank Encounter**`**.**
You can also create an encounter based on previous encounters. ***Use encounter templates based on a patient’s last encounter wisely and often!** They greatly expedite data entry and reduce the possibility of human error.*
 An editing window will pop up with informational sections organized as shown below.
### Encounter Information
#### Patient
This section allows you to use existing patient information, or to `Create Patient`. We’ll choose `Create Patient`.
An editing window will pop up with informational sections organized as shown below.
### Encounter Information
#### Patient
This section allows you to use existing patient information, or to `Create Patient`. We’ll choose `Create Patient`.
 Next, we’ll fill in the patient’s basic information and click `Save`.
 Now we’ll see the new patient’s information populate the Patient section.
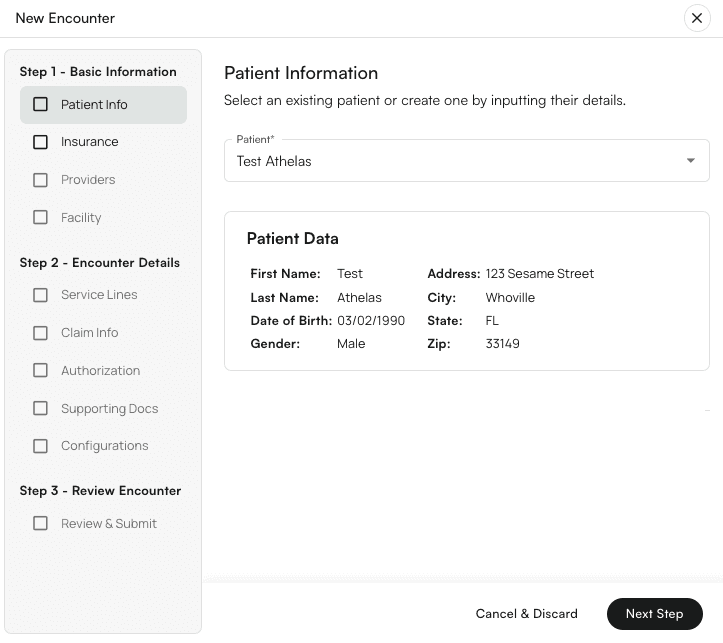 Click `Next Step` when everything looks correct.
#### Insurance
In the encounter’s Insurance section, you can add or update **primary, secondary, and tertiary insurance information**.
Click `Next Step` when everything looks correct.
#### Insurance
In the encounter’s Insurance section, you can add or update **primary, secondary, and tertiary insurance information**.
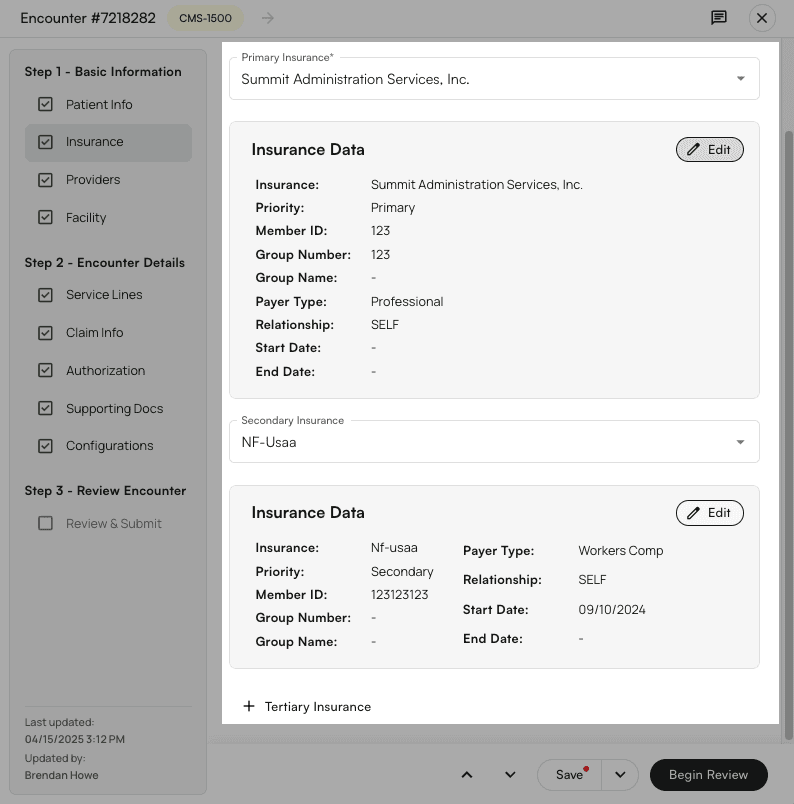 ***Notes on Insurances Listed in the Dropdown Menus***
* *The options that pre-populate these lists come directly from information that Athelas has extracted from your EHR.*
* *The initial list only shows insurances previously **associated with this patient**.*
* *If you click *`*Create Insurance*`* in one of the dropdown menus (primary, secondary, or tertiary), you can select from all known insurances associated with your practice. Fill in the new insurance information and click *`*Create Insurance*`*. This will now be a selectable option in the Insurance menus for this patient.*
***Notes on Insurances Listed in the Dropdown Menus***
* *The options that pre-populate these lists come directly from information that Athelas has extracted from your EHR.*
* *The initial list only shows insurances previously **associated with this patient**.*
* *If you click *`*Create Insurance*`* in one of the dropdown menus (primary, secondary, or tertiary), you can select from all known insurances associated with your practice. Fill in the new insurance information and click *`*Create Insurance*`*. This will now be a selectable option in the Insurance menus for this patient.*
 * \*If you need a new insurance to appear here, please contact our account management team. \*
**Notes on Professional vs. Institutional Insurances**
* \*If you need a new insurance to appear here, please contact our account management team. \*
**Notes on Professional vs. Institutional Insurances**
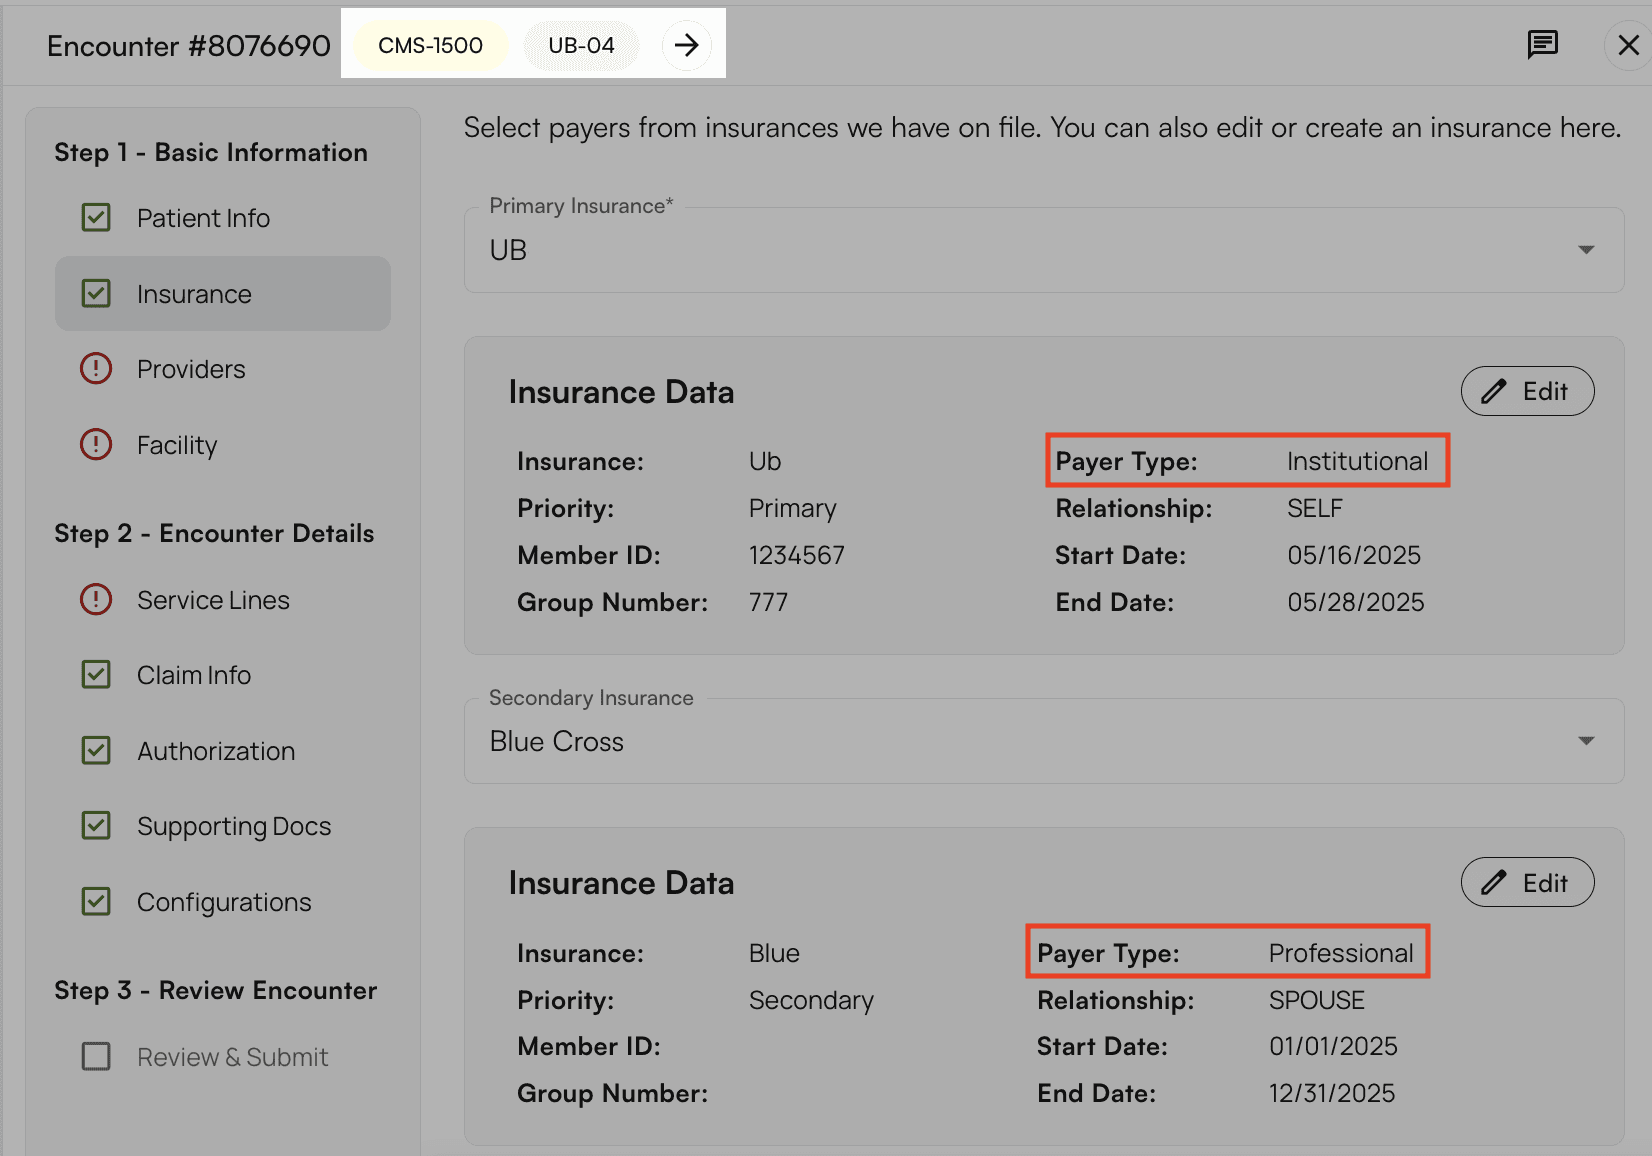 Note the **CMS-1500** and **UB-04** indicators in the header. These indicators appear when the selected insurance requires a specific claim type and will receive the corresponding form.
In the example above, *UB* will receive a **UB-04** form, while *Blue Cross* will receive a **CMS-1500** form. See each insurance’s ‘Payer Type’ information noting which is which.
**Based on your selection of institutional and/or professional insurances, appropriate fields will be shown or hidden throughout the rest of these sections.**
*What is the difference between professional and institutional claims?*
*The services billed on **professional** claims are tied directly to the individual healthcare provider's actions – consultations, surgeries, therapy sessions, etc. **Institutional** claims bill for the use of the facility– room stays, use of medical equipment, and so on.*
#### Providers
Input the **rendering**, **attending**, **referring**, and **supervising provider** if applicable (these provider fields may change depending on whether a CMS-1500 and/or UB-40 forms will be filed for this encounter).
You can either visit the [My Practice page](https://insights.athelas.com/v2/my-practice) to create new providers, or you can simply type a provider’s NPI number into the search field and their information will populate, as shown below. Note that we source this information directly from the NPI registry, but you can update this information if necessary.
Note the **CMS-1500** and **UB-04** indicators in the header. These indicators appear when the selected insurance requires a specific claim type and will receive the corresponding form.
In the example above, *UB* will receive a **UB-04** form, while *Blue Cross* will receive a **CMS-1500** form. See each insurance’s ‘Payer Type’ information noting which is which.
**Based on your selection of institutional and/or professional insurances, appropriate fields will be shown or hidden throughout the rest of these sections.**
*What is the difference between professional and institutional claims?*
*The services billed on **professional** claims are tied directly to the individual healthcare provider's actions – consultations, surgeries, therapy sessions, etc. **Institutional** claims bill for the use of the facility– room stays, use of medical equipment, and so on.*
#### Providers
Input the **rendering**, **attending**, **referring**, and **supervising provider** if applicable (these provider fields may change depending on whether a CMS-1500 and/or UB-40 forms will be filed for this encounter).
You can either visit the [My Practice page](https://insights.athelas.com/v2/my-practice) to create new providers, or you can simply type a provider’s NPI number into the search field and their information will populate, as shown below. Note that we source this information directly from the NPI registry, but you can update this information if necessary.
 #### Facility
Facility, Place of Service code, type of facility, type of care, and claim frequency code may all be entered here. Type of bill is automatically determined by the information you input in these optional fields.
Admission and discharge data should be entered here as well.
#### Facility
Facility, Place of Service code, type of facility, type of care, and claim frequency code may all be entered here. Type of bill is automatically determined by the information you input in these optional fields.
Admission and discharge data should be entered here as well.
 To add a new facility, go to the [My Practice page](https://insights.athelas.com/v2/my-practice).
**Pro Tip**: You can set a default Place of Service (POS) code option for each of your facilities from the My Practice page, either upon creation or when you edit them, shown below.
To add a new facility, go to the [My Practice page](https://insights.athelas.com/v2/my-practice).
**Pro Tip**: You can set a default Place of Service (POS) code option for each of your facilities from the My Practice page, either upon creation or when you edit them, shown below.
 Click `Next Step`.
#### Service Lines
This section allows you to add or update dates of service, templates (detailed below), ICD-10 codes, and service lines.
The claim charge amount is automatically calculated as a sum of all service line charges.
Click `Next Step`.
#### Service Lines
This section allows you to add or update dates of service, templates (detailed below), ICD-10 codes, and service lines.
The claim charge amount is automatically calculated as a sum of all service line charges.
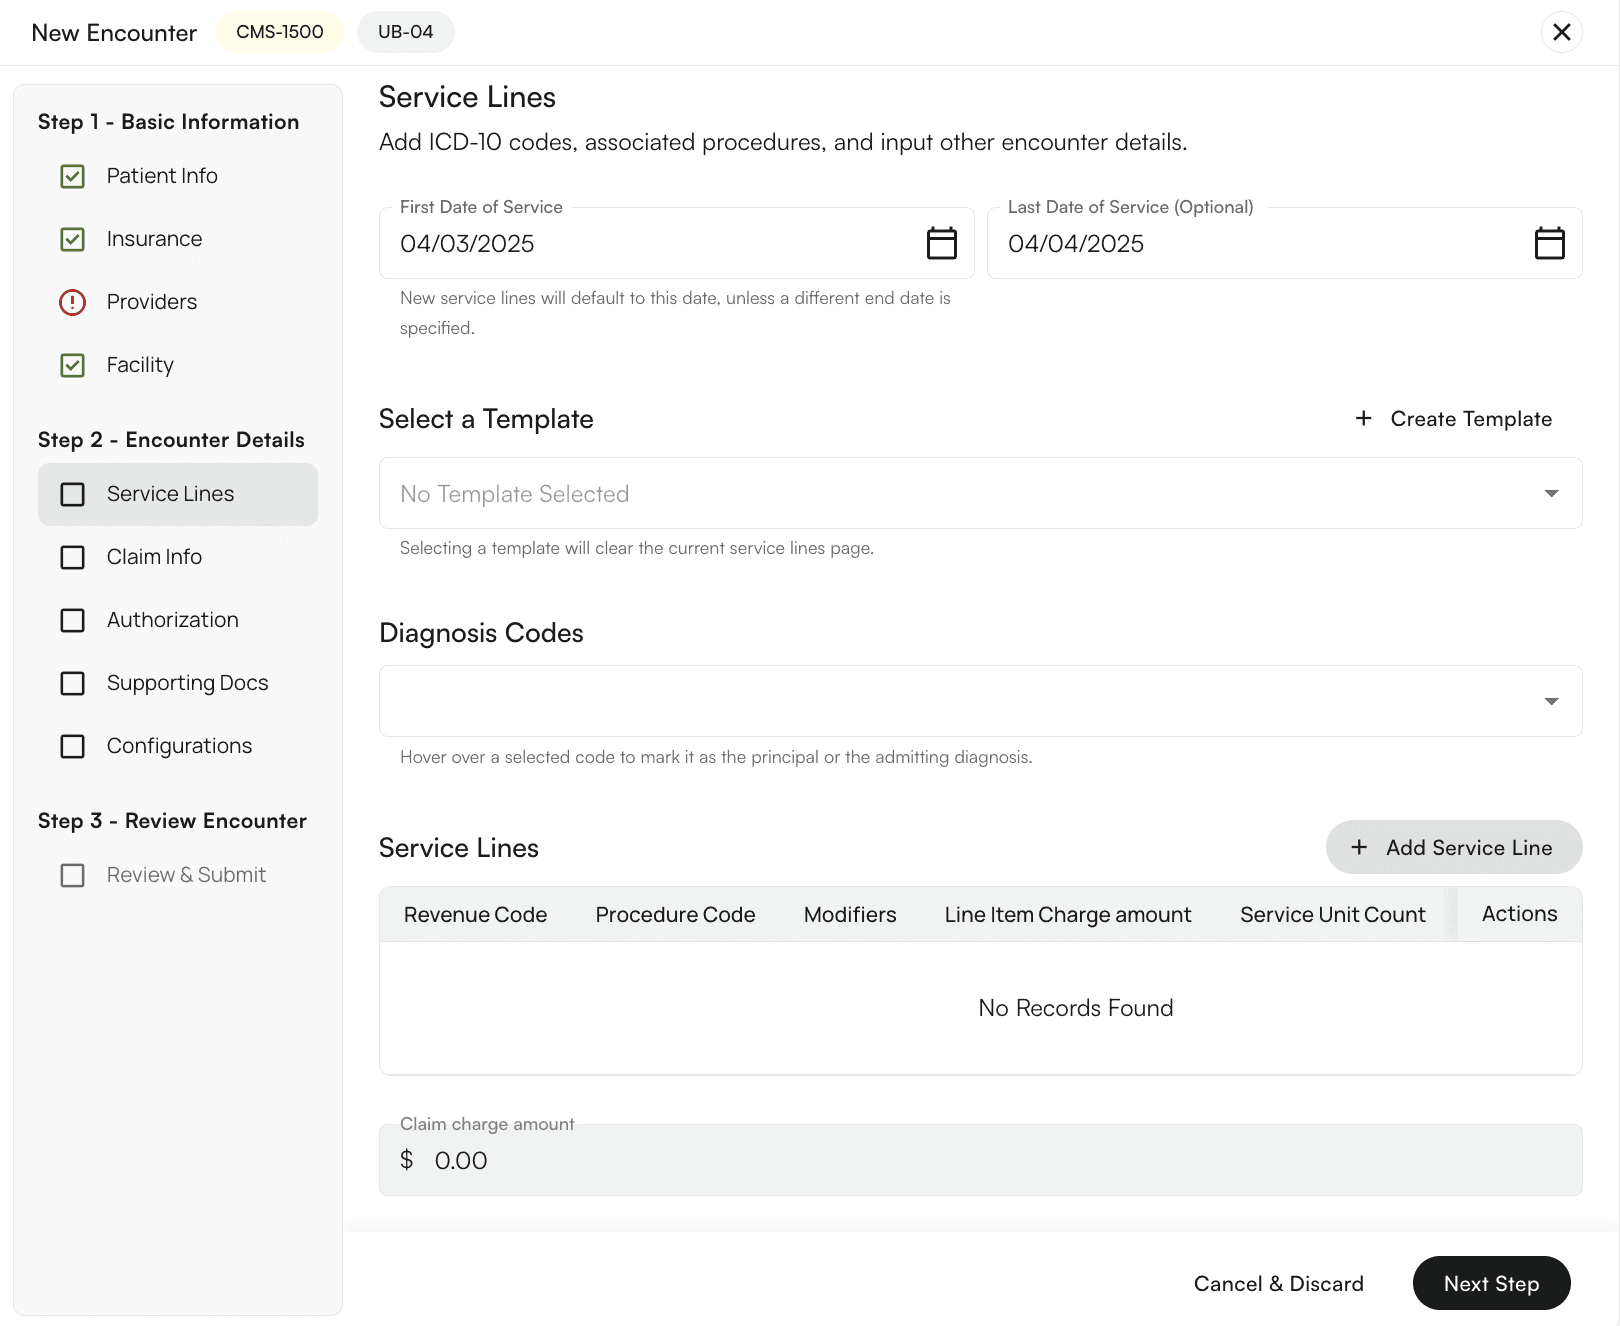 Encounters for which a UB-40 form is required will display the **Revenue Code** column in the table of service lines, as shown in the example above. Those codes come from directly from guidelines set by your practice or EHR.
For example, if your practice is a FQHC, then Wraparound Claims are billed with revenue code 0519.
If revenue code errors are detected upon review of the encounter, Insights will prompt you to update any known and suggested codes with one click, as shown below.
*Contact our support team at *[*support@getathelas.com*](mailto:support@getathelas.com)* for help with mapping revenue codes.*
#### Templates
Access service line templates here. They’ll help you speed up data entry and reduce opportunities for human error.
Encounters for which a UB-40 form is required will display the **Revenue Code** column in the table of service lines, as shown in the example above. Those codes come from directly from guidelines set by your practice or EHR.
For example, if your practice is a FQHC, then Wraparound Claims are billed with revenue code 0519.
If revenue code errors are detected upon review of the encounter, Insights will prompt you to update any known and suggested codes with one click, as shown below.
*Contact our support team at *[*support@getathelas.com*](mailto:support@getathelas.com)* for help with mapping revenue codes.*
#### Templates
Access service line templates here. They’ll help you speed up data entry and reduce opportunities for human error.
 If you click `Edit Templates` a window will appear in which you can create and delete templates.
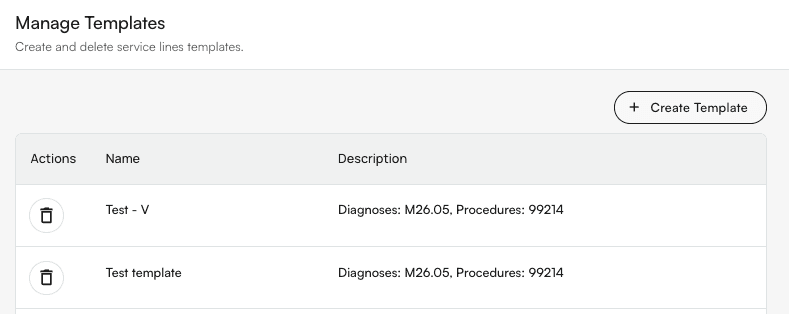 If you need to make a small adjustment to a template, you’ll need to create a new one entirely. We recommend also deleting the old one to avoid confusion.
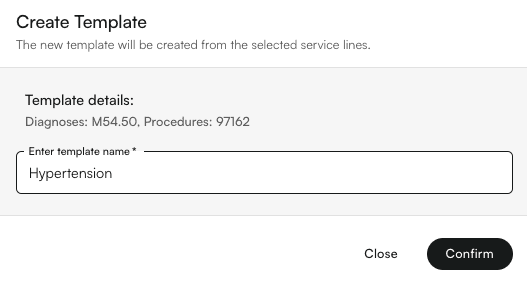 **If you’d like to create a service line template, you’ll need to first fill out all service lines in the next section.**
Your new template will then be created based on those service lines and you’ll be prompted to give it a name before clicking `Confirm`.
#### Diagnosis Codes
Start typing to find the diagnosis code you want to add, then click to select it.
**If you’d like to create a service line template, you’ll need to first fill out all service lines in the next section.**
Your new template will then be created based on those service lines and you’ll be prompted to give it a name before clicking `Confirm`.
#### Diagnosis Codes
Start typing to find the diagnosis code you want to add, then click to select it.
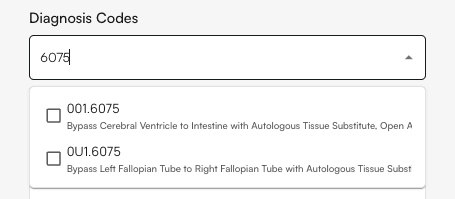 ***You can also search using colloquialisms** to find the code you need.*
*For example, you could type ‘ACL’ and then select from a list of codes pertaining to anterior cruciate ligament injuries.*
When one of the payers entered on the `Insurances` page has a preferred billing type of UB-04, then you will be able to differentiate between Admitting, Principal, and other relevant diagnoses in this section.
***You can also search using colloquialisms** to find the code you need.*
*For example, you could type ‘ACL’ and then select from a list of codes pertaining to anterior cruciate ligament injuries.*
When one of the payers entered on the `Insurances` page has a preferred billing type of UB-04, then you will be able to differentiate between Admitting, Principal, and other relevant diagnoses in this section.
 #### Service Lines
When you click `Add Service Line`, a window will appear.
Fill in the details of the service line here, including procedure code, diagnosis code pointers, modifiers, and so forth (UB-40 encounters will also show a field for revenue code).
You can also check the box to indicate if the procedure was performed as an emergency (which will update section 24c on the CMS-1500 form).
Once everything looks correct, click `Create Service Line`.
#### Service Lines
When you click `Add Service Line`, a window will appear.
Fill in the details of the service line here, including procedure code, diagnosis code pointers, modifiers, and so forth (UB-40 encounters will also show a field for revenue code).
You can also check the box to indicate if the procedure was performed as an emergency (which will update section 24c on the CMS-1500 form).
Once everything looks correct, click `Create Service Line`.
 **Notes About Service Lines**
* Procedures from your practice’s self-pay fee schedule will appear here only if the visit/DoS was self-pay
* Charges for CPT codes that auto-populate are based on insurance information and your practice's fee schedule, but you can overwrite them if necessary.
**Claim Information**
You have the option to add data on occurrences (if an insurance requiring a UB-40 claim has been selected in the Insurances section), illness date, and any additional claim information in this section.
**Notes About Service Lines**
* Procedures from your practice’s self-pay fee schedule will appear here only if the visit/DoS was self-pay
* Charges for CPT codes that auto-populate are based on insurance information and your practice's fee schedule, but you can overwrite them if necessary.
**Claim Information**
You have the option to add data on occurrences (if an insurance requiring a UB-40 claim has been selected in the Insurances section), illness date, and any additional claim information in this section.
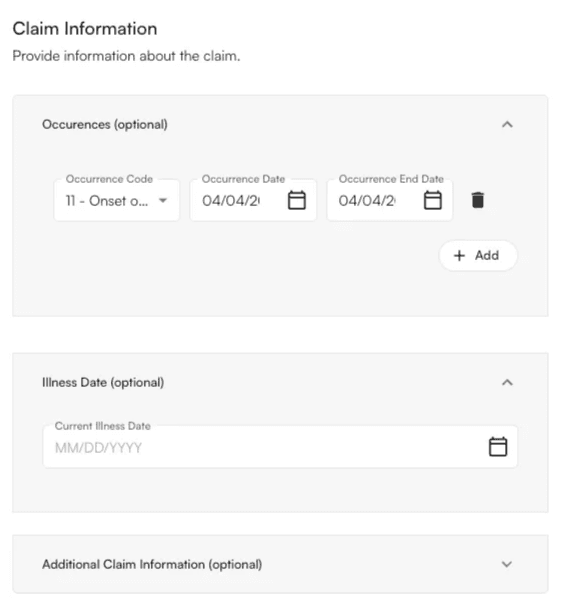 For **Workers’ Comp or automobile billing type** encounters, a date of injury field will also appear here.
**Authorizations**
This is where you can add any prior authorizations.
For this example, we’ll click `Add Authorization`. This will bring up a window in which we can create and edit either a pre-certified authorization or a referral.
For **Workers’ Comp or automobile billing type** encounters, a date of injury field will also appear here.
**Authorizations**
This is where you can add any prior authorizations.
For this example, we’ll click `Add Authorization`. This will bring up a window in which we can create and edit either a pre-certified authorization or a referral.
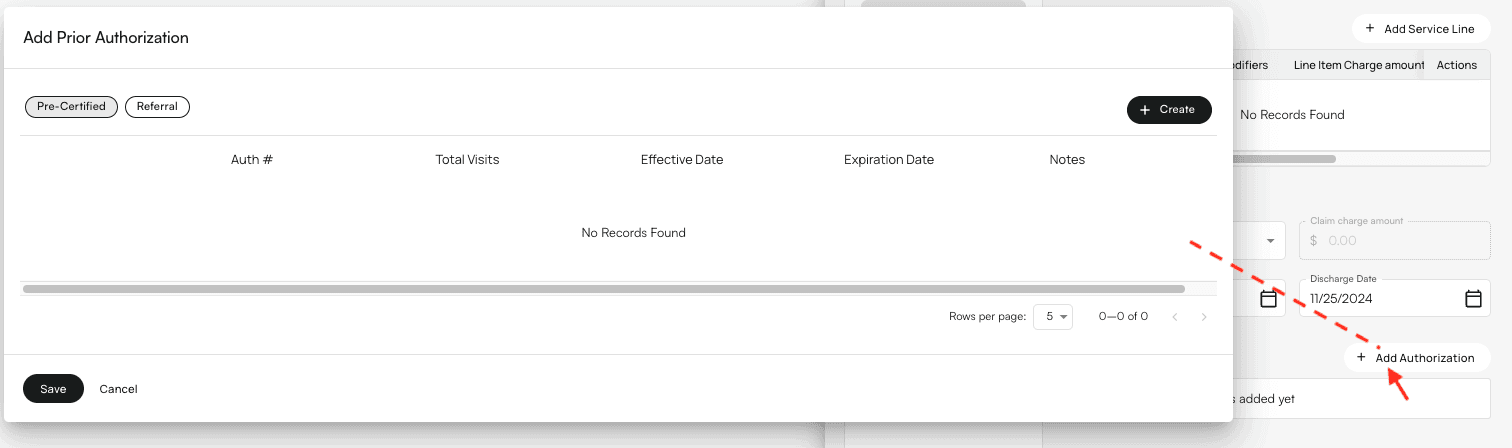 Note that you can switch between viewing the list of Pre-Certifications and Referrals by clicking the corresponding button in the top left corner.
For this example, we’ll create a pre-certified authorization.
Click `Add Authorization`.
Note that you can switch between viewing the list of Pre-Certifications and Referrals by clicking the corresponding button in the top left corner.
For this example, we’ll create a pre-certified authorization.
Click `Add Authorization`.
 A new window will appear. Fill in the information and click `Create`.
Indicate whether this is a pre-certification or a referral. Then fill in all required fields and click `Create`.
A new window will appear. Fill in the information and click `Create`.
Indicate whether this is a pre-certification or a referral. Then fill in all required fields and click `Create`.
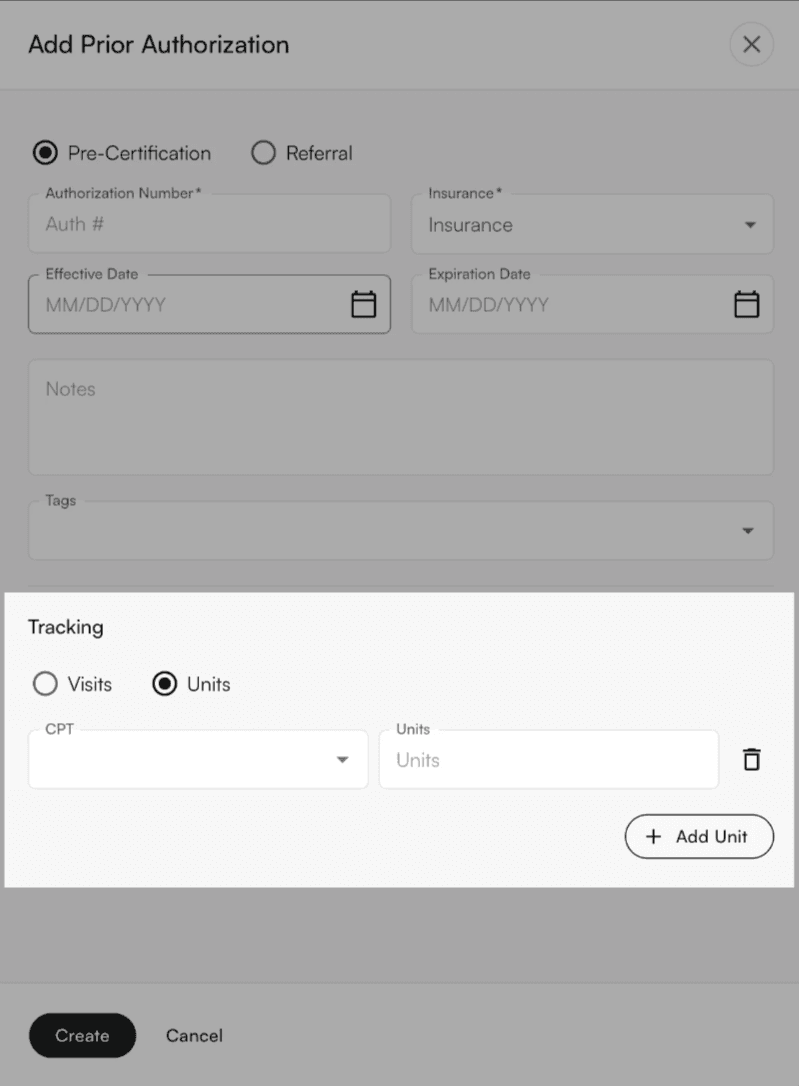 *Rather than only tracking prior auth by visit count, you can choose to track it either by visit count or by a particular CPT code and a unit count, if applicable.*
You’ll see your new prior authorization in the previous window, where it has been automatically selected. Click `Save`.
*Rather than only tracking prior auth by visit count, you can choose to track it either by visit count or by a particular CPT code and a unit count, if applicable.*
You’ll see your new prior authorization in the previous window, where it has been automatically selected. Click `Save`.
 *Note that if a referral is specified as a prior authorization, you will be unable to edit the referring provider in the following Providers section.*
#### Supporting Documentation
*Note that if a referral is specified as a prior authorization, you will be unable to edit the referring provider in the following Providers section.*
#### Supporting Documentation
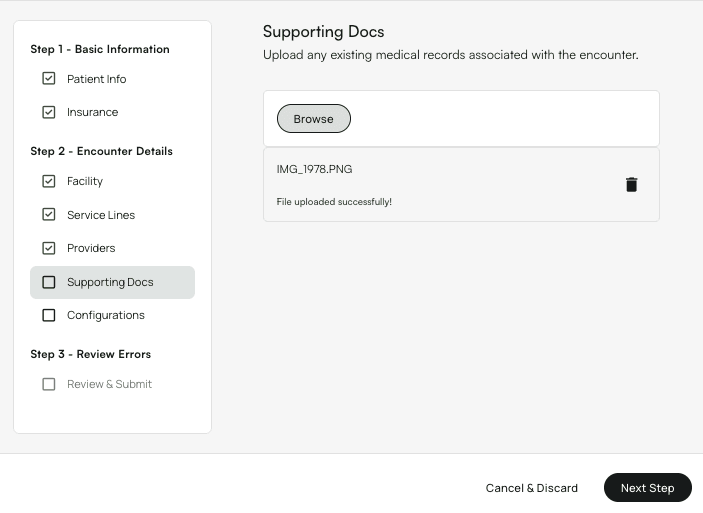 Upload any supporting documentation here.
Note that previously submitted documentation for this encounter is neither visible nor downloadable here. Follow the steps below to view and download previously submitted documentation.
**From the** [**Claim Details page**](https://insights.athelas.com/v3/claim_level_view), click into the encounter in question, then click the `Submissions` tab.
You will see both the claim submissions and any additional documents.
Click `View` at the right end of the corresponding row to view that documentation, as shown in this screenshot.
Upload any supporting documentation here.
Note that previously submitted documentation for this encounter is neither visible nor downloadable here. Follow the steps below to view and download previously submitted documentation.
**From the** [**Claim Details page**](https://insights.athelas.com/v3/claim_level_view), click into the encounter in question, then click the `Submissions` tab.
You will see both the claim submissions and any additional documents.
Click `View` at the right end of the corresponding row to view that documentation, as shown in this screenshot.
 #### Configurations
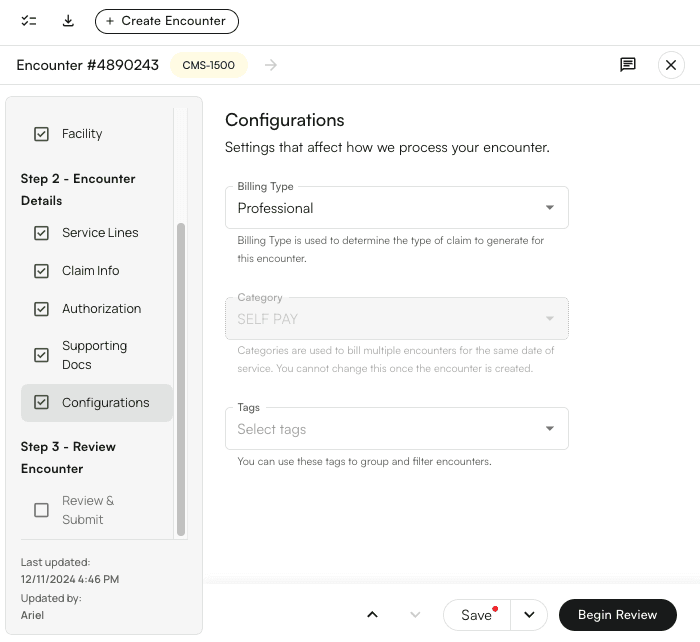 Configure rules for this encounter.
**‘Billing Type’** is the kind of claim you want to produce — Professional, Workers’ Comp, or Auto.
Configure rules for this encounter.
**‘Billing Type’** is the kind of claim you want to produce — Professional, Workers’ Comp, or Auto.
 ***Pro Tip***
***You can submit multiple claims for the same patient on the same date of service!***
*The **‘Category’ section** will be available for modification if you’re creating a new encounter in such a situation. This extra level of distinction ensures that the encounters are unique, otherwise our system will prevent the perceived duplicate from being queued for submission.*
*As these categories are global and cannot be altered, don’t fret too much about which category you choose. Just select the closest match. It simply needs to be different than other categories already associated with other such encounters.*
***Pro Tip***
***You can submit multiple claims for the same patient on the same date of service!***
*The **‘Category’ section** will be available for modification if you’re creating a new encounter in such a situation. This extra level of distinction ensures that the encounters are unique, otherwise our system will prevent the perceived duplicate from being queued for submission.*
*As these categories are global and cannot be altered, don’t fret too much about which category you choose. Just select the closest match. It simply needs to be different than other categories already associated with other such encounters.*
 Finally, you can add any **Tags** you like to the encounter. Tags can be used to informally categorize encounters so that you can filter for them later.
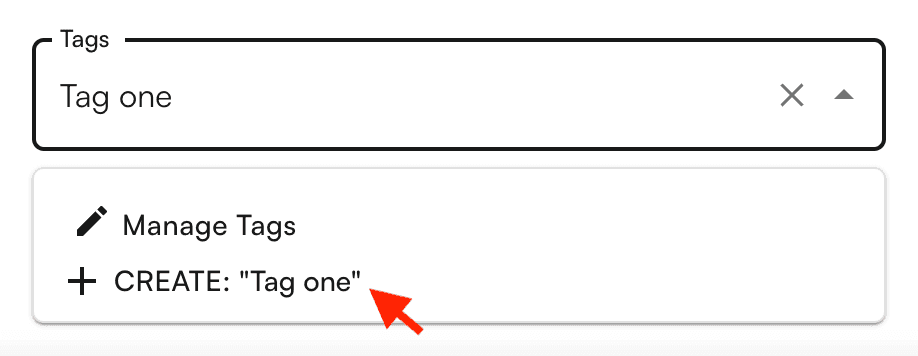
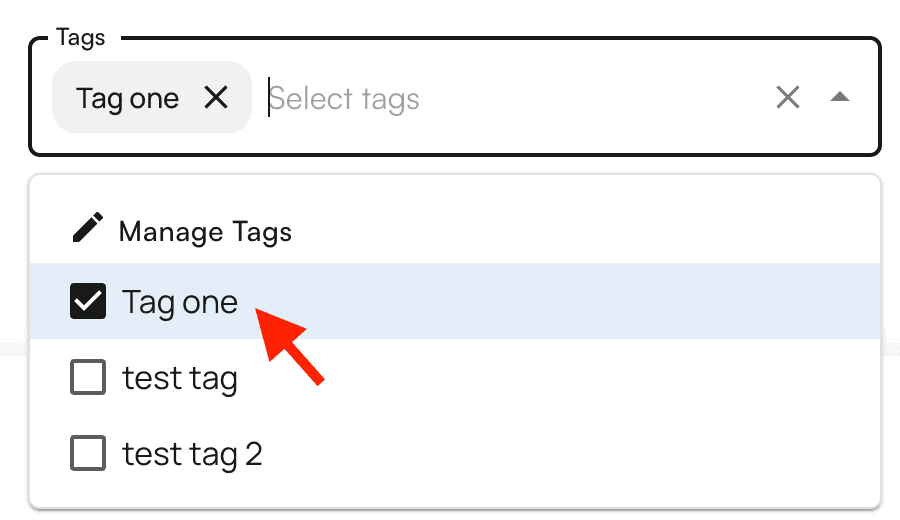
To create a new tag, simply type it in and then select `+ Create`.
To edit or delete tags, click `Manage Tags`.
Finally, you can add any **Tags** you like to the encounter. Tags can be used to informally categorize encounters so that you can filter for them later.
To create a new tag, simply type it in and then select `+ Create`.
To edit or delete tags, click `Manage Tags`.
 If you’ve reached a stopping point, you can choose to **save** your work in one of the following ways.
*These save statuses are for your team’s own flow and understanding, so feel free to use them as you see fit. Generally, this is what each status is intended to indicate:*
* **Open**
* No one has touched this encounter yet. Go ahead and get it started so your practice can get paid!
* **In Progress**
* Someone is working on this encounter.
* **Blocked**
* Someone is working on this encounter but has run into an obstacle that may require more time, or Athelas’ help. For example, perhaps the claim can’t be submitted because a prior authorization needs to be updated, or the provider’s notes are incomplete.
* **Archived**
* This encounter is not currently being prepared for submission.
If you’ve reached a stopping point, you can choose to **save** your work in one of the following ways.
*These save statuses are for your team’s own flow and understanding, so feel free to use them as you see fit. Generally, this is what each status is intended to indicate:*
* **Open**
* No one has touched this encounter yet. Go ahead and get it started so your practice can get paid!
* **In Progress**
* Someone is working on this encounter.
* **Blocked**
* Someone is working on this encounter but has run into an obstacle that may require more time, or Athelas’ help. For example, perhaps the claim can’t be submitted because a prior authorization needs to be updated, or the provider’s notes are incomplete.
* **Archived**
* This encounter is not currently being prepared for submission.
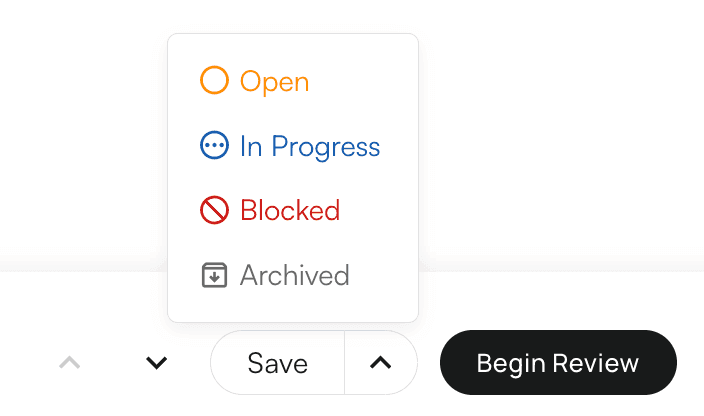 Once everything looks good, click `Begin Review`.
 ####
#### Review / Submit
After clicking `Begin Review` in the **Configurations** section, Insights will ensure that the encounter details are free of technical errors that could lead to claim rejection or denial.
####
#### Review / Submit
After clicking `Begin Review` in the **Configurations** section, Insights will ensure that the encounter details are free of technical errors that could lead to claim rejection or denial.
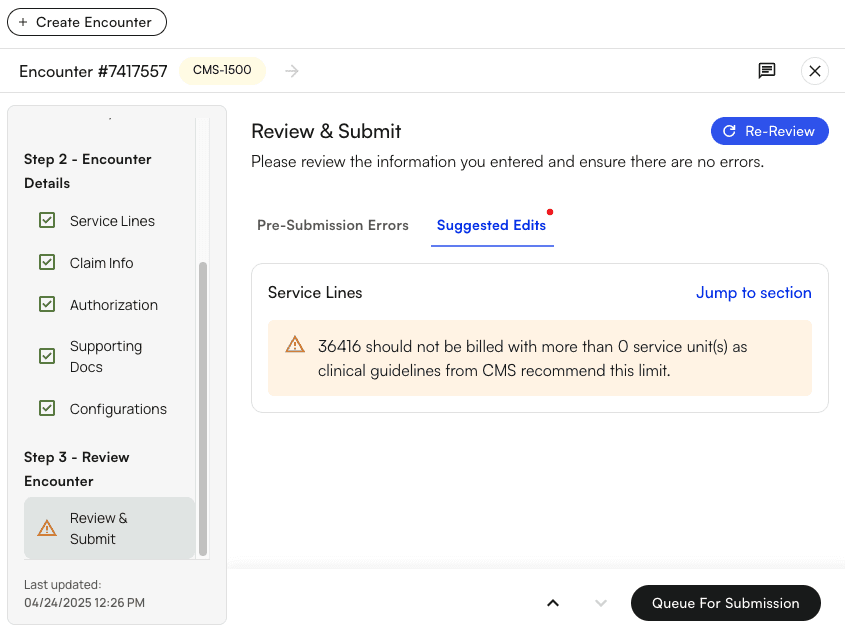 If pre-submission errors or suggestions for edits are found, as shown in the example above, they will appear with explanations along with a link to `Jump to section` so that you can address the issue quickly.
*The ‘**Suggested Edits**’ tab offers an additional layer of actionable direction for avoiding potential denials. The information provided here comes directly from CMS’ National Corrective Coding Initiative (NCCI). We can see in the example below that certain CPT codes cannot be billed together, and only one of the listed modifiers should be used on a given CPT code instead of multiple.*
If pre-submission errors or suggestions for edits are found, as shown in the example above, they will appear with explanations along with a link to `Jump to section` so that you can address the issue quickly.
*The ‘**Suggested Edits**’ tab offers an additional layer of actionable direction for avoiding potential denials. The information provided here comes directly from CMS’ National Corrective Coding Initiative (NCCI). We can see in the example below that certain CPT codes cannot be billed together, and only one of the listed modifiers should be used on a given CPT code instead of multiple.*
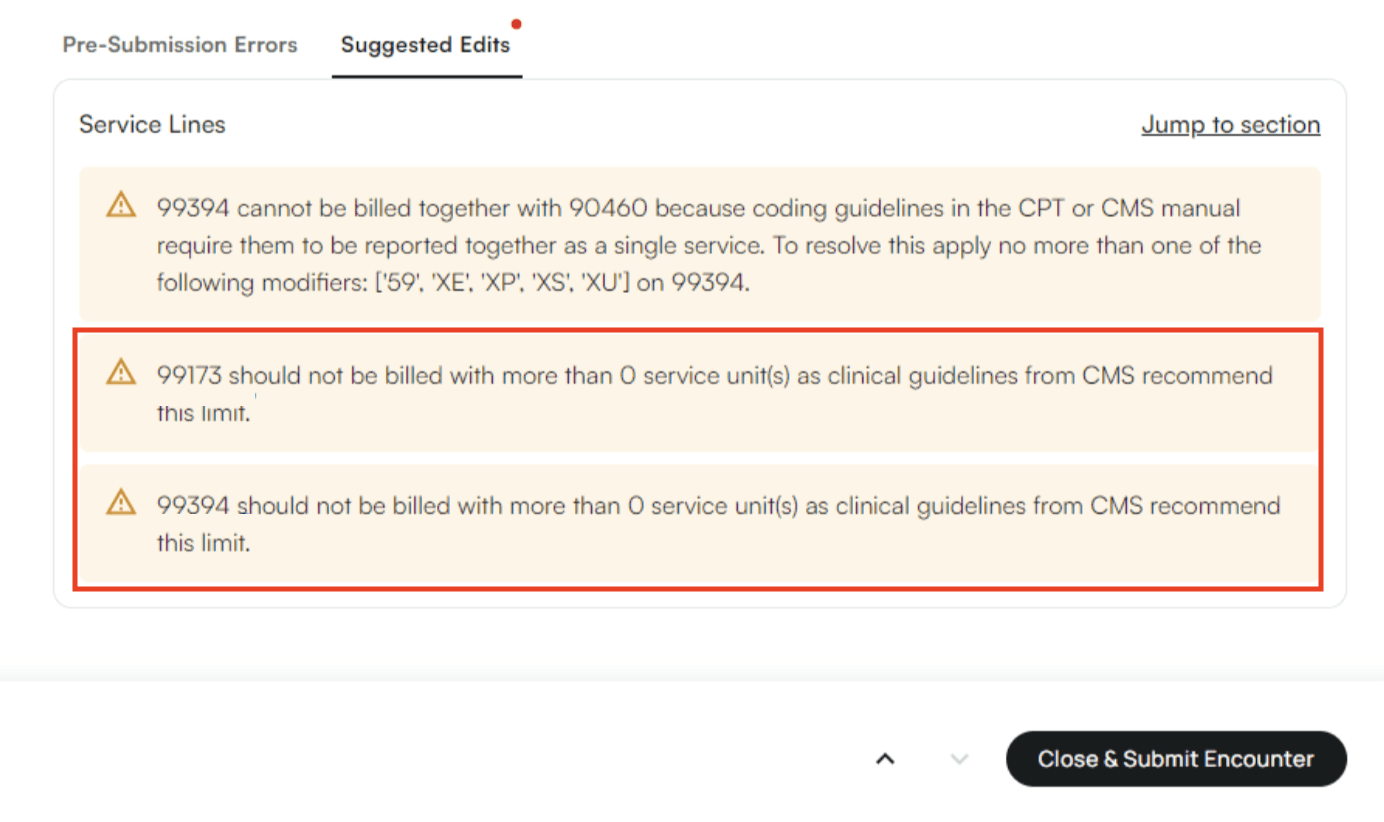 *Keep in mind that the ‘**Suggested Edits**’ are just that — suggestions, based on CMS guidelines, but suggestions nonetheless. You may find cases such as the example below, in which some codes were flagged by the system, but they are indeed payable by the payer. In this case, it is fine to go ahead and submit without making those suggested further changes.*
After all errors have been addressed, click `Re-Review` to find out whether more corrections are required, or if the encounter is now ready for submission.
If it can be submitted successfully, click `Close & Submit Encounter`.
*If you’re updating an encounter and there are no errors or suggested edits, select the closing option that best suits your needs (*`*Resubmit to Primary*`*, *`*Forward to Secondary*`*, etc.)*
*Keep in mind that the ‘**Suggested Edits**’ are just that — suggestions, based on CMS guidelines, but suggestions nonetheless. You may find cases such as the example below, in which some codes were flagged by the system, but they are indeed payable by the payer. In this case, it is fine to go ahead and submit without making those suggested further changes.*
After all errors have been addressed, click `Re-Review` to find out whether more corrections are required, or if the encounter is now ready for submission.
If it can be submitted successfully, click `Close & Submit Encounter`.
*If you’re updating an encounter and there are no errors or suggested edits, select the closing option that best suits your needs (*`*Resubmit to Primary*`*, *`*Forward to Secondary*`*, etc.)*
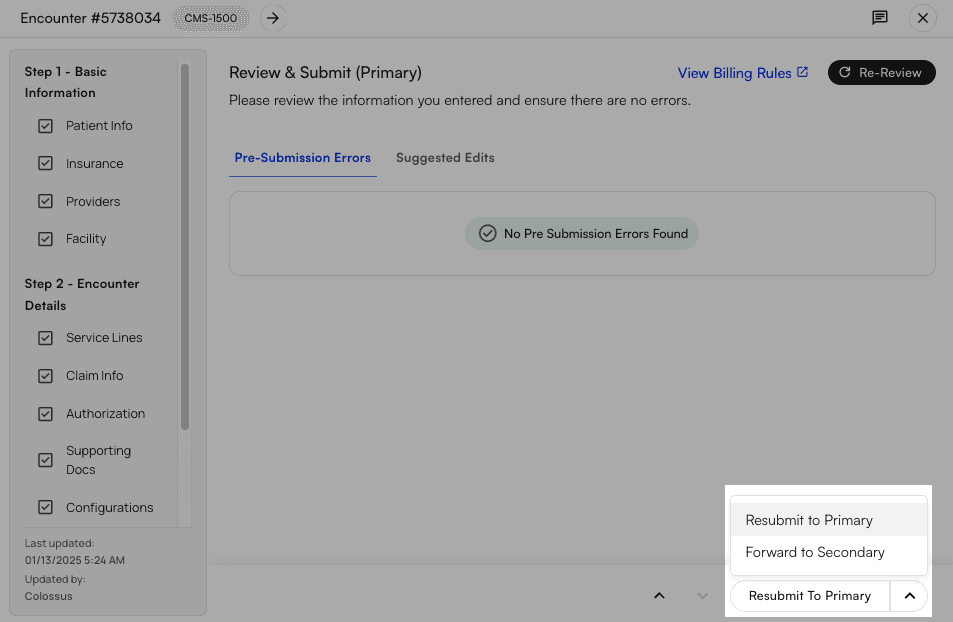 This will set your encounter status to ‘Closed.’ Then, when you hover the status on the Encounter Details page, a tooltip will indicate when it will be submitted.
 ####
#### Mobile-Friendly Encounter Details Page
The Encounter Details page is mobile-friendly. This is particularly notable for providers who work out of multiple facilities, as they can easily create and update encounters on the go.
**Features In Development:**
* Add default values when creating encounters
* Hide/show certain fields on encounter creation
* Create dental encounters
* Ability to see when the most recent/next extraction pulls will be
####
#### Mobile-Friendly Encounter Details Page
The Encounter Details page is mobile-friendly. This is particularly notable for providers who work out of multiple facilities, as they can easily create and update encounters on the go.
**Features In Development:**
* Add default values when creating encounters
* Hide/show certain fields on encounter creation
* Create dental encounters
* Ability to see when the most recent/next extraction pulls will be