> ## Documentation Index
> Fetch the complete documentation index at: https://trainings.air.athelas.com/llms.txt
> Use this file to discover all available pages before exploring further.
# Getting started as a Healthcare Provider
> Learn how to document patient encounters, record clinical notes, and complete chart notes efficiently using the Athelas Healthcare platform
Welcome to the Athelas Healthcare platform! This guide helps you master the essential workflows for documenting patient encounters and completing chart notes efficiently.
## What you'll accomplish
By the end of this guide, you'll know how to:
* Open chart notes from appointments or patient profiles
* Record patient conversations using AI Scribe
* Document clinical measurements, goals, and treatment plans
* Create and manage chart note templates
* Complete and submit chart notes for billing
## Understanding Chart Notes
Chart Notes are the core workflow for documenting patient encounters in the Athelas EHR. Each chart note captures everything needed for clinical documentation and billing, including:
* **Plan of Care** - Treatment frequency, duration, and visit count
* **Measurements** - Clinical measurements and assessments
* **Goals** - Patient treatment objectives and outcomes
* **Treatments** - CPT codes and interventions
Chart Notes streamline your documentation workflow by organizing all encounter information in one place, reducing time spent on administrative tasks and ensuring complete documentation for billing.
## Prerequisites
Before you begin documenting encounters, ensure you have:
* Access to the Athelas Healthcare platform
* An appointment scheduled or checked in for the patient
* A patient case assigned to the appointment (required for check-in)
* Patient insurance information available
## Open a Chart Note
You can access chart notes from two locations: appointments or patient profiles. Choose the method that fits your workflow.
### Open from an Appointment
Use this method when you're working directly with appointments in your calendar or schedule.
Check in the appointment to enable chart note access. You must complete this step before you can open the chart note.
 A Case must be present before you can check in an appointment. If no case is assigned, you'll receive an error when attempting to check in. Add the relevant case via the dropdown menu or create a new case for the appointment.
Fill the following required fields before checking in:
* **Case** - Patient case associated with the appointment
* **Appointment Type** - Type of visit
* **Facility** - Location where the appointment takes place
* **Insurance** - Patient's insurance information
A Case must be present before you can check in an appointment. If no case is assigned, you'll receive an error when attempting to check in. Add the relevant case via the dropdown menu or create a new case for the appointment.
Fill the following required fields before checking in:
* **Case** - Patient case associated with the appointment
* **Appointment Type** - Type of visit
* **Facility** - Location where the appointment takes place
* **Insurance** - Patient's insurance information
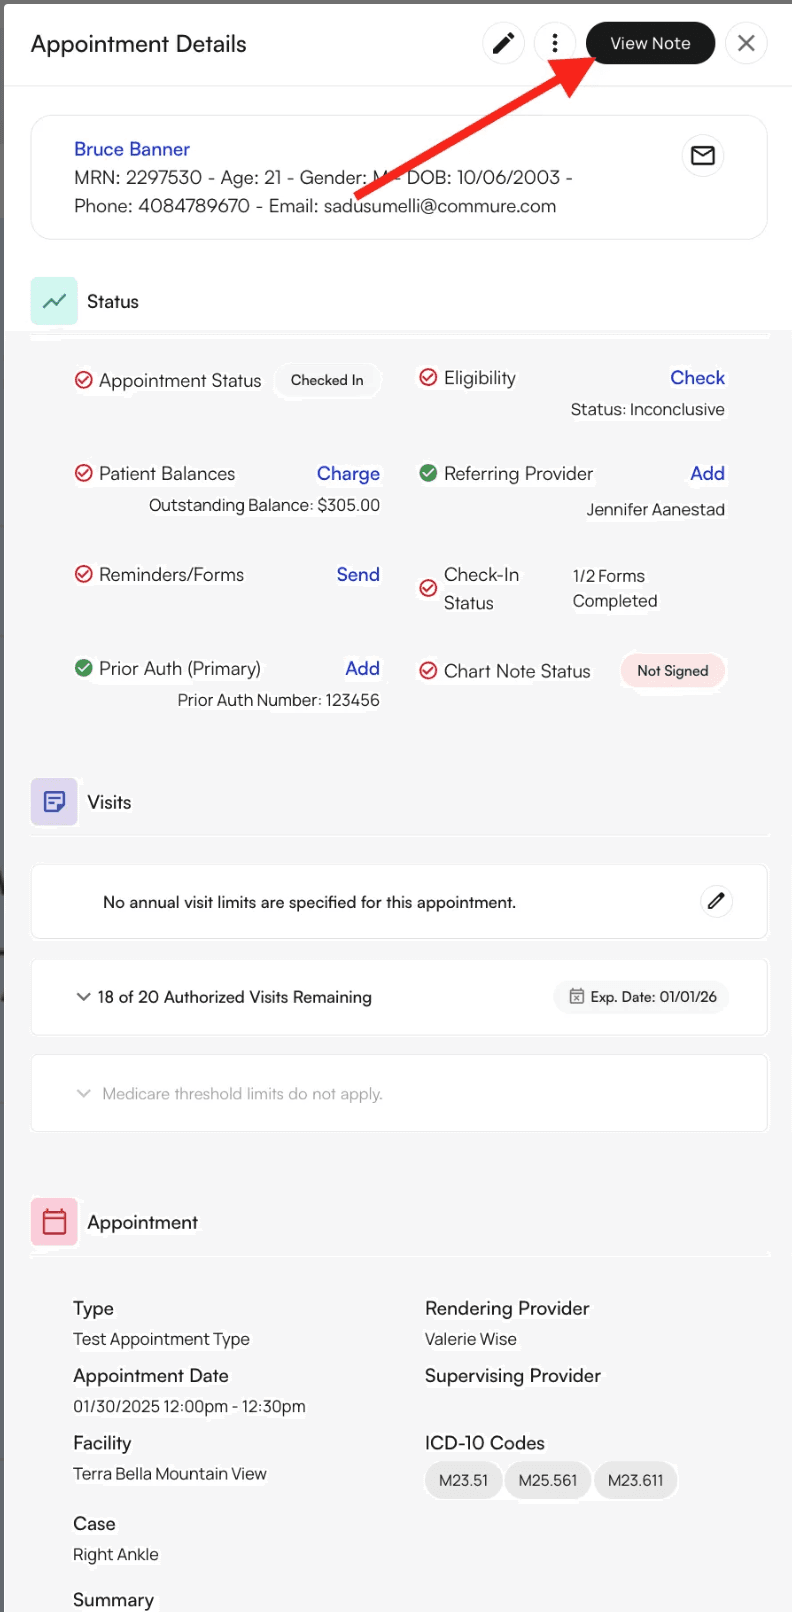
 Click the box icon with an arrow in the top right corner to open the chart note.
 The chart note opens and displays setup buttons for configuring your encounter structure.
### Open from Patient Profile
Use this method when you need to access a patient's chart note from their profile, useful for reviewing previous encounters or accessing notes for walk-in patients.
Click **Patients** in the left-hand menu and search for the patient by name.
The chart note opens and displays setup buttons for configuring your encounter structure.
### Open from Patient Profile
Use this method when you need to access a patient's chart note from their profile, useful for reviewing previous encounters or accessing notes for walk-in patients.
Click **Patients** in the left-hand menu and search for the patient by name.
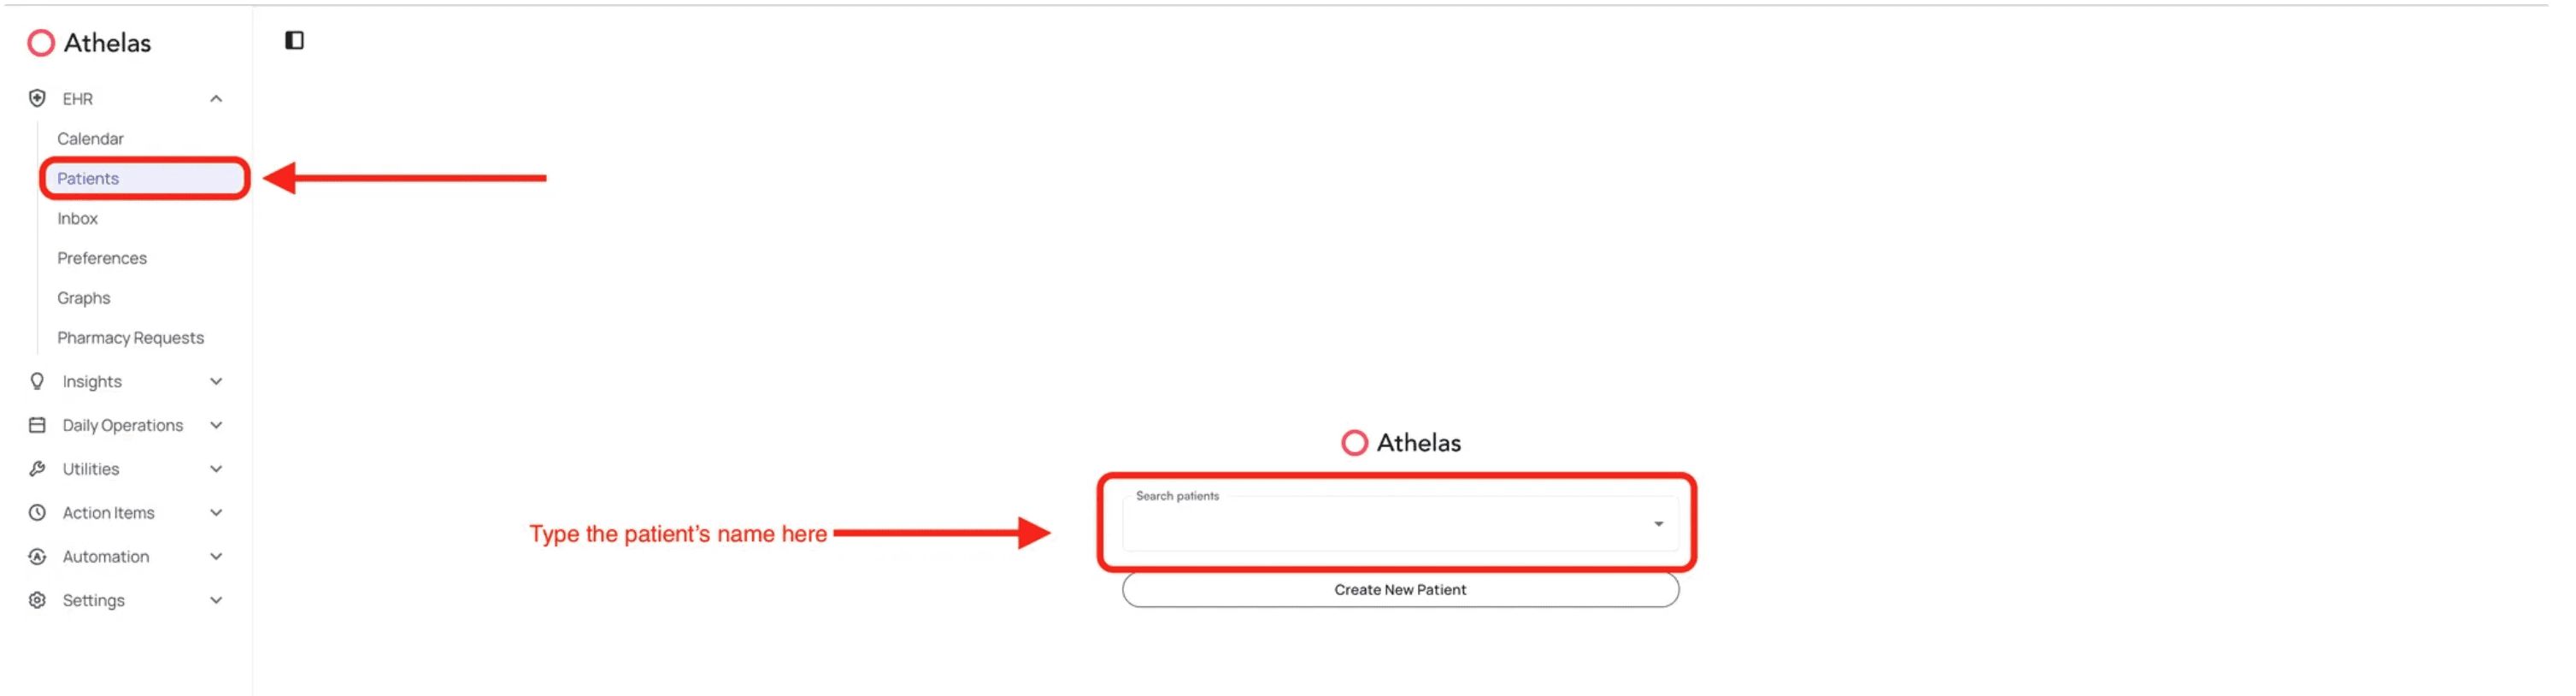 The system automatically routes you to the Appointments page of the patient's profile.
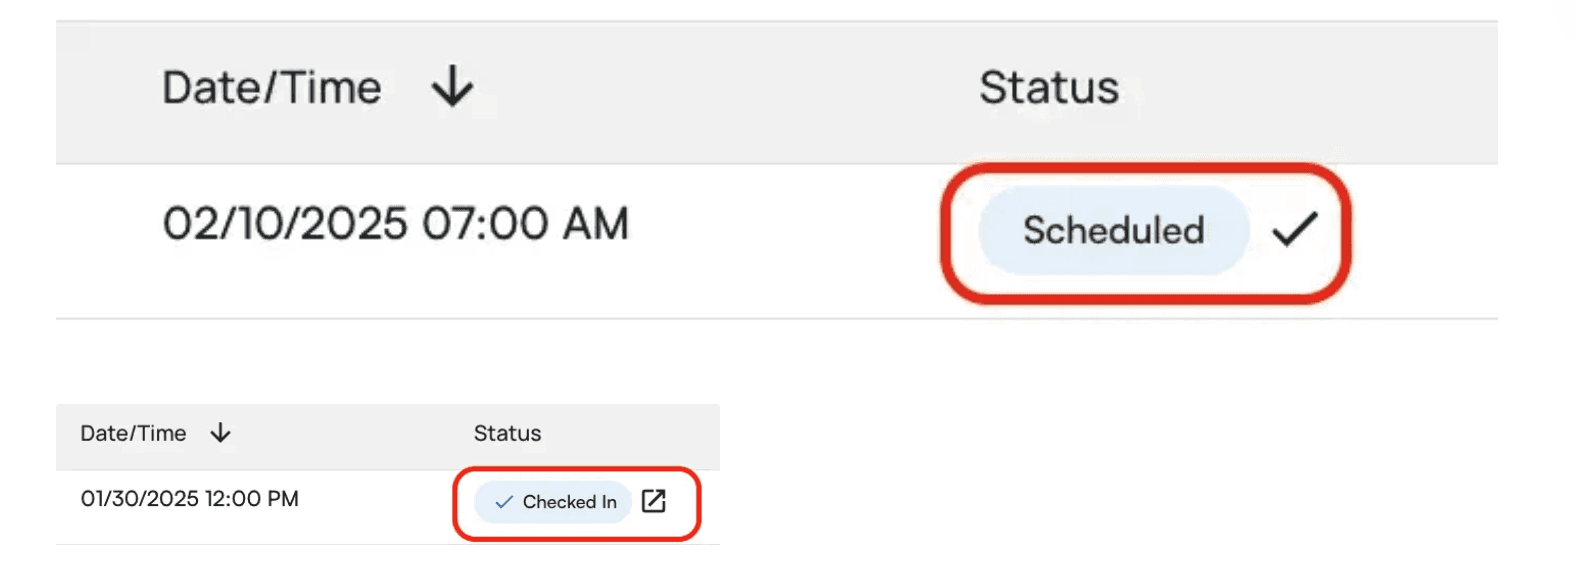
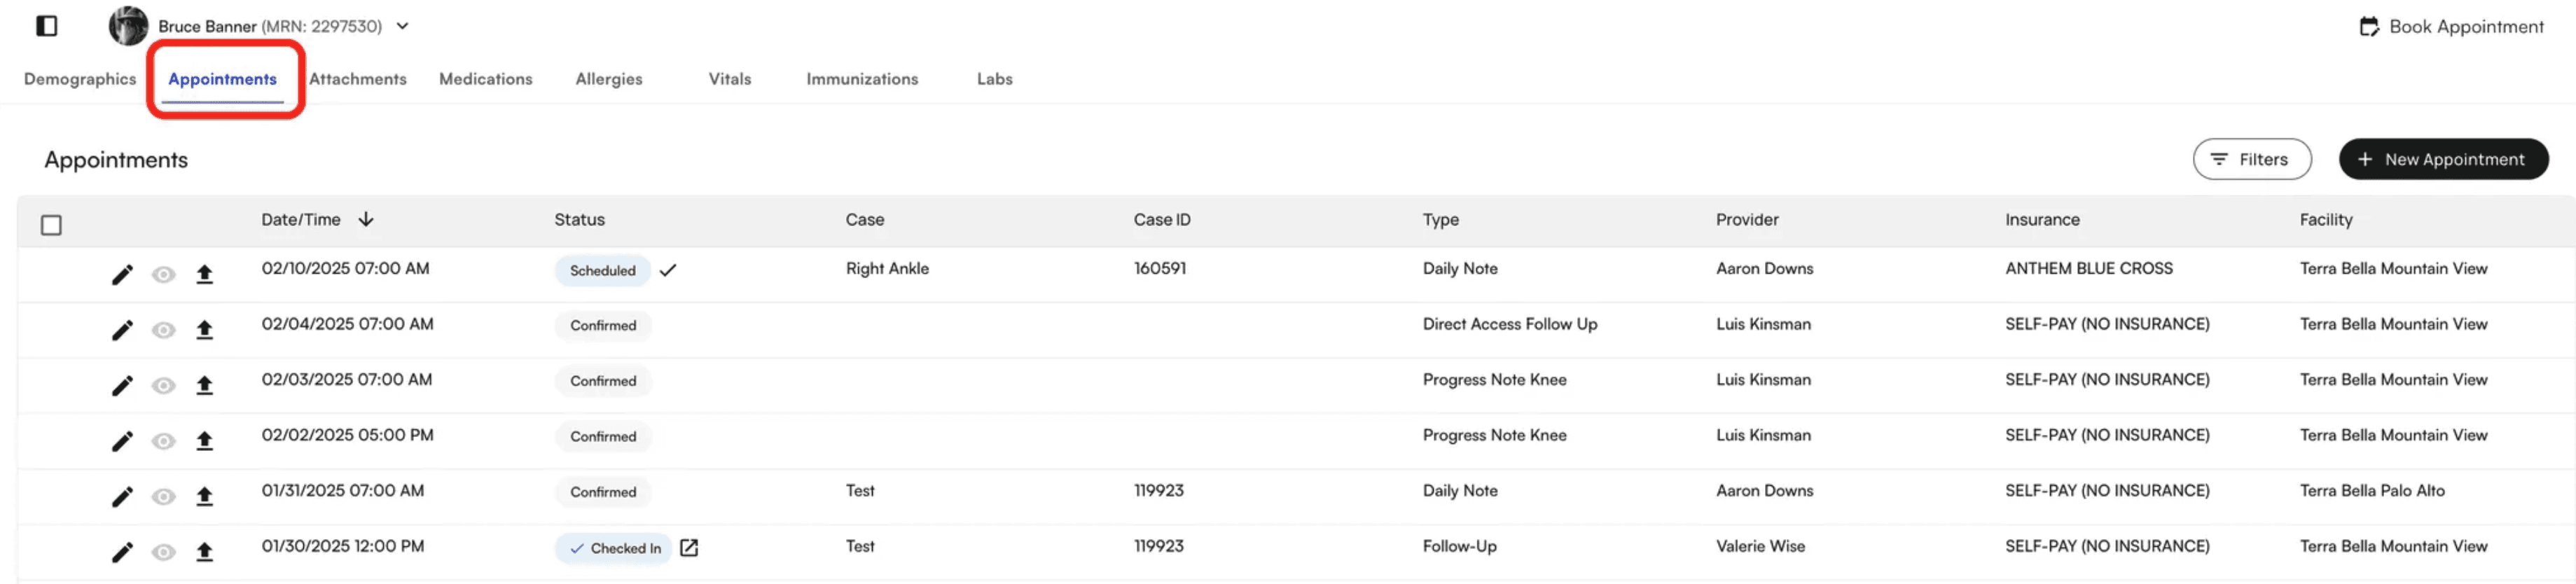 * If the appointment is scheduled, click the checkmark to check in the patient
* If the appointment is already checked in, click the box icon with an arrow to open the chart note
The chart note opens and you can begin documenting the encounter.
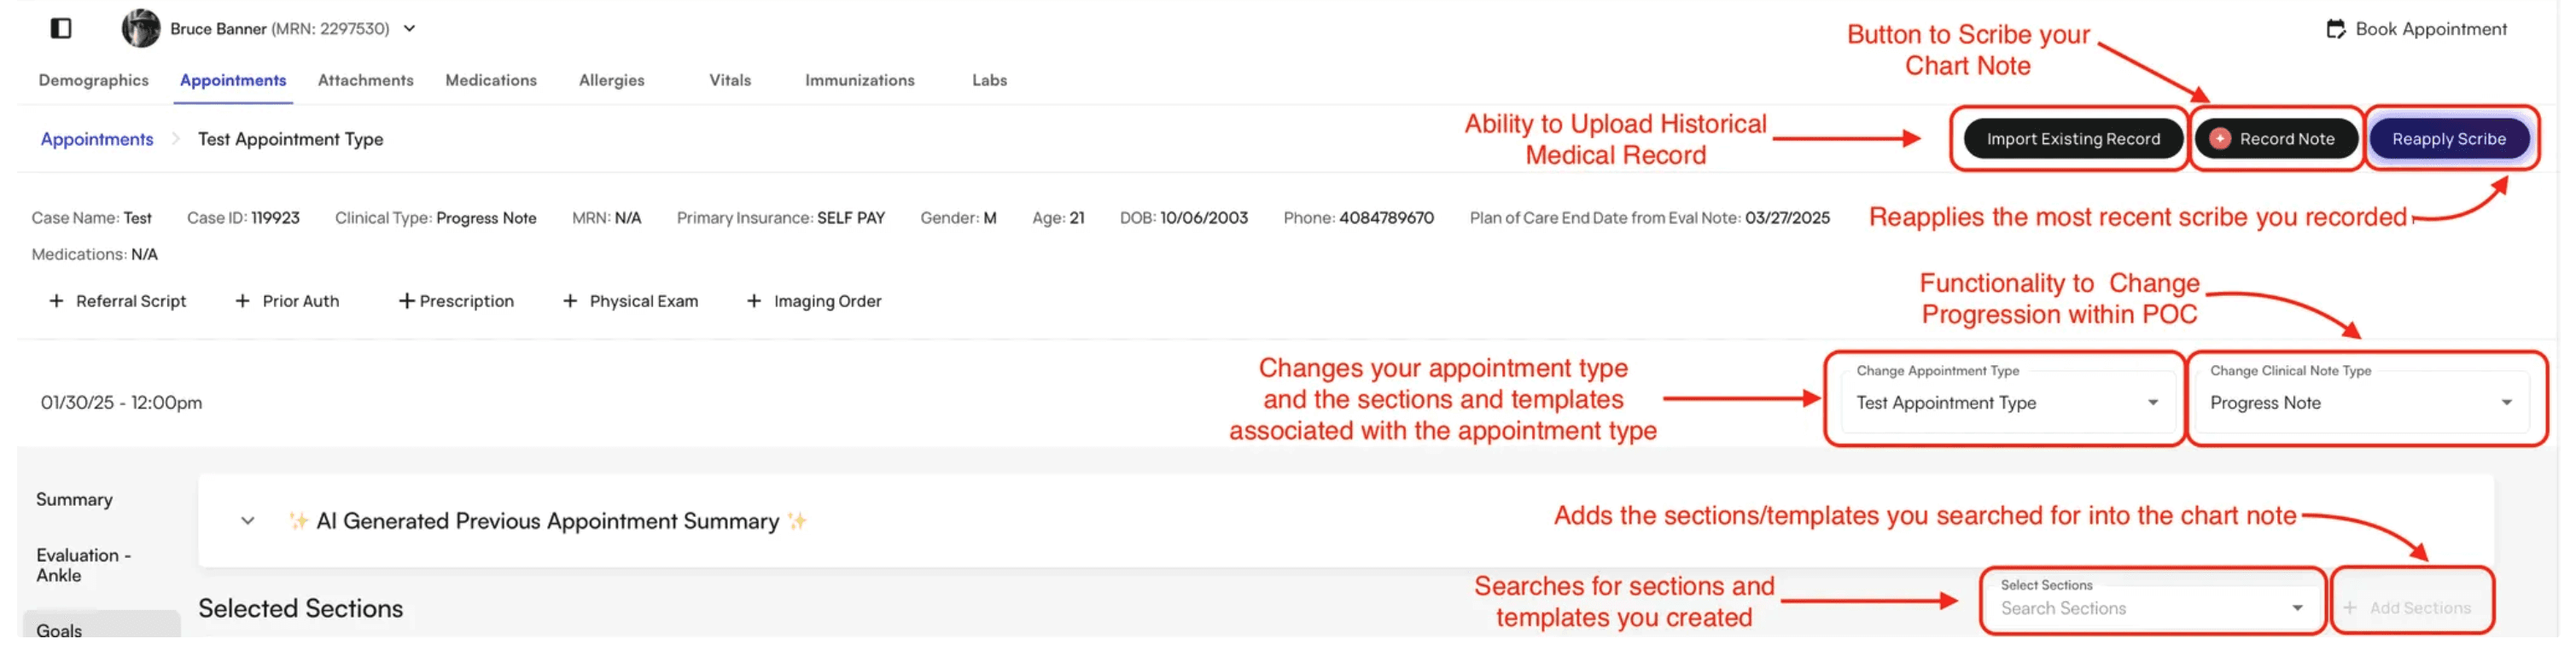
When you first open a chart note, you'll see setup buttons that allow you to configure the base structure for your encounter.
* If the appointment is scheduled, click the checkmark to check in the patient
* If the appointment is already checked in, click the box icon with an arrow to open the chart note
The chart note opens and you can begin documenting the encounter.
When you first open a chart note, you'll see setup buttons that allow you to configure the base structure for your encounter.
 ## Record patient conversations with Scribe
Scribe automatically transcribes your patient conversations and populates the encounter note, saving you time on documentation while ensuring accuracy. Think of Scribe as a digital transcription assistant that listens to your conversations and converts them into structured clinical notes.
Click the **Athelas AI** button in the bottom right corner. A window opens with the option to **Start Recording**. Click it to activate Scribe.
## Record patient conversations with Scribe
Scribe automatically transcribes your patient conversations and populates the encounter note, saving you time on documentation while ensuring accuracy. Think of Scribe as a digital transcription assistant that listens to your conversations and converts them into structured clinical notes.
Click the **Athelas AI** button in the bottom right corner. A window opens with the option to **Start Recording**. Click it to activate Scribe.
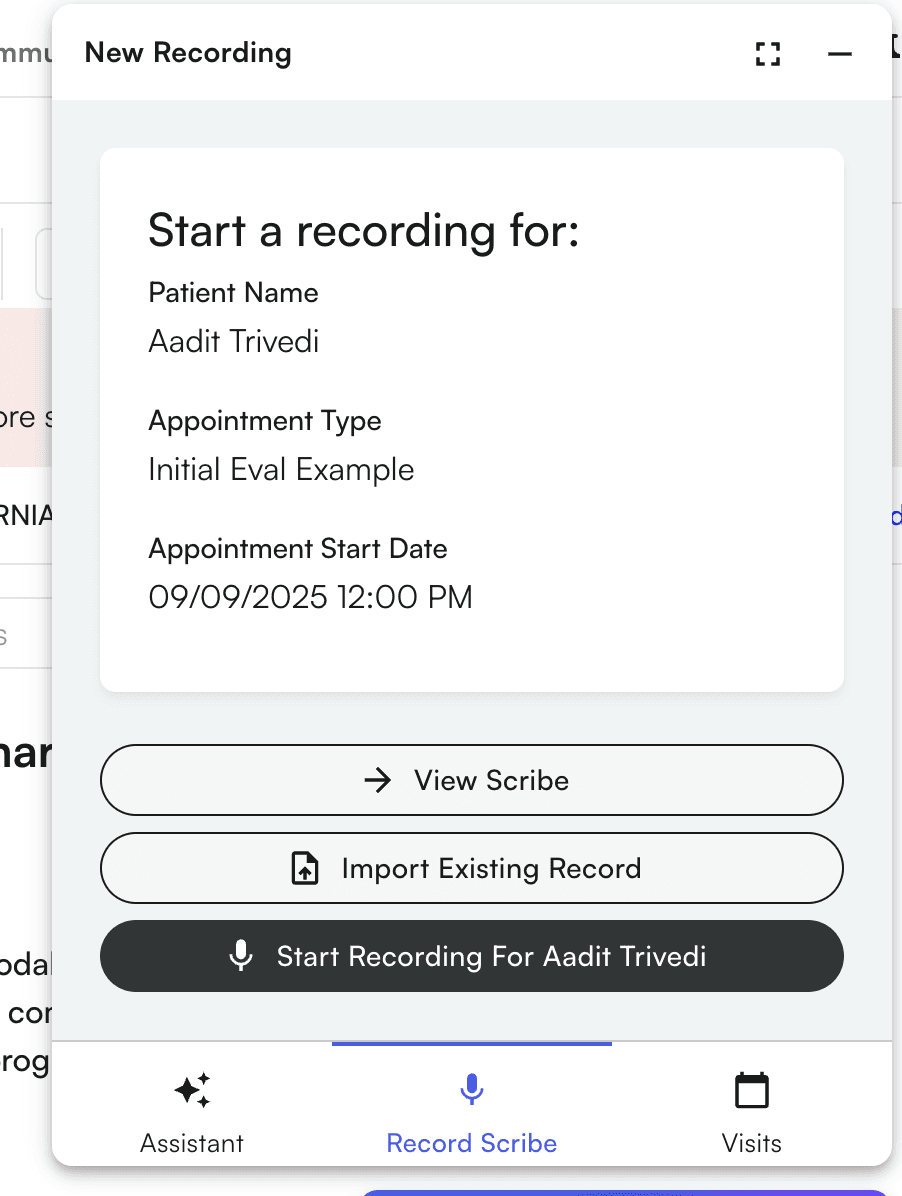 The recording interface appears and Scribe is ready to capture your conversation.
Begin recording your conversation with the patient. While the EHR Scribe widget is open, you can:
* Navigate to other EHR pages on the Athelas website and continue recording in the background
* Click **Minimize** to minimize the widget while it continues recording
You cannot navigate to non-EHR pages while recording. End or cancel the recording first if you need to leave the EHR.
The recording interface appears and Scribe is ready to capture your conversation.
Begin recording your conversation with the patient. While the EHR Scribe widget is open, you can:
* Navigate to other EHR pages on the Athelas website and continue recording in the background
* Click **Minimize** to minimize the widget while it continues recording
You cannot navigate to non-EHR pages while recording. End or cancel the recording first if you need to leave the EHR.
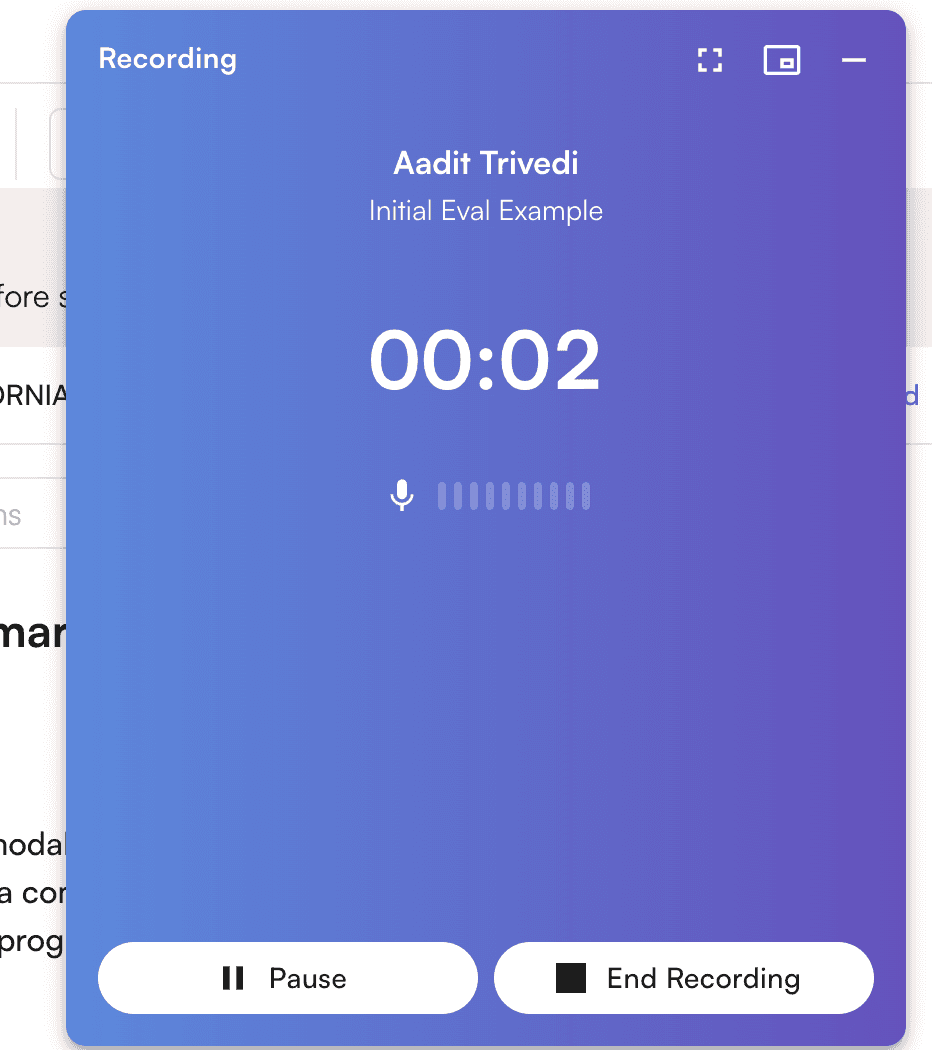 When you're ready to upload the recording, click **End Recording**.
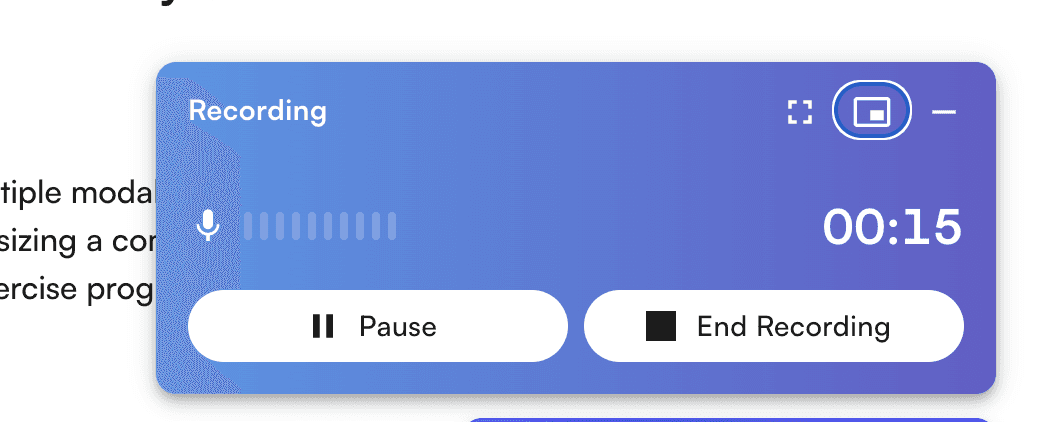 The recording uploads successfully and processing begins.
After the recording uploads successfully, the system generates a scribe from your recording. This process takes some time. You can:
* Wait for processing to complete
* Close the window and continue with other tasks
The recording uploads successfully and processing begins.
After the recording uploads successfully, the system generates a scribe from your recording. This process takes some time. You can:
* Wait for processing to complete
* Close the window and continue with other tasks
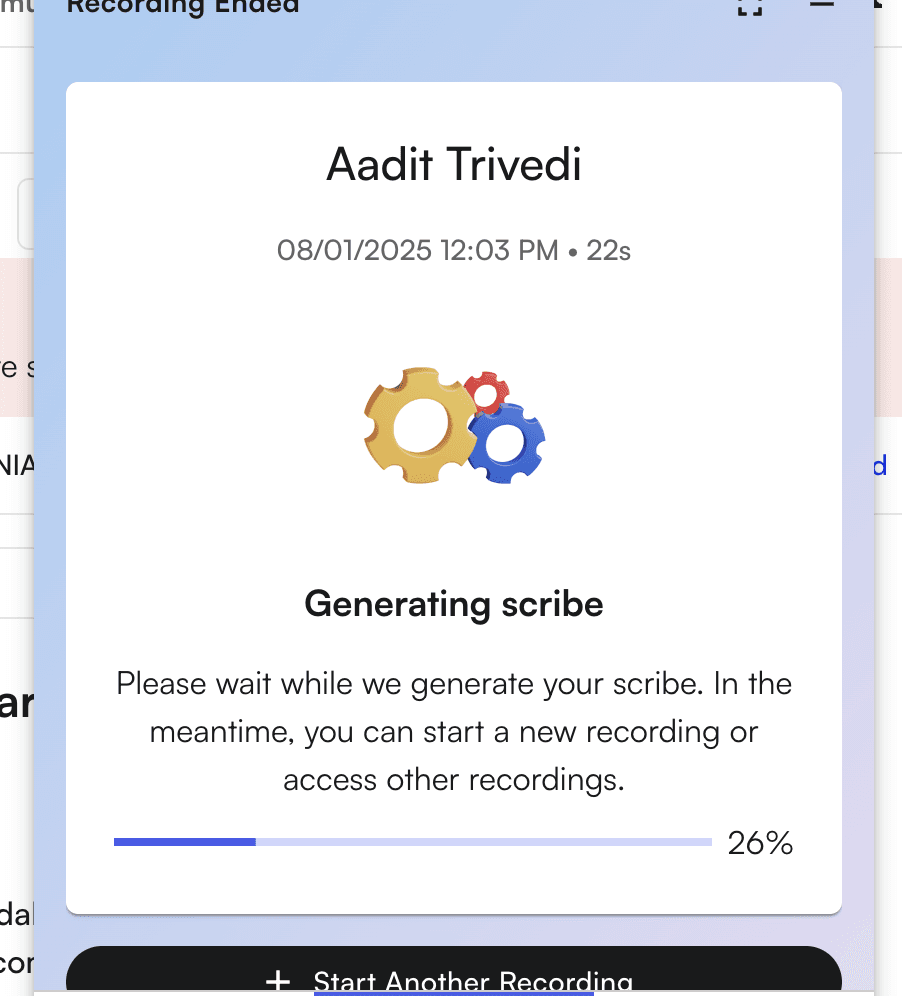 Once processing completes, click **View Scribe** to review the generated outputs and add them to your chart note.
The scribe appears in your chart note with transcribed conversation content ready for review and editing.
## Add measurements to chart notes
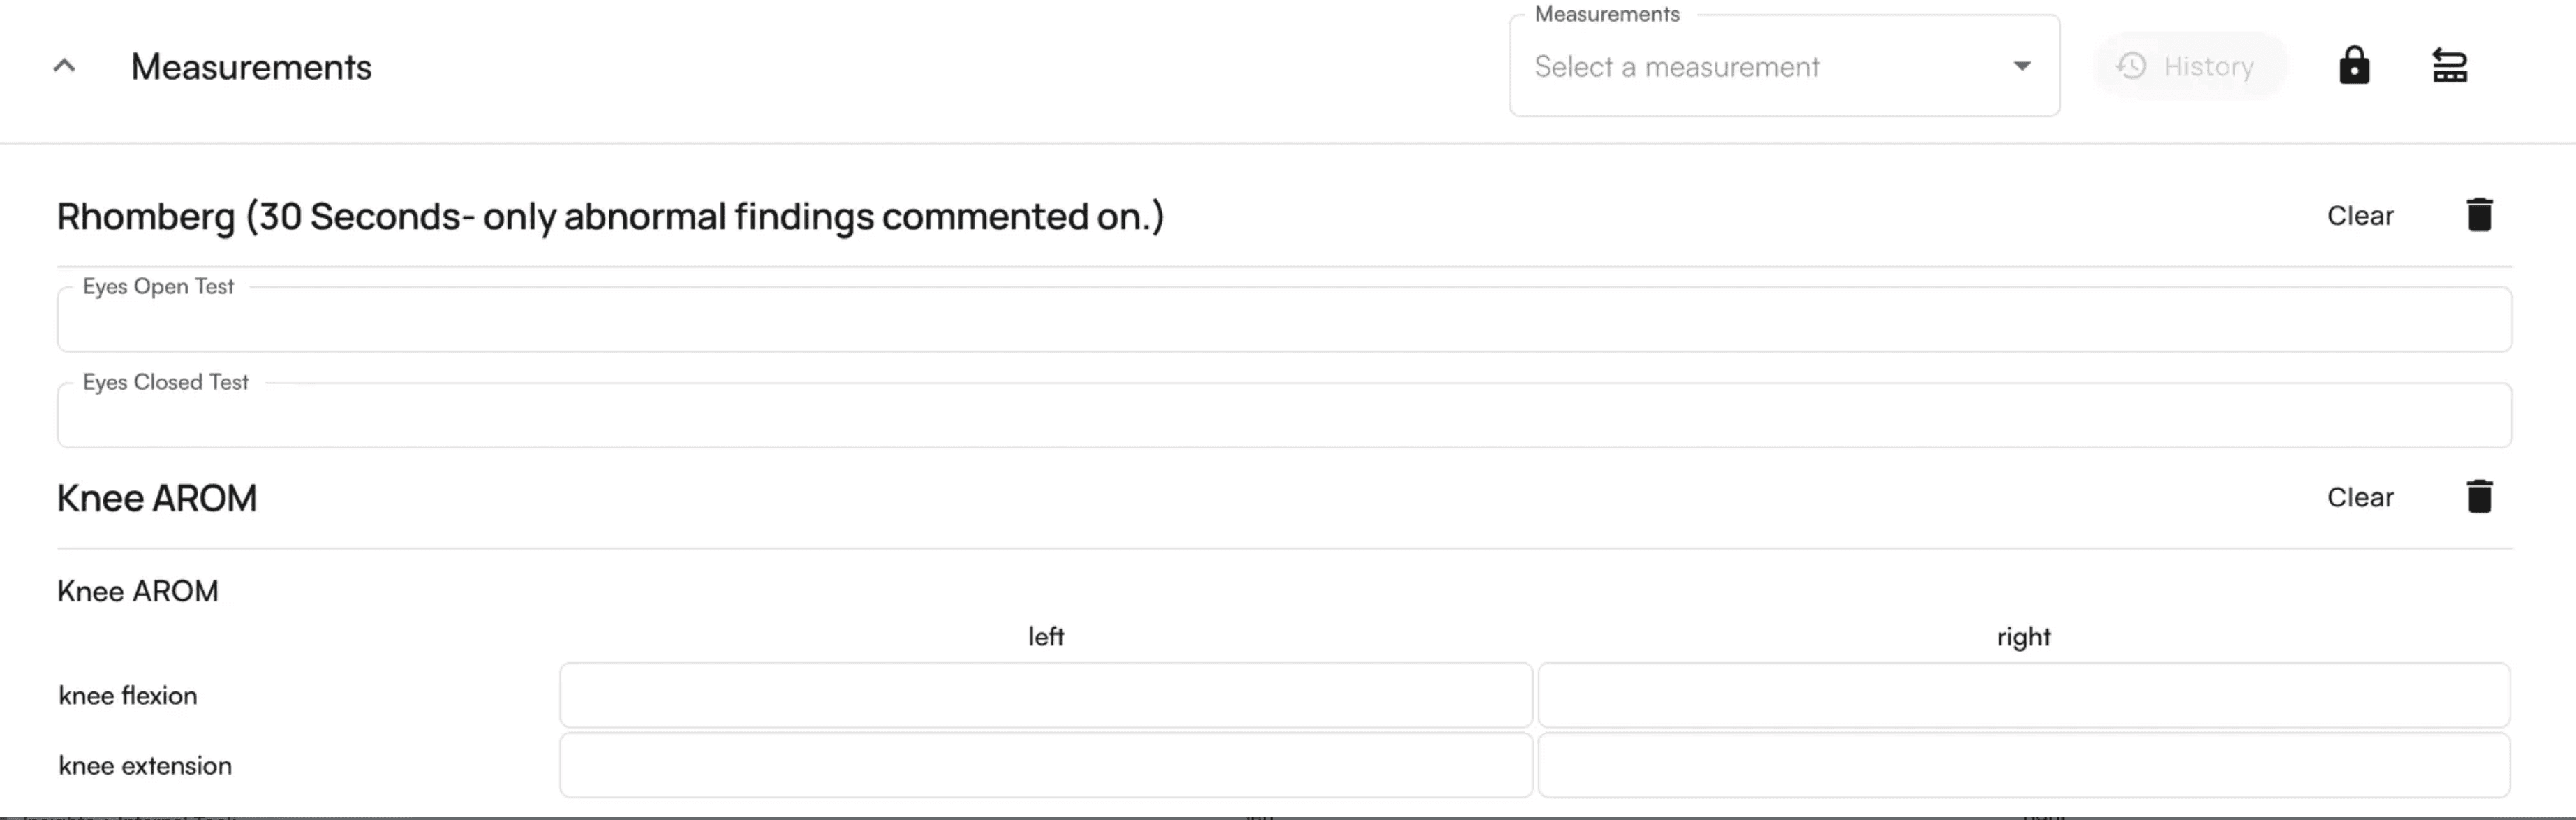
Measurements capture clinical assessments and are organized by category for easy access. Adding measurements ensures your documentation includes all required clinical data and helps track patient progress over time.
Once processing completes, click **View Scribe** to review the generated outputs and add them to your chart note.
The scribe appears in your chart note with transcribed conversation content ready for review and editing.
## Add measurements to chart notes
Measurements capture clinical assessments and are organized by category for easy access. Adding measurements ensures your documentation includes all required clinical data and helps track patient progress over time.
 ### How measurements are organized
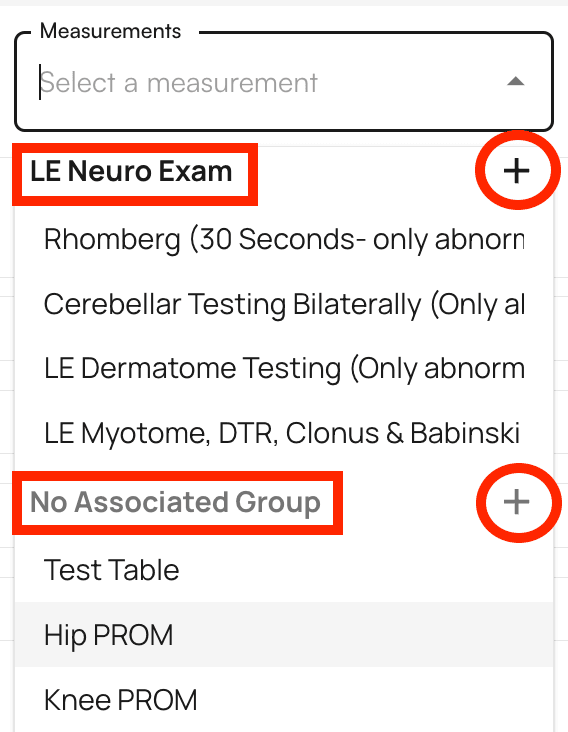
Clicking on measurements displays them in categorized order:
* **Grouped measurements** (e.g., LE Neuro Exam) appear together
* **Ungrouped measurements** (marked as "No Associated Group") appear at the bottom
* Click an individual measurement to add it to the chart note
* Click the **+** icon next to a group name to add all measurements within that group
You can view the history of measurements and pull data from previous chart notes if measurements exist for the patient. This saves time when documenting follow-up visits and helps you track changes over time.
### How measurements are organized
Clicking on measurements displays them in categorized order:
* **Grouped measurements** (e.g., LE Neuro Exam) appear together
* **Ungrouped measurements** (marked as "No Associated Group") appear at the bottom
* Click an individual measurement to add it to the chart note
* Click the **+** icon next to a group name to add all measurements within that group
You can view the history of measurements and pull data from previous chart notes if measurements exist for the patient. This saves time when documenting follow-up visits and helps you track changes over time.
 ## Set patient treatment goals
Goals track patient treatment objectives and outcomes, helping you monitor progress and document treatment plans effectively. Unlike measurements which capture current clinical status, goals define what you and the patient aim to achieve.
Click **+ Add Goal** in the Goals section. Alternatively, click the curled arrow icon to pull goals from the previous chart note.
## Set patient treatment goals
Goals track patient treatment objectives and outcomes, helping you monitor progress and document treatment plans effectively. Unlike measurements which capture current clinical status, goals define what you and the patient aim to achieve.
Click **+ Add Goal** in the Goals section. Alternatively, click the curled arrow icon to pull goals from the previous chart note.
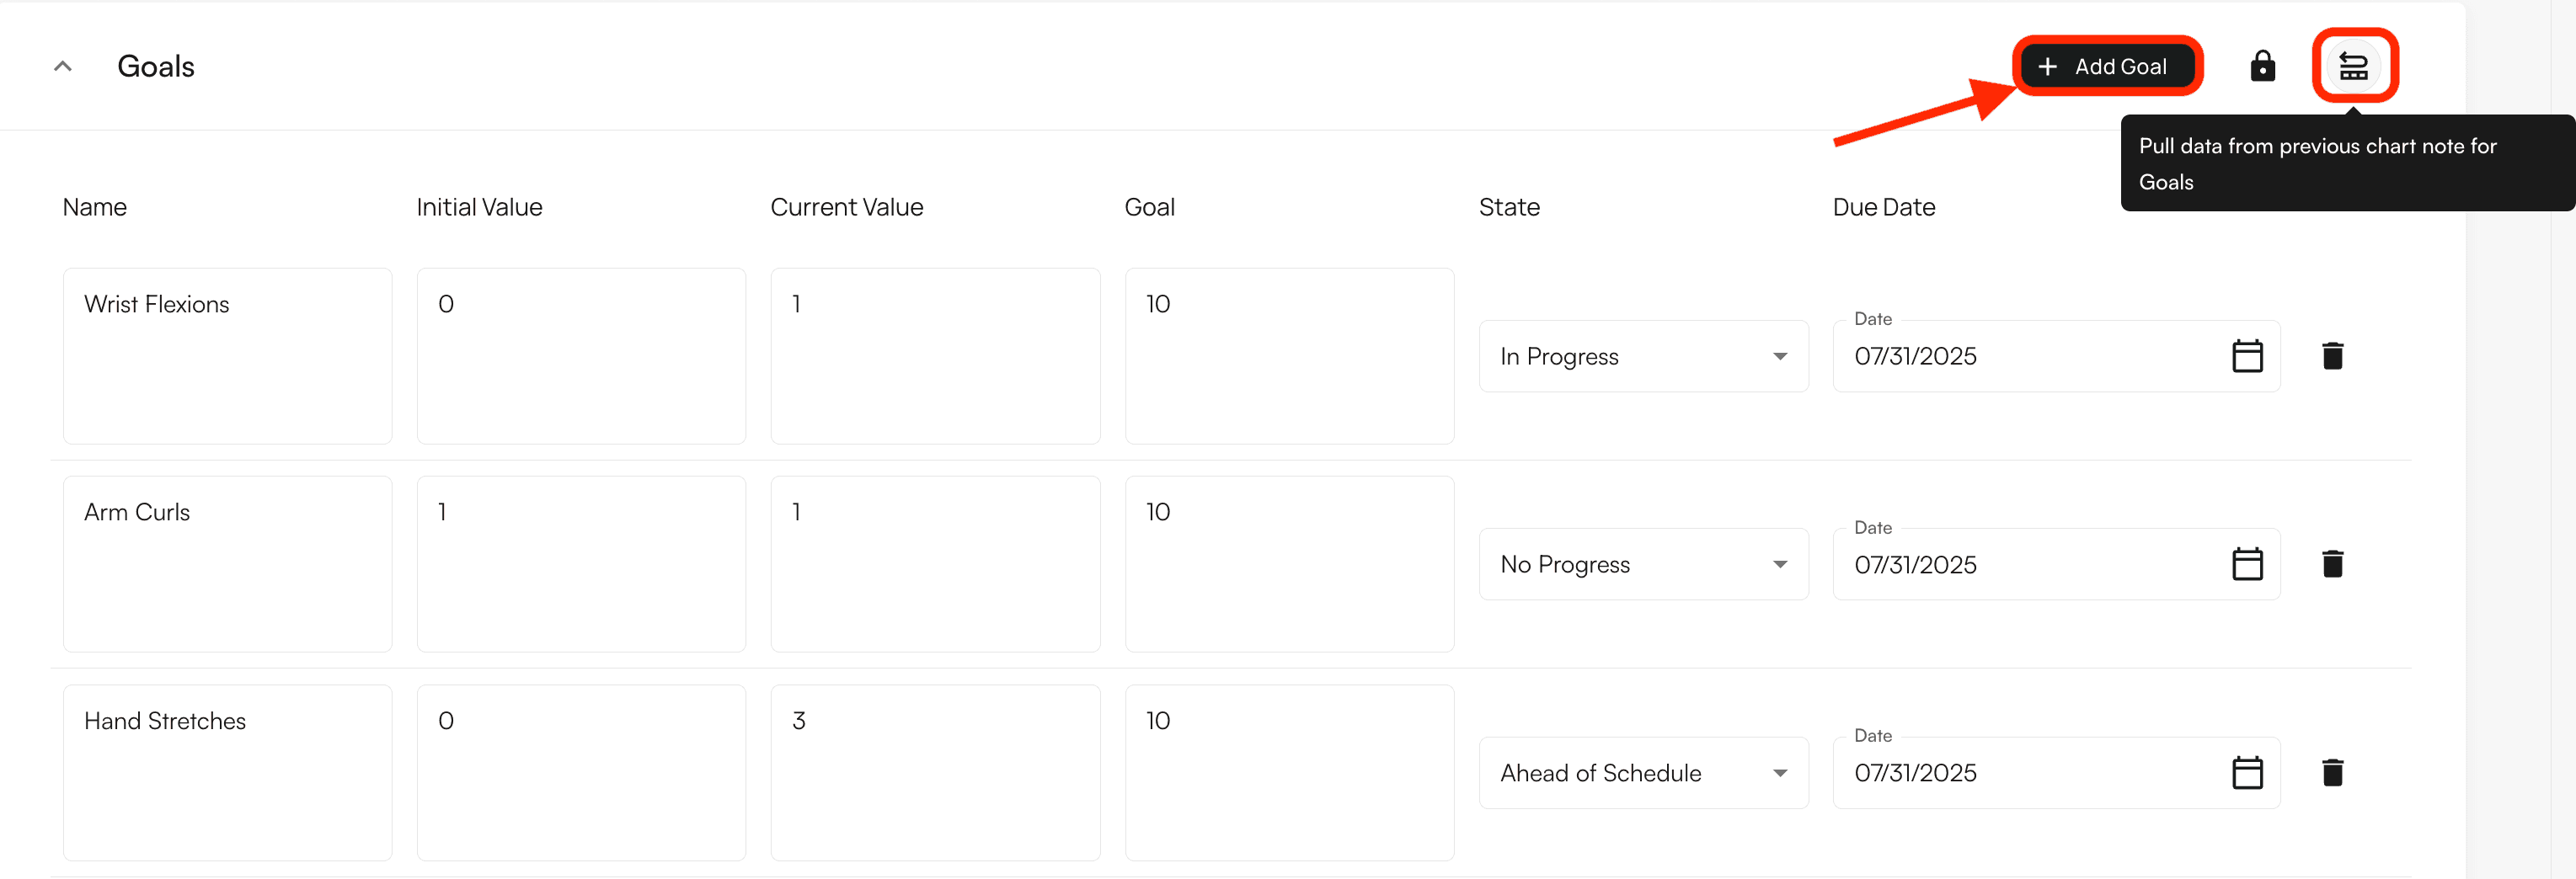 A window opens where you can input goal information. Enter the details and click **Add Goal** at the bottom of the window.
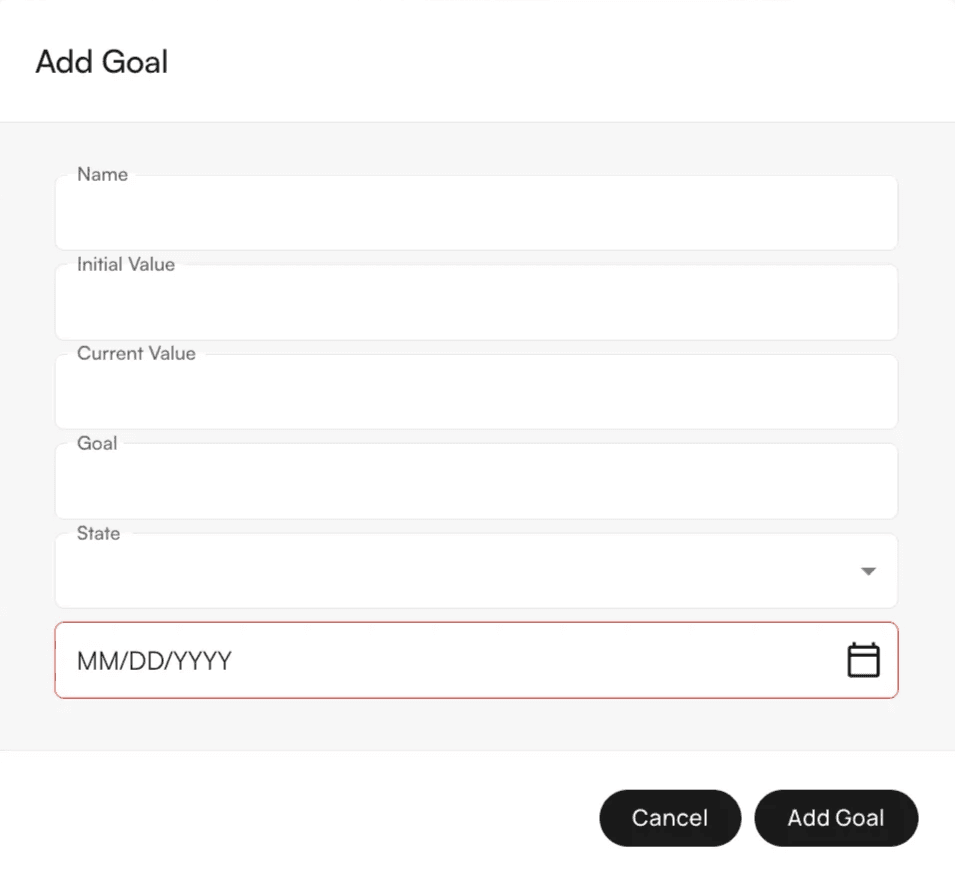 The goal appears in the Goals section of your chart note.
Scribe can automatically detect goals from your transcription and extract values and specifications, reducing manual data entry.
## Create a Plan of Care
The Plan of Care defines treatment frequency, duration, and visit count for the patient, ensuring accurate documentation of the treatment plan. This differs from goals (which define objectives) and measurements (which capture current status) by specifying the treatment schedule and timeline.
The goal appears in the Goals section of your chart note.
Scribe can automatically detect goals from your transcription and extract values and specifications, reducing manual data entry.
## Create a Plan of Care
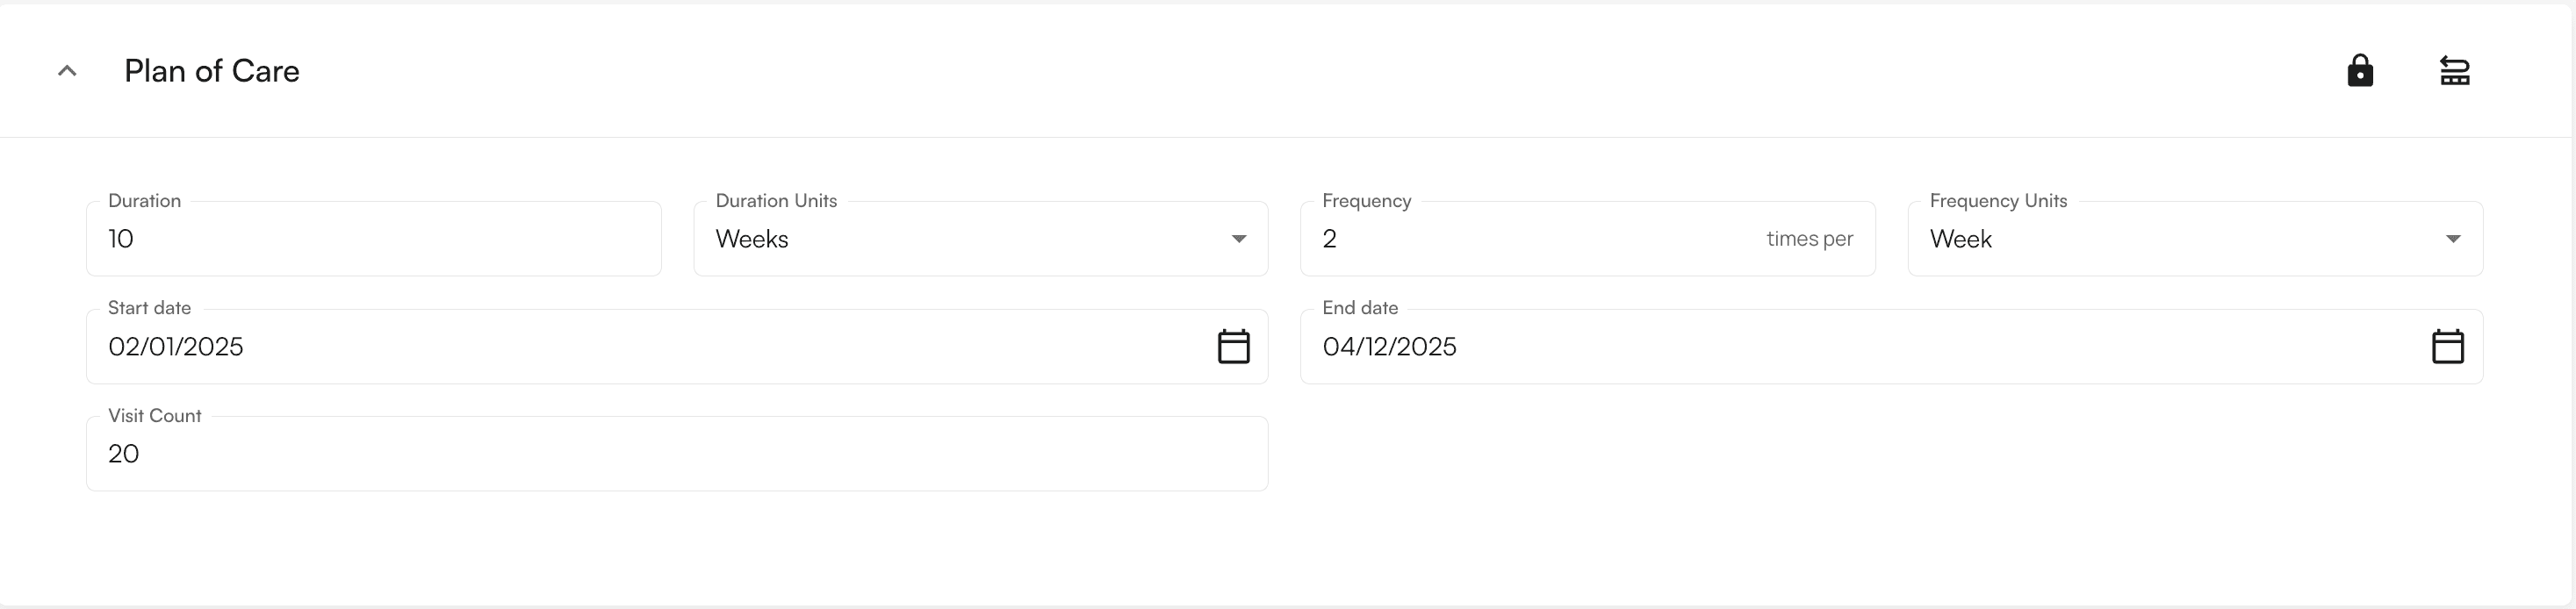
The Plan of Care defines treatment frequency, duration, and visit count for the patient, ensuring accurate documentation of the treatment plan. This differs from goals (which define objectives) and measurements (which capture current status) by specifying the treatment schedule and timeline.
 ### Plan of Care fields
When selecting Plan of Care, you'll be prompted to input:
* **Start Date** - When treatment begins
* **End Date** - When treatment concludes
* **Frequency + Units** - How often treatment occurs
* **Duration + Units** - Length of treatment period
* **Visit Count** - Total number of visits
You don't need to fill all fields manually. If you enter duration + units, frequency + units, and start date, the system auto-populates the end date and visit count. You can override these values if needed.
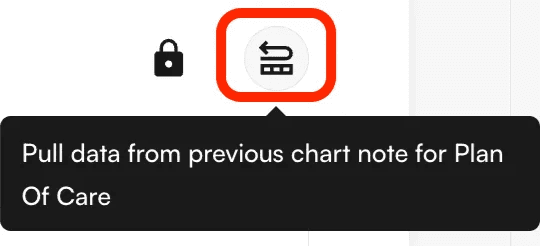
Click the curled arrow icon to pull Plan of Care data from the previous chart note, saving time on follow-up visits.
### Plan of Care fields
When selecting Plan of Care, you'll be prompted to input:
* **Start Date** - When treatment begins
* **End Date** - When treatment concludes
* **Frequency + Units** - How often treatment occurs
* **Duration + Units** - Length of treatment period
* **Visit Count** - Total number of visits
You don't need to fill all fields manually. If you enter duration + units, frequency + units, and start date, the system auto-populates the end date and visit count. You can override these values if needed.
Click the curled arrow icon to pull Plan of Care data from the previous chart note, saving time on follow-up visits.
 ## Create Home Exercise Programs (HEP)
Create home exercise programs by selecting interventions marked as `HEP`. This feature helps you provide patients with clear exercise instructions they can reference at home, improving patient compliance and outcomes.
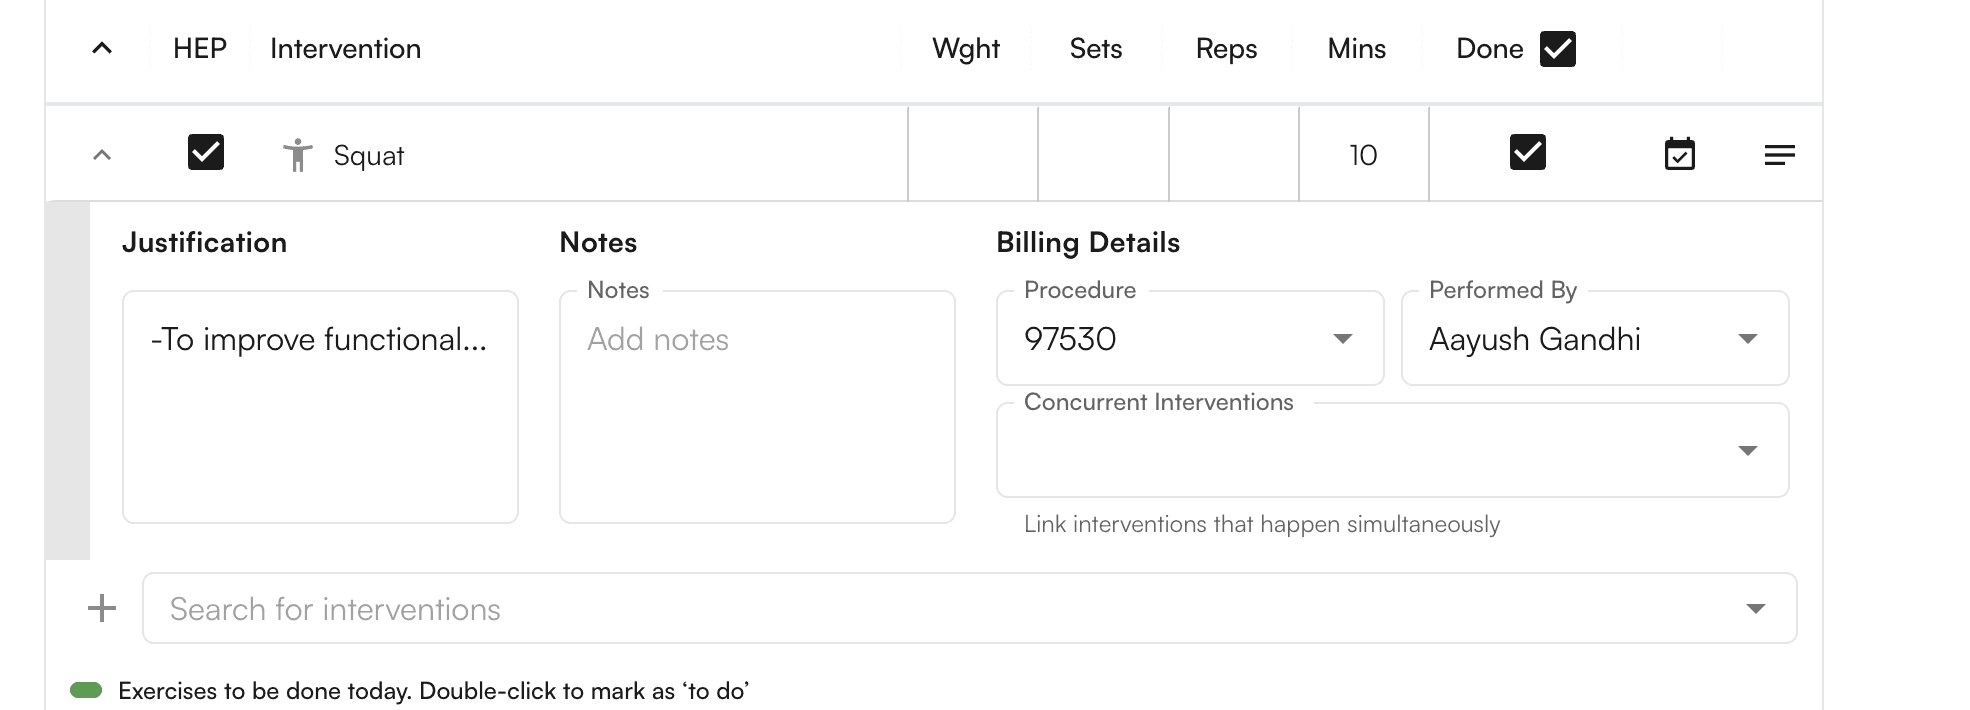
Click the checkbox for any intervention marked as `HEP`. This adds it to a staging area where you can prepare the Home Exercise Program.
## Create Home Exercise Programs (HEP)
Create home exercise programs by selecting interventions marked as `HEP`. This feature helps you provide patients with clear exercise instructions they can reference at home, improving patient compliance and outcomes.
Click the checkbox for any intervention marked as `HEP`. This adds it to a staging area where you can prepare the Home Exercise Program.
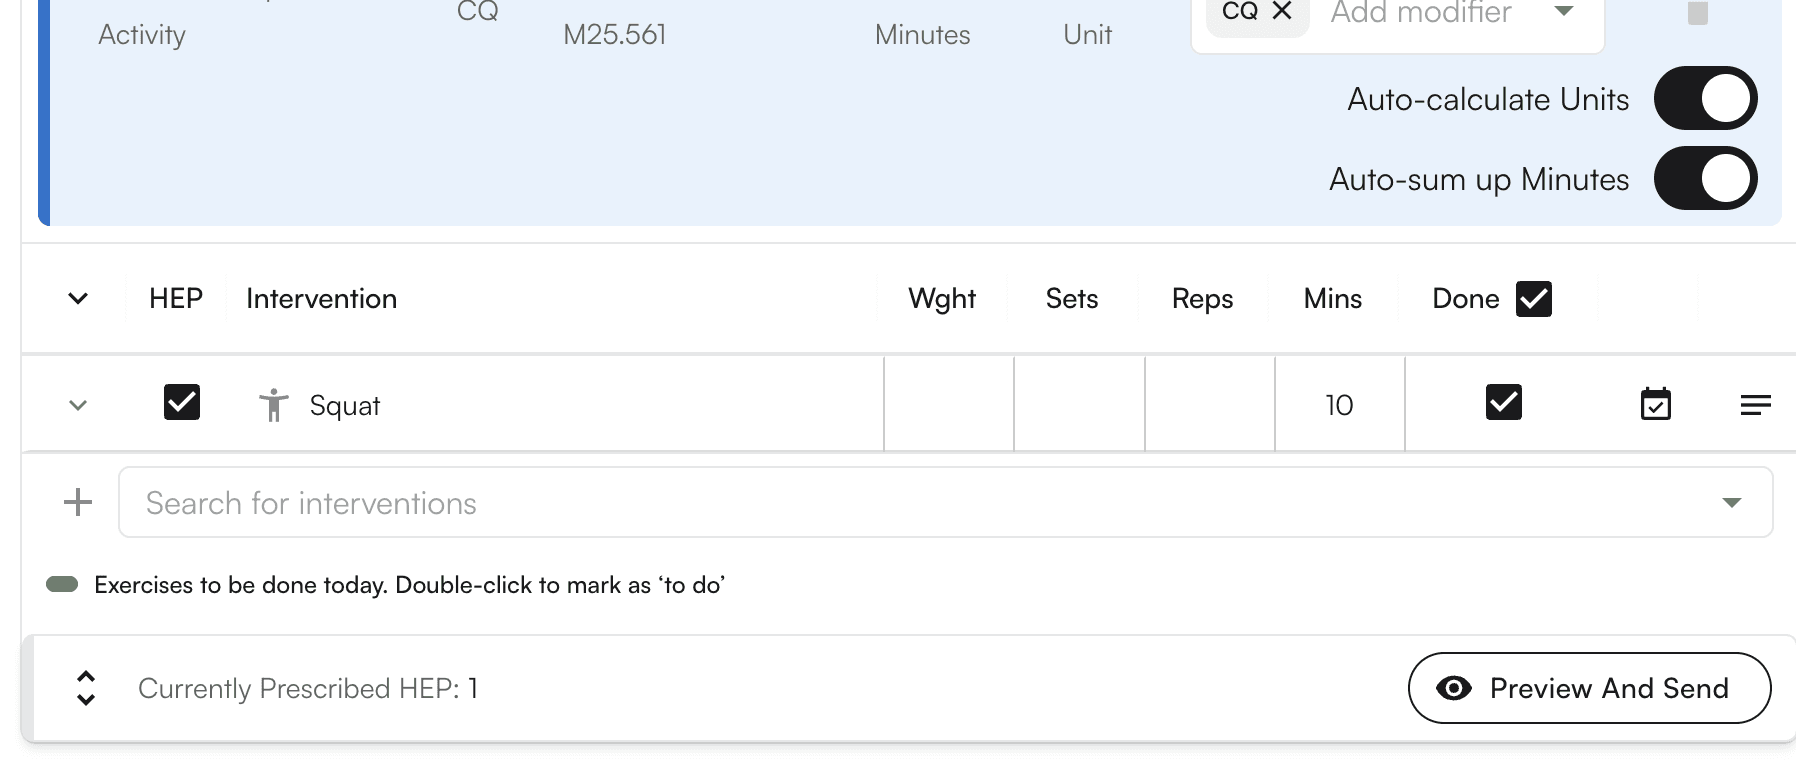 Click the caret for HEP to open a dropdown where you can assign additional notes to the HEP section on a per-intervention basis.
 Click **Preview and Send** to email, text, or print the PDF of the Home Exercise Program.
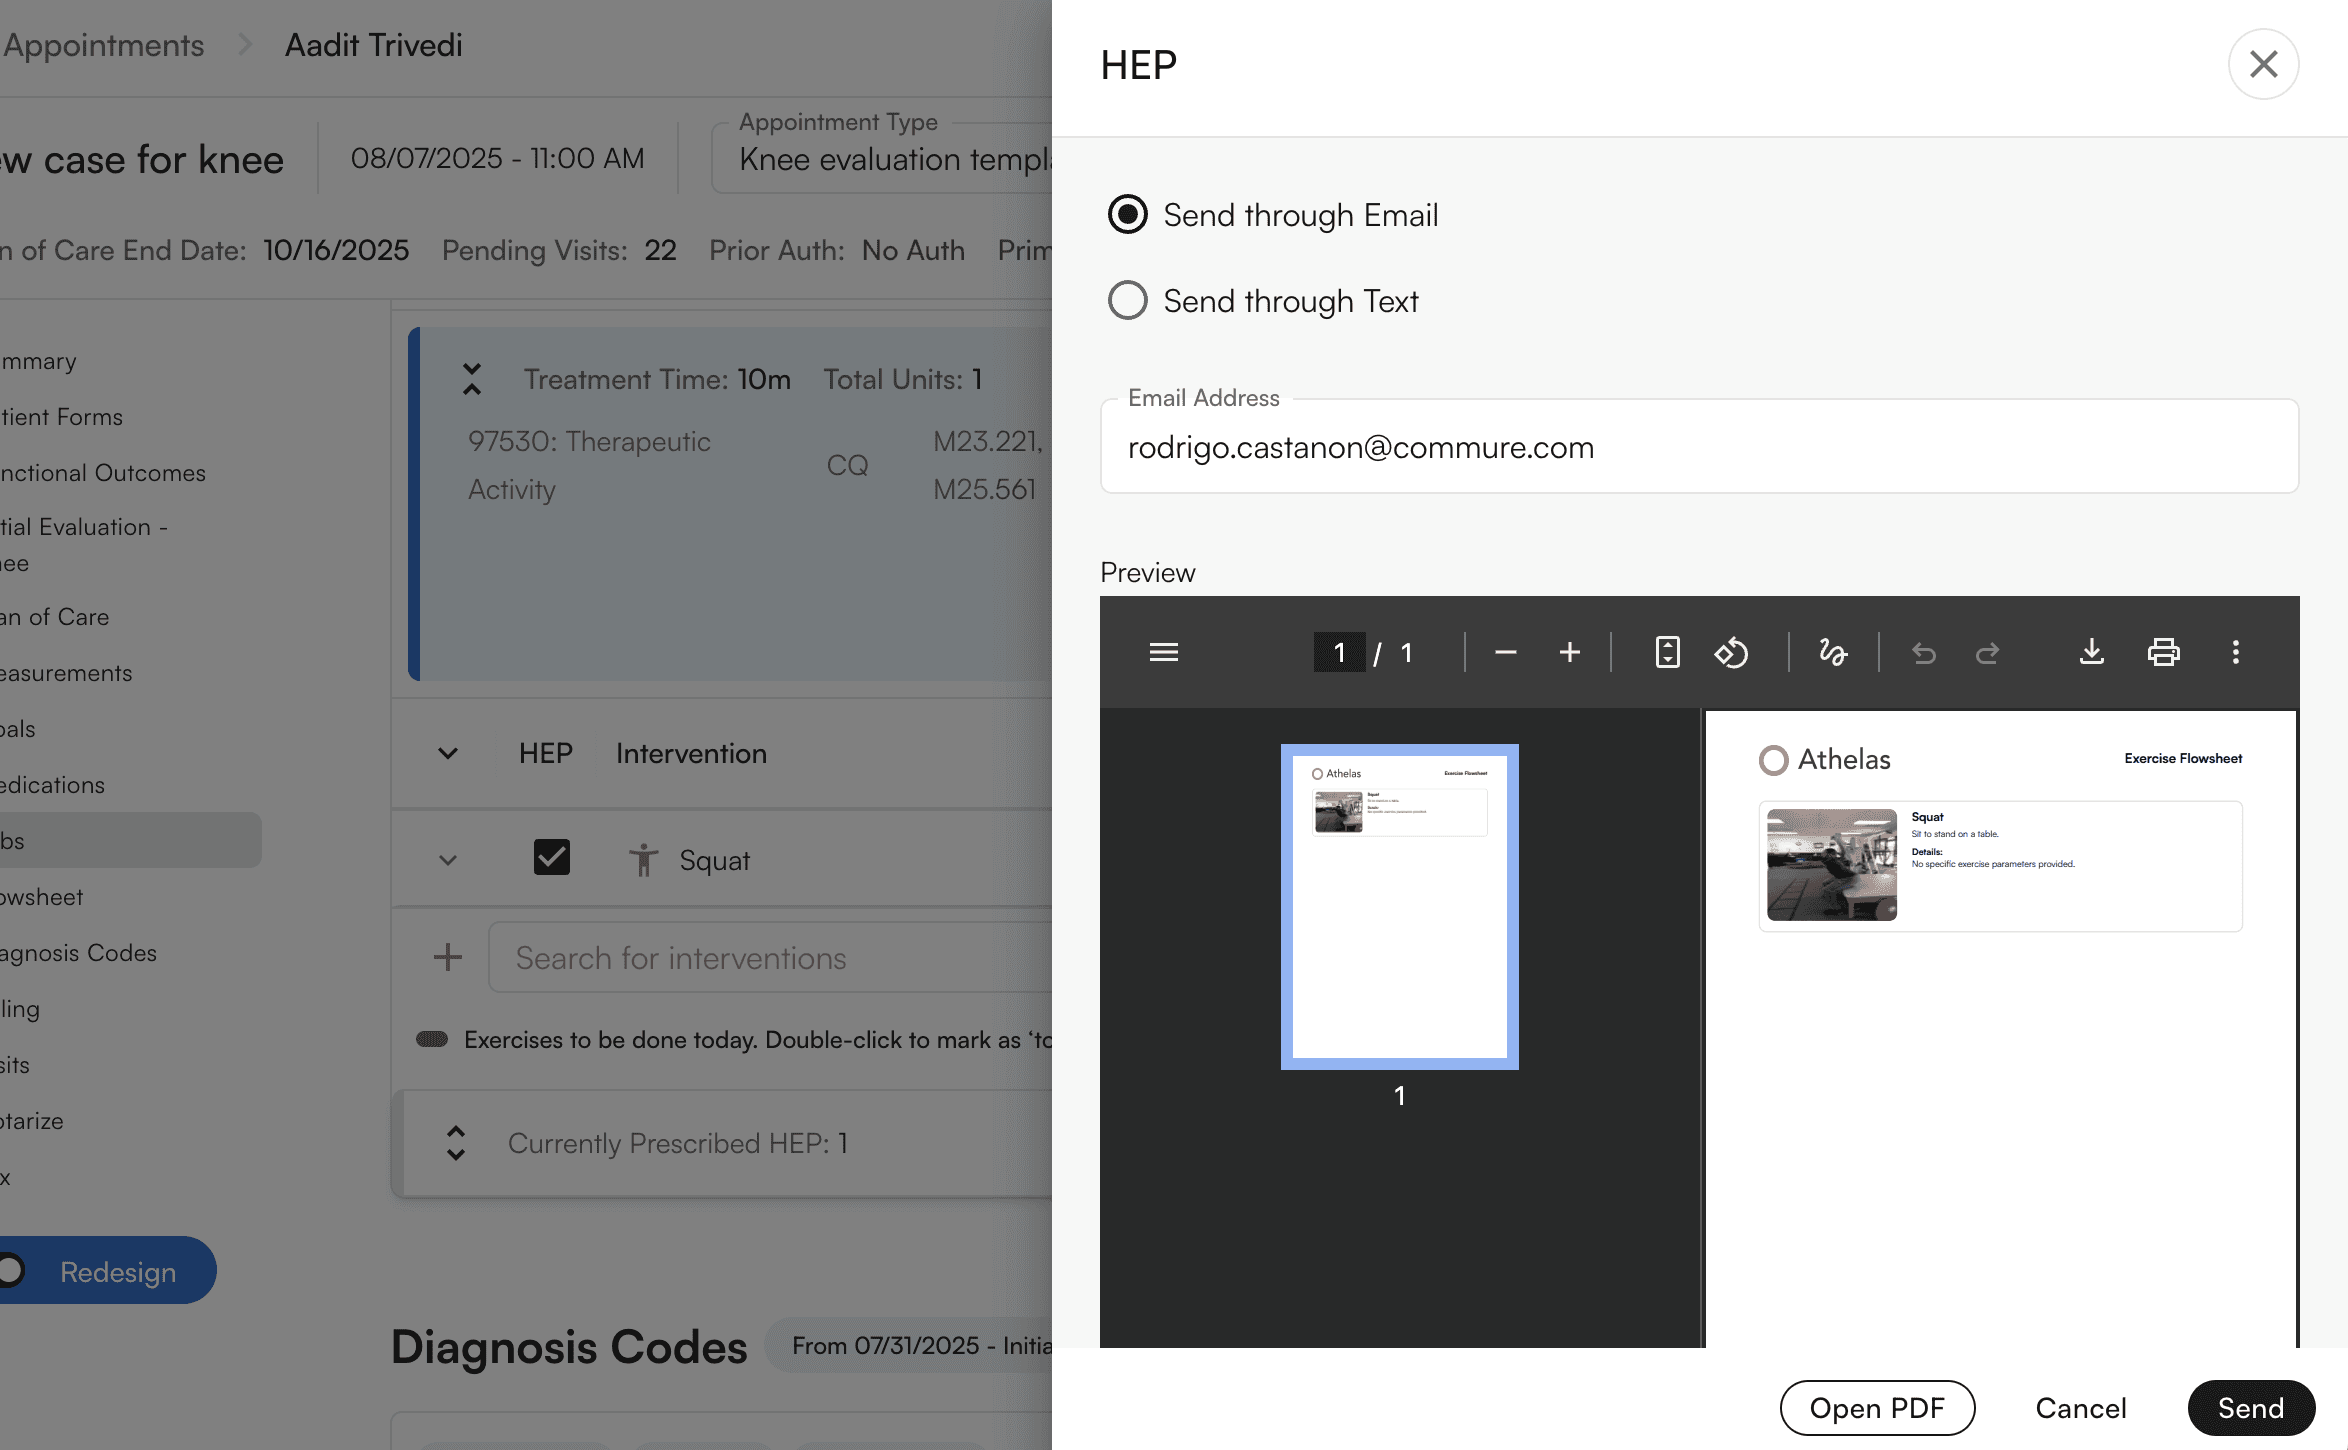 The patient receives the Home Exercise Program via their preferred method (email, text, or print).
## Document with templates
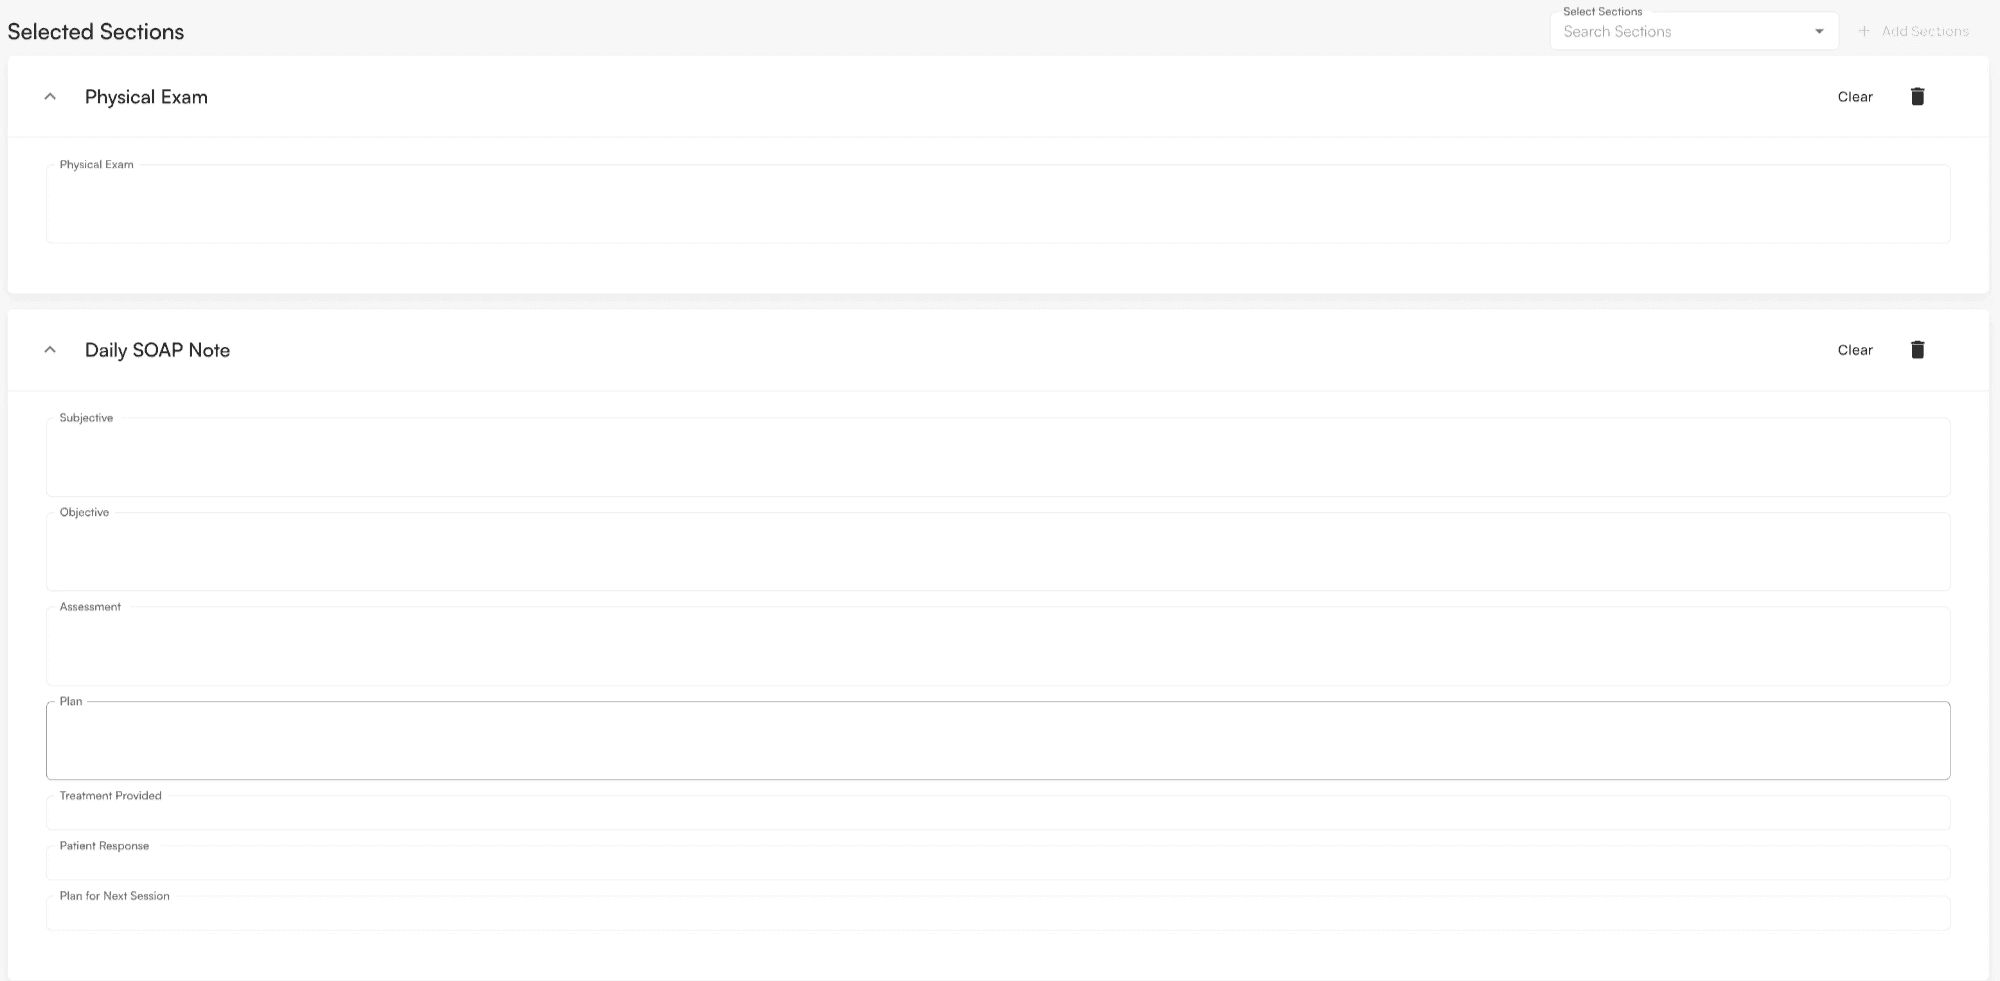
Templates are your primary tool for documenting information during patient encounters. They include SOAP notes, initial evaluations, and other specialized fields categorized under **Selected Sections**, helping you maintain consistent documentation standards. Unlike free-form notes, templates provide structure that ensures all required information is captured.
The patient receives the Home Exercise Program via their preferred method (email, text, or print).
## Document with templates
Templates are your primary tool for documenting information during patient encounters. They include SOAP notes, initial evaluations, and other specialized fields categorized under **Selected Sections**, helping you maintain consistent documentation standards. Unlike free-form notes, templates provide structure that ensures all required information is captured.
 ### Template features
Templates support Scribe input, allowing you to dictate directly into template fields, which speeds up documentation while maintaining structure.
### Clear template content
Click **Clear** in the top right corner of the template section to remove all information from the template.
### Template features
Templates support Scribe input, allowing you to dictate directly into template fields, which speeds up documentation while maintaining structure.
### Clear template content
Click **Clear** in the top right corner of the template section to remove all information from the template.
 A warning popup appears to confirm you want to delete the template contents. This prevents accidental data loss.
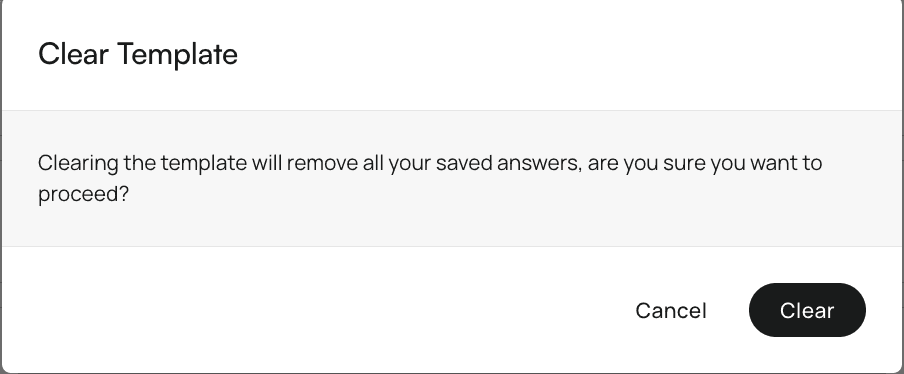 The template content is cleared and you can start fresh.
### Delete templates
Click the trash icon to delete the template entirely. This is useful if you no longer need the section or accidentally added a template.
The template content is cleared and you can start fresh.
### Delete templates
Click the trash icon to delete the template entirely. This is useful if you no longer need the section or accidentally added a template.
 A warning popup appears to confirm you want to delete the entire template.
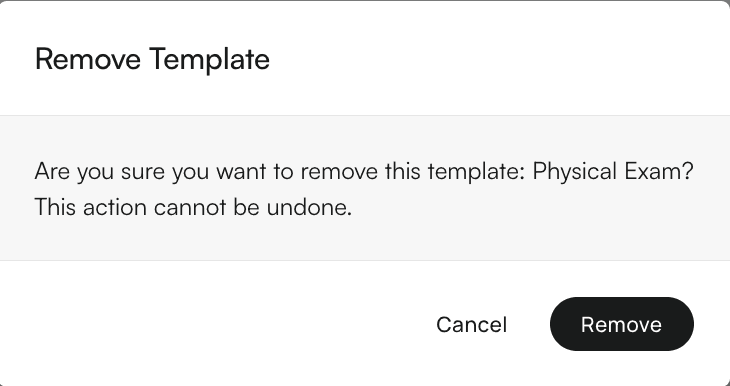 The template is removed from your chart note.
## Track compliance with checkmarks
Compliance checkmarks track specific details that must be captured within the chart note, helping you ensure complete documentation. They can be configured for any template in the EHR. Unlike templates which provide structure, compliance checkmarks verify that required information is actually filled in.
The template is removed from your chart note.
## Track compliance with checkmarks
Compliance checkmarks track specific details that must be captured within the chart note, helping you ensure complete documentation. They can be configured for any template in the EHR. Unlike templates which provide structure, compliance checkmarks verify that required information is actually filled in.
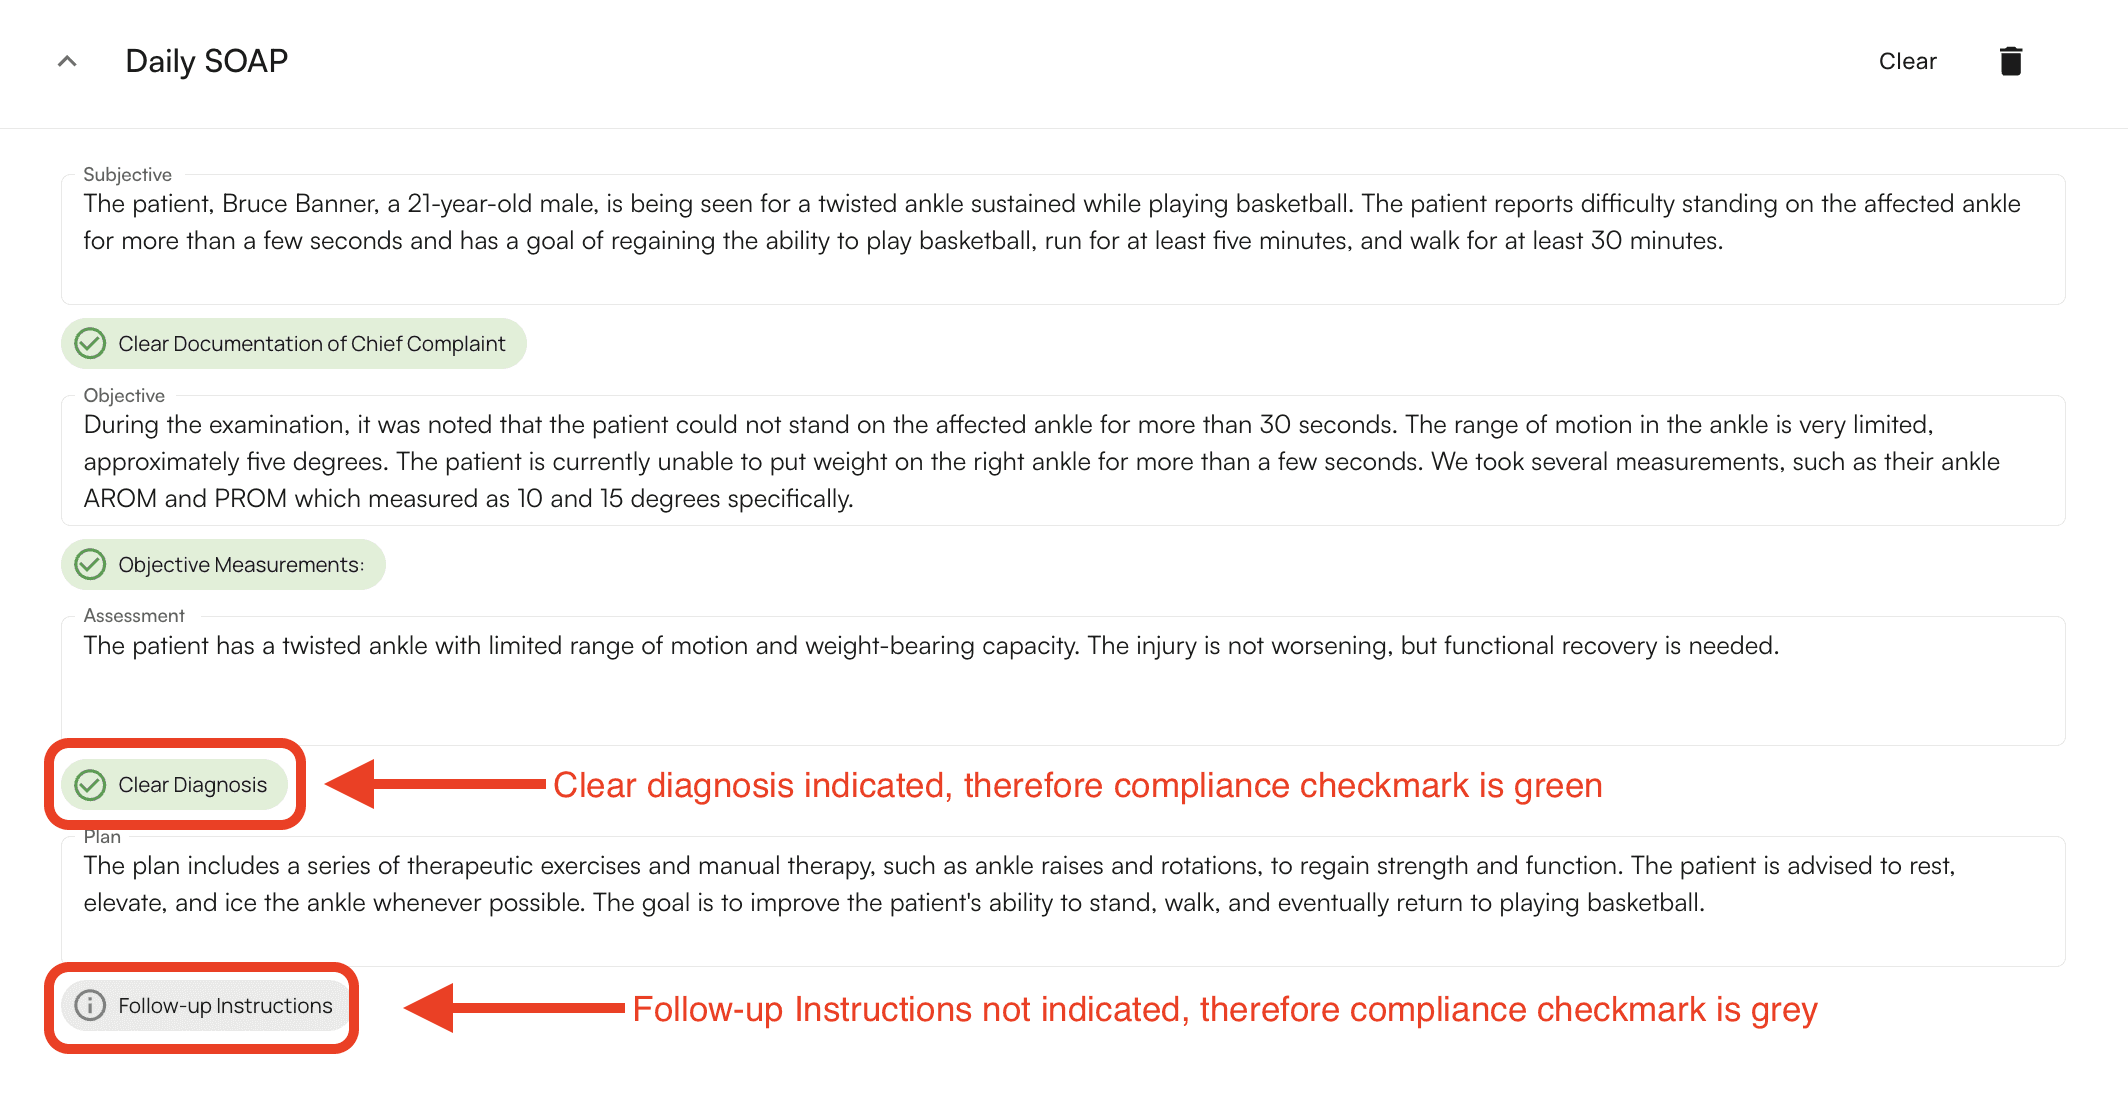 ### How compliance checkmarks work
* **Grey checkmark** - The required detail has not been captured
* **Green checkmark** - The required detail has been captured
You can complete compliance checkmarks by either typing information directly or using Scribe.
## Add treatments and CPT codes
Select treatments according to their corresponding CPT codes to ensure accurate billing and documentation of services provided. Treatments differ from interventions (which are exercises or procedures) by being tied to specific billing codes.
### How compliance checkmarks work
* **Grey checkmark** - The required detail has not been captured
* **Green checkmark** - The required detail has been captured
You can complete compliance checkmarks by either typing information directly or using Scribe.
## Add treatments and CPT codes
Select treatments according to their corresponding CPT codes to ensure accurate billing and documentation of services provided. Treatments differ from interventions (which are exercises or procedures) by being tied to specific billing codes.
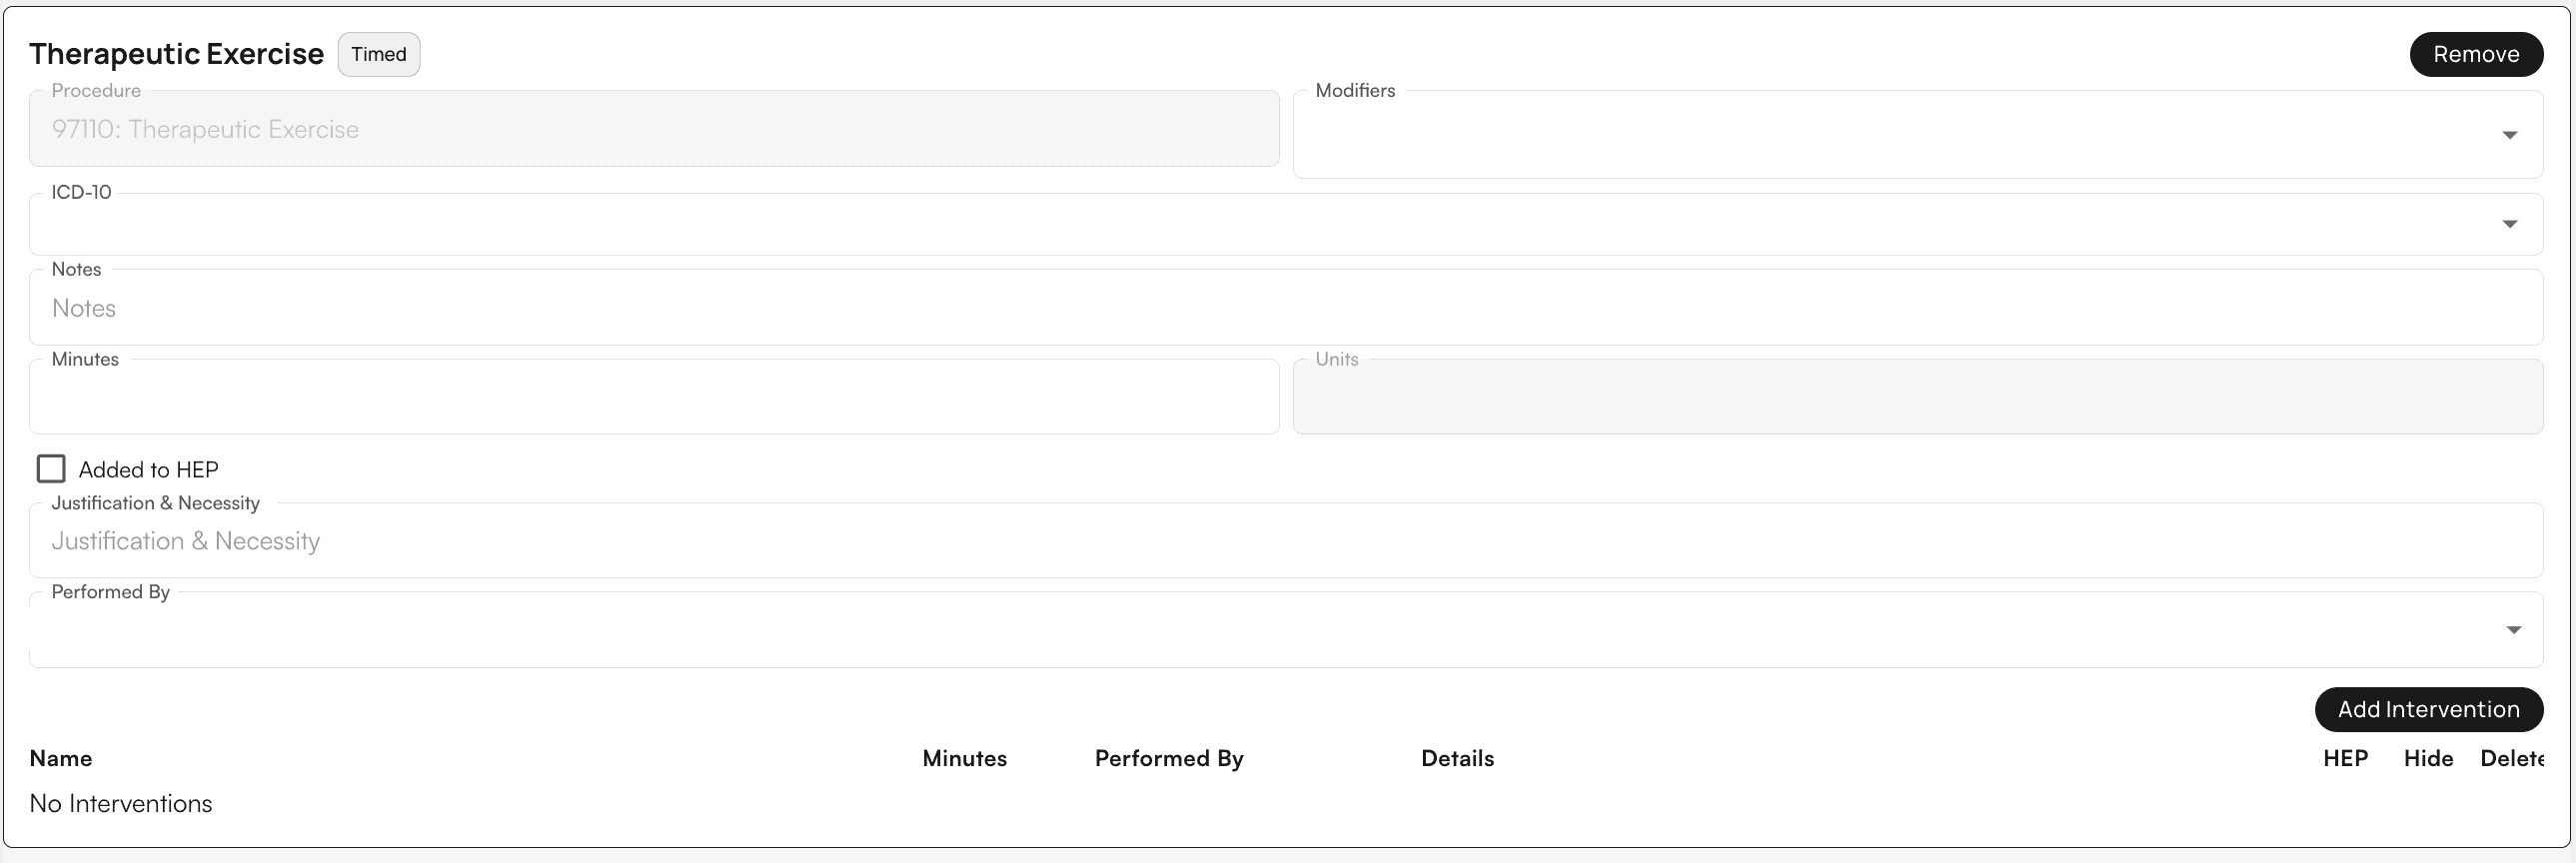 ### Treatment features
* **Add Interventions** - Specify exercises associated with the given treatment
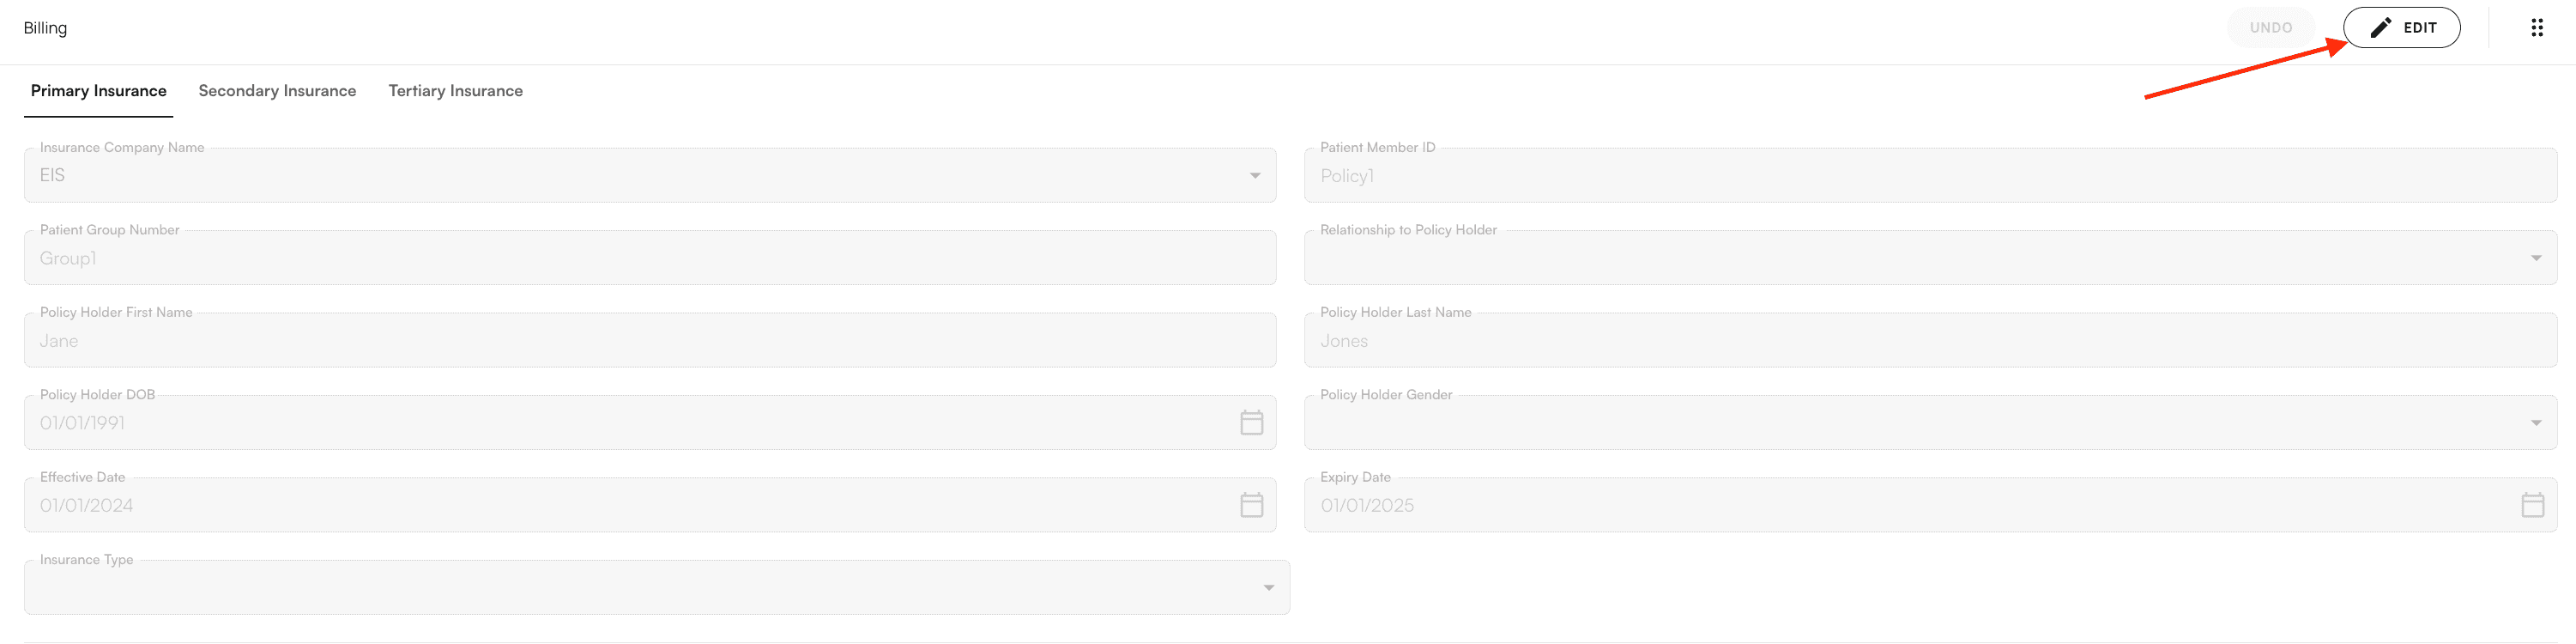
* **Edit Billing** - Click **Edit** under the billing section to modify insurance priority and billing information
### Treatment features
* **Add Interventions** - Specify exercises associated with the given treatment
* **Edit Billing** - Click **Edit** under the billing section to modify insurance priority and billing information
 ### Add co-signers
Navigate to the **Additional Providers** section and select providers from the dropdown menu to co-sign the note.
### Add co-signers
Navigate to the **Additional Providers** section and select providers from the dropdown menu to co-sign the note.
 The provider is added to the co-signer list.
To fax the encounter to a referring provider for co-signature:
1. Select their name in the dropdown menu
2. Enter their fax number
3. Ensure the **Request Signature** checkbox is selected
The fax request is configured and ready to send.
### Send to individual fax number
Use this method when you need to send a chart note to a specific fax number that isn't associated with a provider in the system.
Select **Send to individual fax number** and enter the fax number.
The provider is added to the co-signer list.
To fax the encounter to a referring provider for co-signature:
1. Select their name in the dropdown menu
2. Enter their fax number
3. Ensure the **Request Signature** checkbox is selected
The fax request is configured and ready to send.
### Send to individual fax number
Use this method when you need to send a chart note to a specific fax number that isn't associated with a provider in the system.
Select **Send to individual fax number** and enter the fax number.
 Click **Send Fax** after entering the fax number.
The fax is sent successfully to the specified number.
## Sign and submit the chart note
Complete the encounter by signing the note and submitting it as a claim. This finalizes your documentation and initiates the billing process.
Sign the note under the **Notarize** section.
Click **Send Fax** after entering the fax number.
The fax is sent successfully to the specified number.
## Sign and submit the chart note
Complete the encounter by signing the note and submitting it as a claim. This finalizes your documentation and initiates the billing process.
Sign the note under the **Notarize** section.
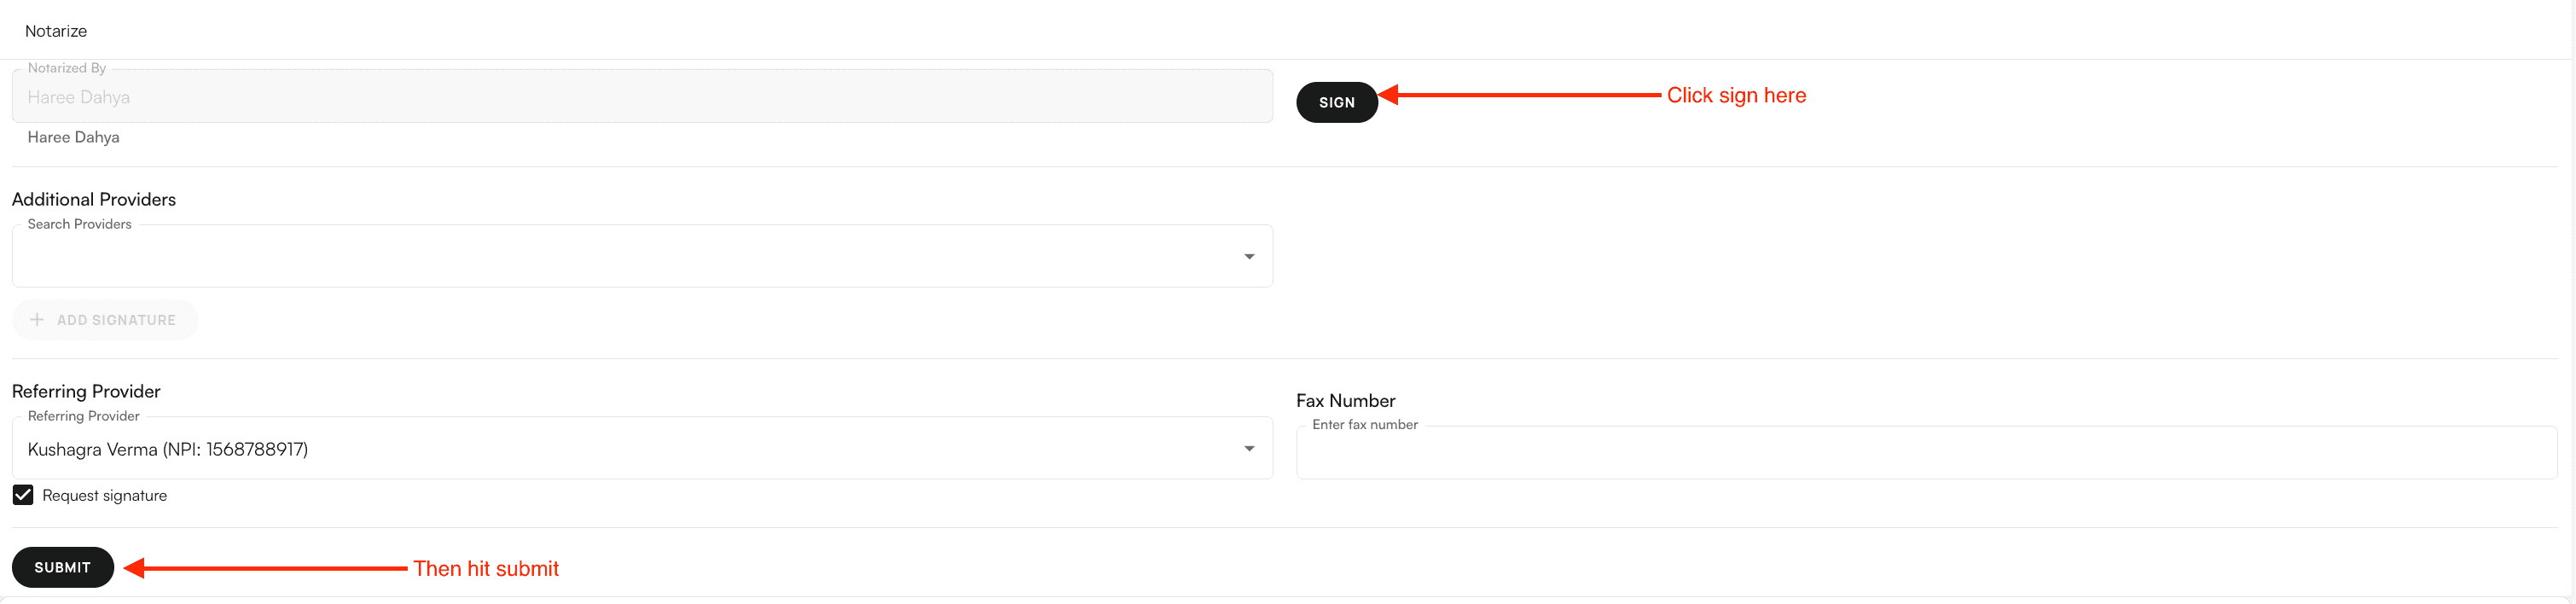 The note is signed and ready for submission.
Click **Submit** to close the encounter and submit it as a claim.
Your chart note is now complete and submitted. The encounter will be processed for billing.
## Troubleshooting
### Cannot check in appointment
**Problem:** You receive an error when trying to check in an appointment.
**Solution:** Ensure a Case is assigned to the appointment. If no case exists, add one via the dropdown menu or create a new case before checking in.
### Scribe not processing
**Problem:** The scribe processing takes longer than expected or fails.
**Solution:**
* Ensure your internet connection is stable
* Check that the recording uploaded successfully
* If processing fails, try recording again
* Contact support if the issue persists
### Cannot submit chart note
**Problem:** The Submit button is disabled or you cannot submit the chart note.
**Solution:**
* Verify all required fields are completed
* Check that compliance checkmarks are green (if applicable)
* Ensure the note is signed
* Review any error messages displayed
### Measurements not appearing
**Problem:** Expected measurements don't appear in the measurements list.
**Solution:**
* Verify the measurements are configured for your practice
* Check that you're looking in the correct category
* Contact your administrator if measurements should be available but aren't showing
## Frequently asked questions
Opening from an appointment is faster when you're working directly with your schedule. Opening from a patient profile is better when you need to review previous encounters or access notes for walk-in patients who may not have scheduled appointments.
Once a chart note is submitted, it becomes a claim and cannot be edited directly. You may need to work with your billing team to make adjustments if changes are required.
Scribe processing typically takes 2-5 minutes, depending on the length of your recording. You can close the window and continue with other tasks while it processes in the background.
Goals define what you and the patient aim to achieve (future objectives), while measurements capture the patient's current clinical status (present assessments). Both are important for tracking progress.
Yes, templates support Scribe input, allowing you to dictate directly into template fields. This speeds up documentation while maintaining the structured format templates provide.
Compliance checkmarks help ensure complete documentation. If a checkmark remains grey, your chart note may be incomplete. Review the requirements and fill in the missing information before submitting.
Your chart note is ready to submit when:
* All required fields are completed
* Compliance checkmarks are green (if applicable)
* The note is signed
* You've reviewed all sections for accuracy
The note is signed and ready for submission.
Click **Submit** to close the encounter and submit it as a claim.
Your chart note is now complete and submitted. The encounter will be processed for billing.
## Troubleshooting
### Cannot check in appointment
**Problem:** You receive an error when trying to check in an appointment.
**Solution:** Ensure a Case is assigned to the appointment. If no case exists, add one via the dropdown menu or create a new case before checking in.
### Scribe not processing
**Problem:** The scribe processing takes longer than expected or fails.
**Solution:**
* Ensure your internet connection is stable
* Check that the recording uploaded successfully
* If processing fails, try recording again
* Contact support if the issue persists
### Cannot submit chart note
**Problem:** The Submit button is disabled or you cannot submit the chart note.
**Solution:**
* Verify all required fields are completed
* Check that compliance checkmarks are green (if applicable)
* Ensure the note is signed
* Review any error messages displayed
### Measurements not appearing
**Problem:** Expected measurements don't appear in the measurements list.
**Solution:**
* Verify the measurements are configured for your practice
* Check that you're looking in the correct category
* Contact your administrator if measurements should be available but aren't showing
## Frequently asked questions
Opening from an appointment is faster when you're working directly with your schedule. Opening from a patient profile is better when you need to review previous encounters or access notes for walk-in patients who may not have scheduled appointments.
Once a chart note is submitted, it becomes a claim and cannot be edited directly. You may need to work with your billing team to make adjustments if changes are required.
Scribe processing typically takes 2-5 minutes, depending on the length of your recording. You can close the window and continue with other tasks while it processes in the background.
Goals define what you and the patient aim to achieve (future objectives), while measurements capture the patient's current clinical status (present assessments). Both are important for tracking progress.
Yes, templates support Scribe input, allowing you to dictate directly into template fields. This speeds up documentation while maintaining the structured format templates provide.
Compliance checkmarks help ensure complete documentation. If a checkmark remains grey, your chart note may be incomplete. Review the requirements and fill in the missing information before submitting.
Your chart note is ready to submit when:
* All required fields are completed
* Compliance checkmarks are green (if applicable)
* The note is signed
* You've reviewed all sections for accuracy