
Key concepts
Four pieces make up the feature:Accessing Scheduling Templates
There are two entry points. EHR Preferences → Calendar → Scheduling Templates — the full management view. Create, edit, duplicate, delete, and apply templates from here. Calendar — click the Scheduling Templates icon on the top-right calendar toolbar to open the drawer, where you can see what’s active and apply a template without leaving the calendar.Creating a template
- From EHR Preferences → Calendar → Scheduling Templates, click “+ Provider Schedule”. The Template Editor opens with a Sunday–Saturday week grid and a configuration panel on the right.
- Enter a title for the template. Give it a name your team will recognize later — “Main Office - Summer Schedule,” “PTA Standard Week,” “Holiday Coverage.”
- Select the facility or facilities and, optionally, the providers this template is intended for.
- Providers set here are prefilled automatically when you apply the template.
- Set My Availability — the start and end time for each day the provider works. The grid intervals update to match your site and facility calendar settings once availability is entered.
- Add slots by dragging on the week grid. Click any slot to configure it in the side panel:
- Title (required)
- Bookable or non-bookable
- Start and end time
- Days — If this slot repeats over multiple days of the week
- Facilities — when using multiple facilities, choose which ones this block applies to
- Color — how the block appears on the calendar
- Expire if vacant? — releases the slot’s restrictions a set number of hours before the appointment time, so unfilled protected slots can be used
- Required Appointment Types — which appointment types can be booked in this slot
- Notes — optional details for your team, on either bookable or non-bookable blocks
- Required Insurance Group — for bookable slots, select insurance companies or claim insurance types that can use the slot
- Refine the week with drag-and-drop, resize, and copy/paste. To delete a slot, select it and click Remove Block.
- Click Save in the top-right to add the template to your list for reuse, or click Apply to put the schedule on a provider’s calendar directly from the builder. You do not have to save it first. Use the back arrow next to the template title to return to the list.
Building a template with the AI Builder
Rather than placing every slot by hand, you can describe the schedule in plain language and let the assistant build it.- In the template editor, switch the right panel from the Manual tab to the AI Builder tab.
- Describe the schedule you want in the Ask Athelas box. For example: “Create a Monday–Friday schedule 9AM–5PM with a 30-minute lunch break and 40-minute appointment slots.”
- The assistant asks clarifying questions if it needs more detail, then proposes a set of changes and overlays a preview on the week grid.
- Review the proposed changes. Accept or reject each one individually, or use Accept All or Reject All. Accepted changes are merged into your unsaved draft.
- Click Save to persist the template.
Note: AI proposals only edit your unsaved draft. Nothing takes effect until you save the template and then apply it.
Applying Directly from the Builder
For a short-term change — a holiday week, a few days of coverage, or a different set of hours — you can build the schedule and apply it without adding another template to your list.- Create a schedule in the Template Editor, or open an existing template and make your changes. You can use either Manual or AI Builder.
- Click Apply next to Save in the top-right. This uses the schedule currently shown in the builder, including unsaved changes.
- Confirm the providers, Start Date, and optional End Date, then click Apply Schedule.
- If existing templates overlap your dates, review which ones to Keep or Replace (see Keeping Existing Templates When Applying a New Schedule).
- Review the confirmation and any conflict counts, then click Apply Schedule to finish.
Note: Save and Apply do different things. Apply updates the selected providers’ calendars. It does not add a new template to your saved list or update the saved template you started from. Save keeps your changes in the template list, but does not update calendars that already have a schedule applied.
Starting from an Existing Schedule
You can also use another saved schedule as your starting point without leaving the builder.- In the Manual panel, click Copy from an existing schedule.
- Select a schedule and review its facilities, availability, and blocks.
- Click Apply schedule, or Replace schedule if your draft already has hours or blocks.
Applying a Template to a Provider’s Calendar
Saving a template does not change anyone’s calendar. Only applying the template will update what displays on a provider’s calendar. To do this:- Open the Scheduling Templates drawer from the calendar toolbar, or navigate to the template in EHR Preferences.
- Select the template and click Apply. The Apply Schedule Template modal opens.
- Confirm the providers. Any providers set on the template are prefilled; you can add or remove them here.
- Set the Start Date. To bound the schedule, turn on Have schedule expire on specific date and set an End Date. Leave it off for an open-ended schedule.
- Click Apply Schedule to review the application. If the Overlapping schedules step appears, choose which existing templates to Keep or Replace, then click Continue.
- Review the confirmation message and any conflict counts. Click Apply Schedule to finish, or, when applying from the calendar with conflicts, choose Apply Only or Apply & View Conflicts.
Keeping Existing Templates When Applying a New Schedule
When changing a provider’s regular schedule, you may want to keep a holiday or out-of-office template that is already on the calendar. Where this option is enabled, the Overlapping schedules step lets you make that choice before applying.- Select your providers and dates, then click Apply Schedule.
- Review the overlapping templates. Each row shows the template name and the providers and dates it covers. Hover over +N more, if shown, to see additional schedules.
- Choose an action for each template:
- Keep — leaves that template on the calendar. The new schedule applies around its dates.
- Replace — replaces that template within the date range you are applying. This is the default.
- Click Continue. The confirmation shows which templates will be replaced, which will be kept, and any appointment or slot conflicts in the dates being changed.
- Confirm the application. You can use Back to change your choices before applying.
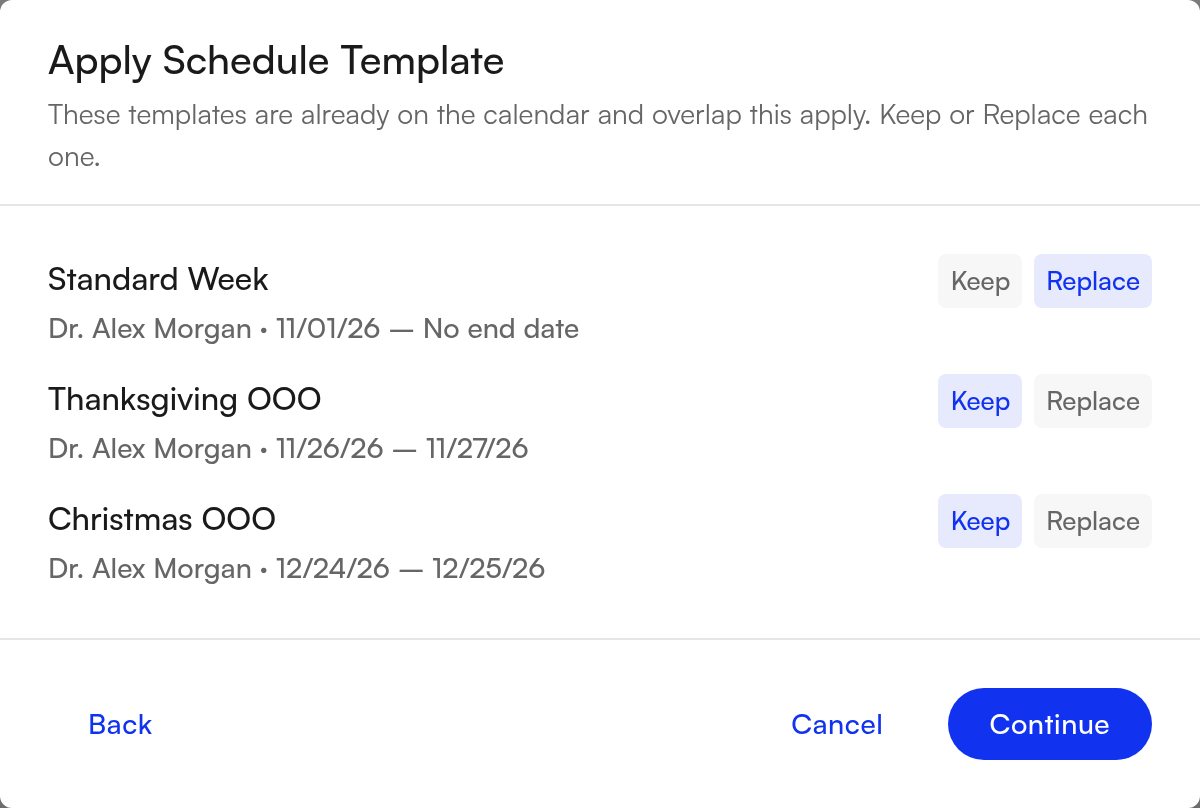
Keep applies to this application. It does not permanently protect a template from future changes. Review your choices each time you apply, especially when leaving the end date open. If the overlapping schedules step is not available, applying replaces existing template coverage within your selected range.
What happens to recurring template slots
Template-generated recurring slots (for example, weekly appointment slots) follow the same date range you apply. When a new apply overlaps an existing recurring series:- Occurrences inside the apply range are replaced by the new template’s slots, except where you chose to Keep an existing schedule.
- Occurrences before the apply range are preserved as a continuing series on the calendar.
- Occurrences after the apply range are also preserved. If the underlying applied schedule was split around your date range, the post-range portion stays linked to the surviving schedule after the gap.
Manual slots are not removed by apply. Apply overwrites template-generated slots and applied schedule coverage in the selected range. Slots you created directly on the calendar are left unchanged, even if they overlap the apply range. Booked appointments are also unchanged.
Managing templates
From Preferences → Calendar → Scheduling Templates you can:- Search and filter the template list by provider and by facility.
- Duplicate a template as the starting point for a variation.
- Edit a template. Changes affect future applies only, not schedules that have already been applied.
- Delete a template using the trash icon in its row.
Note: Deleting a template does not remove blocks that have already been placed on a calendar.
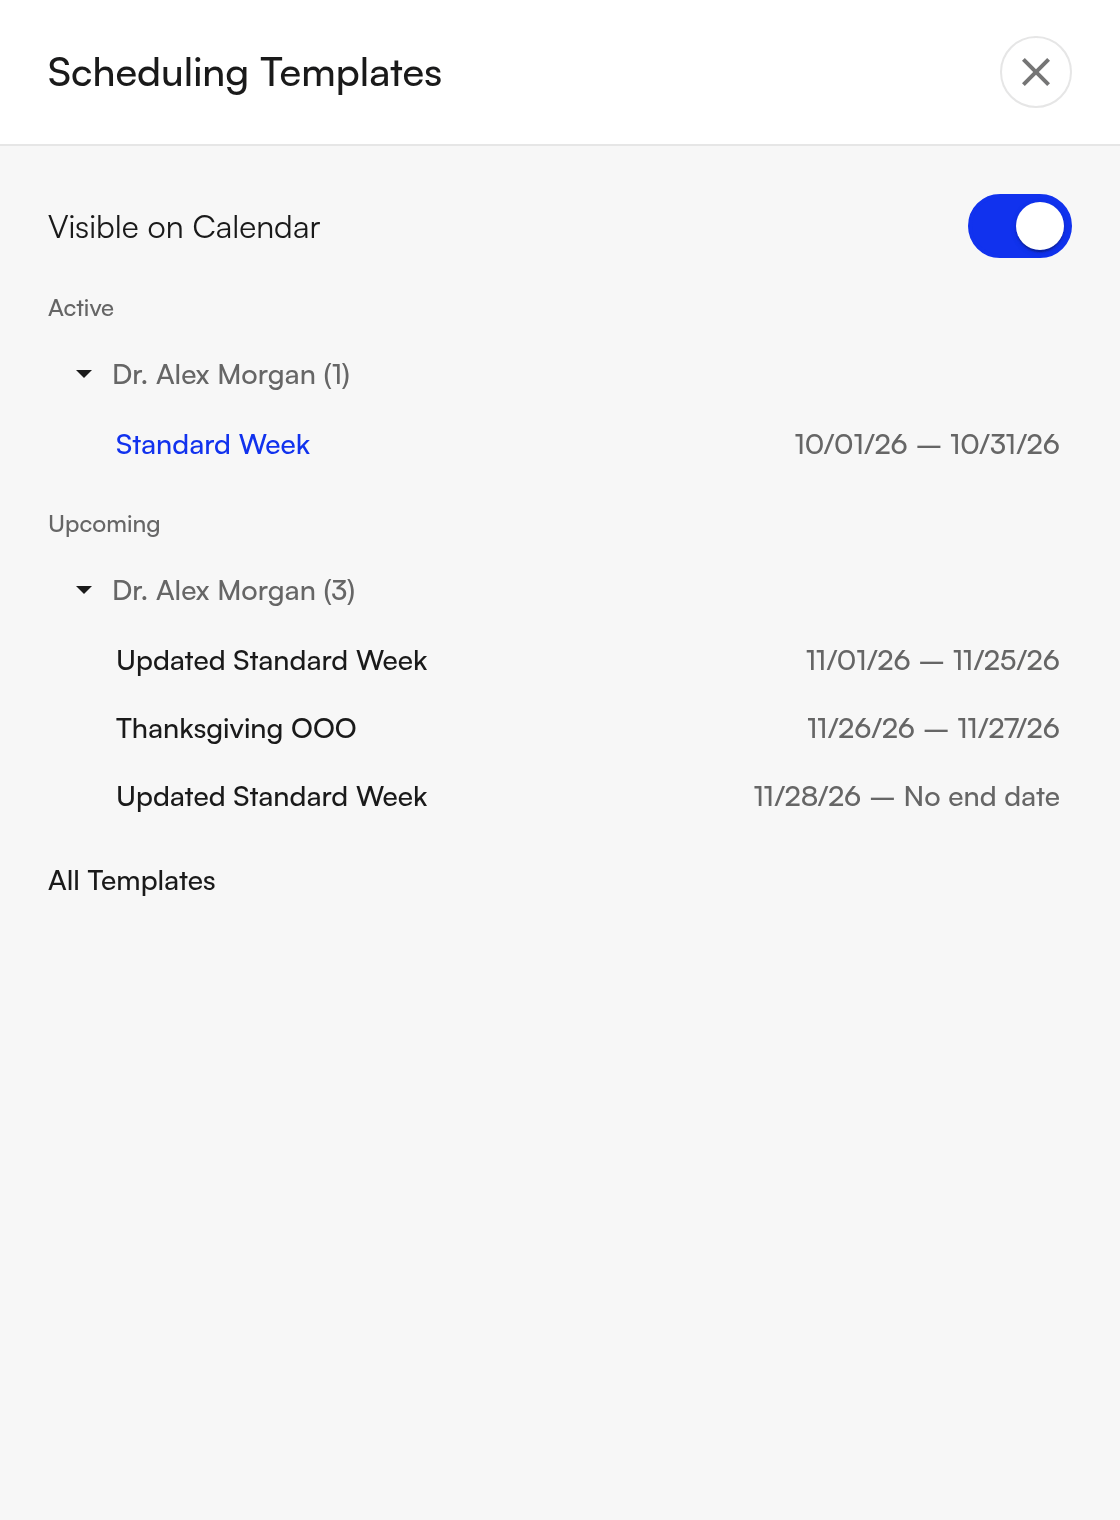
The Scheduling Templates drawer
Once a template is applied, it drives what the calendar shows. Open the drawer from the Scheduling Templates icon in the top-center of the calendar toolbar. It contains: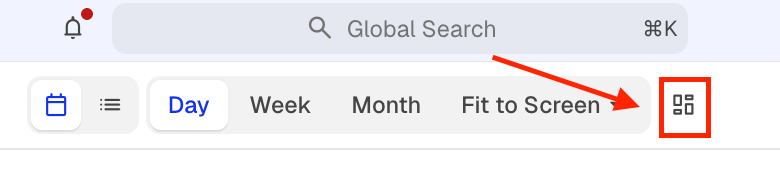
- Visible on Calendar — a toggle at the top that shows or hides template shading and blocks. Your preference is remembered.
- Active — schedules currently in effect, grouped by provider. Expand or collapse a provider’s name to see their applied schedules. The number beside the name is the number of schedule entries in that section. Shows No templates active when there are none.
- Upcoming — schedules that start in the future, also grouped by provider and ordered by start date. Hidden when empty.
- Schedule dates — each row shows the template name and its start and end dates, or No end date for an open-ended schedule. The same template can appear more than once when it has been applied for separate periods.
- Clear — hover over a schedule row to reveal this action. It opens the clear dialog for that provider and schedule.
- All Templates — a collapsible list of saved templates at the site, with search and provider and facility filters.
Clearing a Template from a Provider’s Calendar
Clearing removes a template from providers’ calendars over a date range. It can also cancel a template that is scheduled to start in the future. To do this:- Open the Scheduling Templates drawer from the calendar toolbar.
- Clearing is only available from the calendar, not EHR Preferences.
- Expand the provider under Active or Upcoming, hover over the schedule row you want to remove, and click Clear. The Clear Template modal opens, or Cancel Upcoming Template for a schedule that has not started yet.
- Confirm the provider shown. Clearing from a row targets that provider’s schedule; it does not select every provider who uses the same template.
- Set the Start Date. To clear a set period, turn on Have schedule expire on specific date and set an End Date. Leave it off to clear everything from the start date onward.
- Click Clear Schedule Template.
Clearing only removes that template’s schedule coverage and template-generated slots in the selected range. Manual slots, other templates, and booked appointments are unchanged. Appointments in cleared slots stay booked but may appear as conflicts (see Resolving Conflicts). Clearing does not restore the template that was there before. To put a schedule back, apply the desired template again.
Resolving Conflicts
Applying or clearing a template can leave existing appointments and slots out of step with the new schedule. These show up as conflicts. Conflicts never block an apply or clear; you can resolve them afterward.
- Slot conflicts: a manual slot falls within the applied or cleared date range.
- Appointment conflicts: a booked appointment no longer fits the schedule — for example, there is no available bookable slot, the available slots are already at capacity, or the appointment does not match the slot’s restrictions.
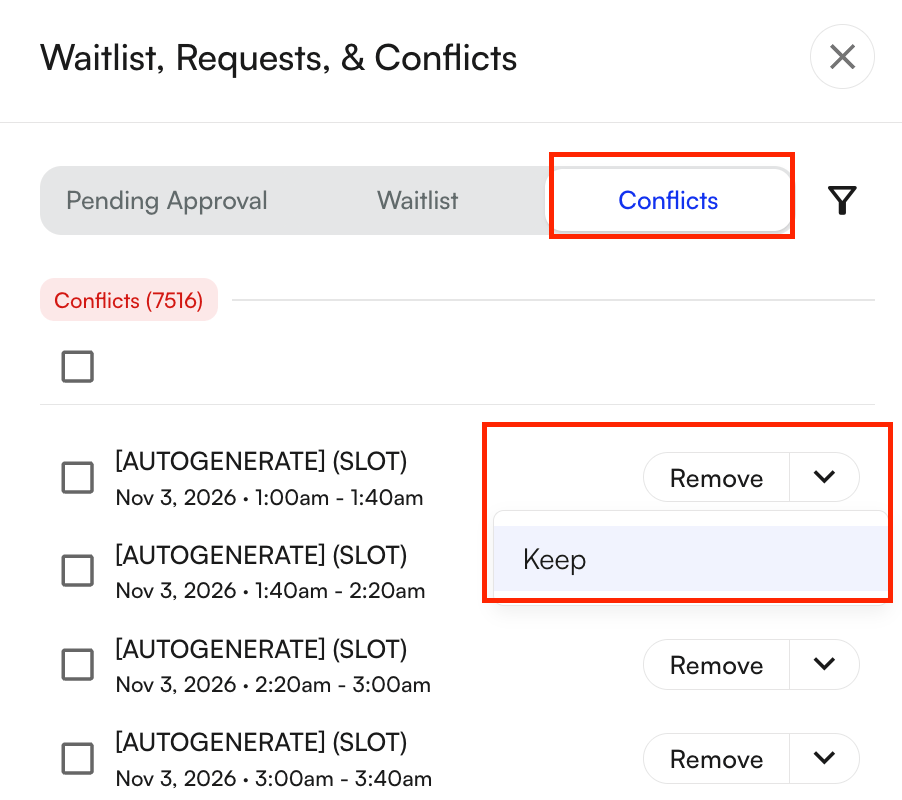
- Click the requests button in the calendar header and open the Conflicts tab.
- Filter by conflict type, provider, patient, or facility as needed. The list shows unresolved conflicts from today onward, with the earliest dates first. Scroll to load more.
- Review each row’s date, time, and details, then choose an action:
- Slots — click Remove to remove the manual slot, or open the action dropdown and choose Keep to leave it on the schedule and mark the conflict resolved.
- Appointments — click Reschedule to open the appointment on the calendar and choose a new time. Use the dropdown to Keep it as is, Cancel, or Archive it. You can also click the patient’s name to open their profile.
- To resolve several at once, select the rows and use the bulk actions at the top:
- Slots only — Keep or Delete.
- Appointments only — Keep or Cancel.
- Slots and appointments together — the action menu lets you keep all, delete the selected slots, or cancel the selected appointments.
- Review the confirmation before removing slots or canceling appointments.
Select all only selects the rows already loaded in the list. Scroll to load more conflicts before selecting additional rows. The Clear button in the bulk action bar clears your selection; it does not clear a template from the calendar.
Booking appointments on available slots
To book into a bookable slot, click the + in the center of the slot.- The New Appointment modal opens with the Appointment Type dropdown suggesting the types the slot allows.
- The appointment duration defaults to the appointment type’s configured duration, not the full length of the slot. If the appointment runs into the next slot and that slot permits the same type, the next slot is consumed as well. Otherwise the remaining time stays open and bookable.
Overlapping appointment logic
Each appointment type has an allow overlapping bookings setting, configured in the appointment type form — see Appointment Types. When it is disabled, that appointment type cannot be booked more than once at the same time for a provider, even if multiple slots are open in that window. Use this together with slot layout: side-by-side slots create the capacity, and the appointment type setting decides whether a given type is allowed to consume more than one of them.FAQ
How do I keep holiday or out-of-office schedules when changing regular hours?
How do I keep holiday or out-of-office schedules when changing regular hours?
Where the overlapping schedules step is enabled, choose Keep for those templates before confirming the new application. Leave Replace selected for the regular schedule you want to change. Review this each time you apply.
Does saving a template change any calendars?
Does saving a template change any calendars?
No. A saved template is only configuration. Nothing appears on a calendar until you apply it to specific providers and dates.
What happens to a template I edit after it has been applied?
What happens to a template I edit after it has been applied?
The edit affects future applies only. Schedules already generated from the earlier version stay as they are. To push the change out, re-apply the template to the relevant providers and date range.
Can a provider have two templates running at once?
Can a provider have two templates running at once?
No. One template is in effect per provider at any point in time. A newly applied template replaces the coverage for the range you select.
Can I still create one-off blocks manually?
Can I still create one-off blocks manually?
Yes. Individual slots can still be created and edited directly on the calendar, and a single occurrence of a recurring slot can be changed or removed without affecting the rest of the series.
What happens if the feature is turned off for my site?
What happens if the feature is turned off for my site?
The Scheduling Templates interface is hidden and the calendar returns to legacy Reserve Blocks and schedule blocks, with provider hours managed again from Provider Settings.
Can I apply a schedule without saving a template?
Can I apply a schedule without saving a template?
Yes. Click Apply in the builder to use the schedule currently shown, including unsaved changes. It updates the selected providers’ calendars without adding a template to your saved list. If you started from an existing template, that saved template stays as it was until you click Save.
Does clearing a template cancel appointmen
Does clearing a template cancel appointmen
No. Appointments stay booked. Any that no longer fit the schedule appear in the Conflicts window.
Do I have to resolve conflicts before applying a template?
Do I have to resolve conflicts before applying a template?
No. Applying always goes through, and you can resolve conflicts at any time afterward.