
What are order sets?
An order set is a reusable clinical order template. You save a group of orders with default values once, then apply that set with a single action when ordering for a patient. The system fills in every field, and you can still adjust any value for a specific patient before submitting. Order sets support the following order types:- Medications — Prescription medications with SIG, duration, quantity, and refills.
- Labs — Laboratory tests with priority and specimen details.
- Imaging — Radiology orders (X-rays, MRIs, CTs, etc.) with priority settings.
- DME (Durable Medical Equipment) — Equipment orders with quantity and diagnosis linking.
- Referrals — Specialist referrals with clinical reason and notes.
Benefits
- Save time — No need to re-enter the same order details every time you see a common condition.
- Reduce errors — Pre-set values reduce manual entry mistakes.
- Consistency — Common protocols (e.g., knee pain, back pain, post-op care) stay consistent across providers.
- Faster onboarding — New clinicians can use shared order sets from day one.
Order sets are site-specific: they exist only for your current clinic site and are shared among all providers at that site.
Where to find order sets
You can access order sets in two places:- Manage order sets (create, edit, archive): Go to Preferences → Order Sets in the left sidebar.
- Use order sets when ordering: Open a patient’s visit note, navigate to the Orders section, and click Add Order Set to apply an existing set.
Create an order set
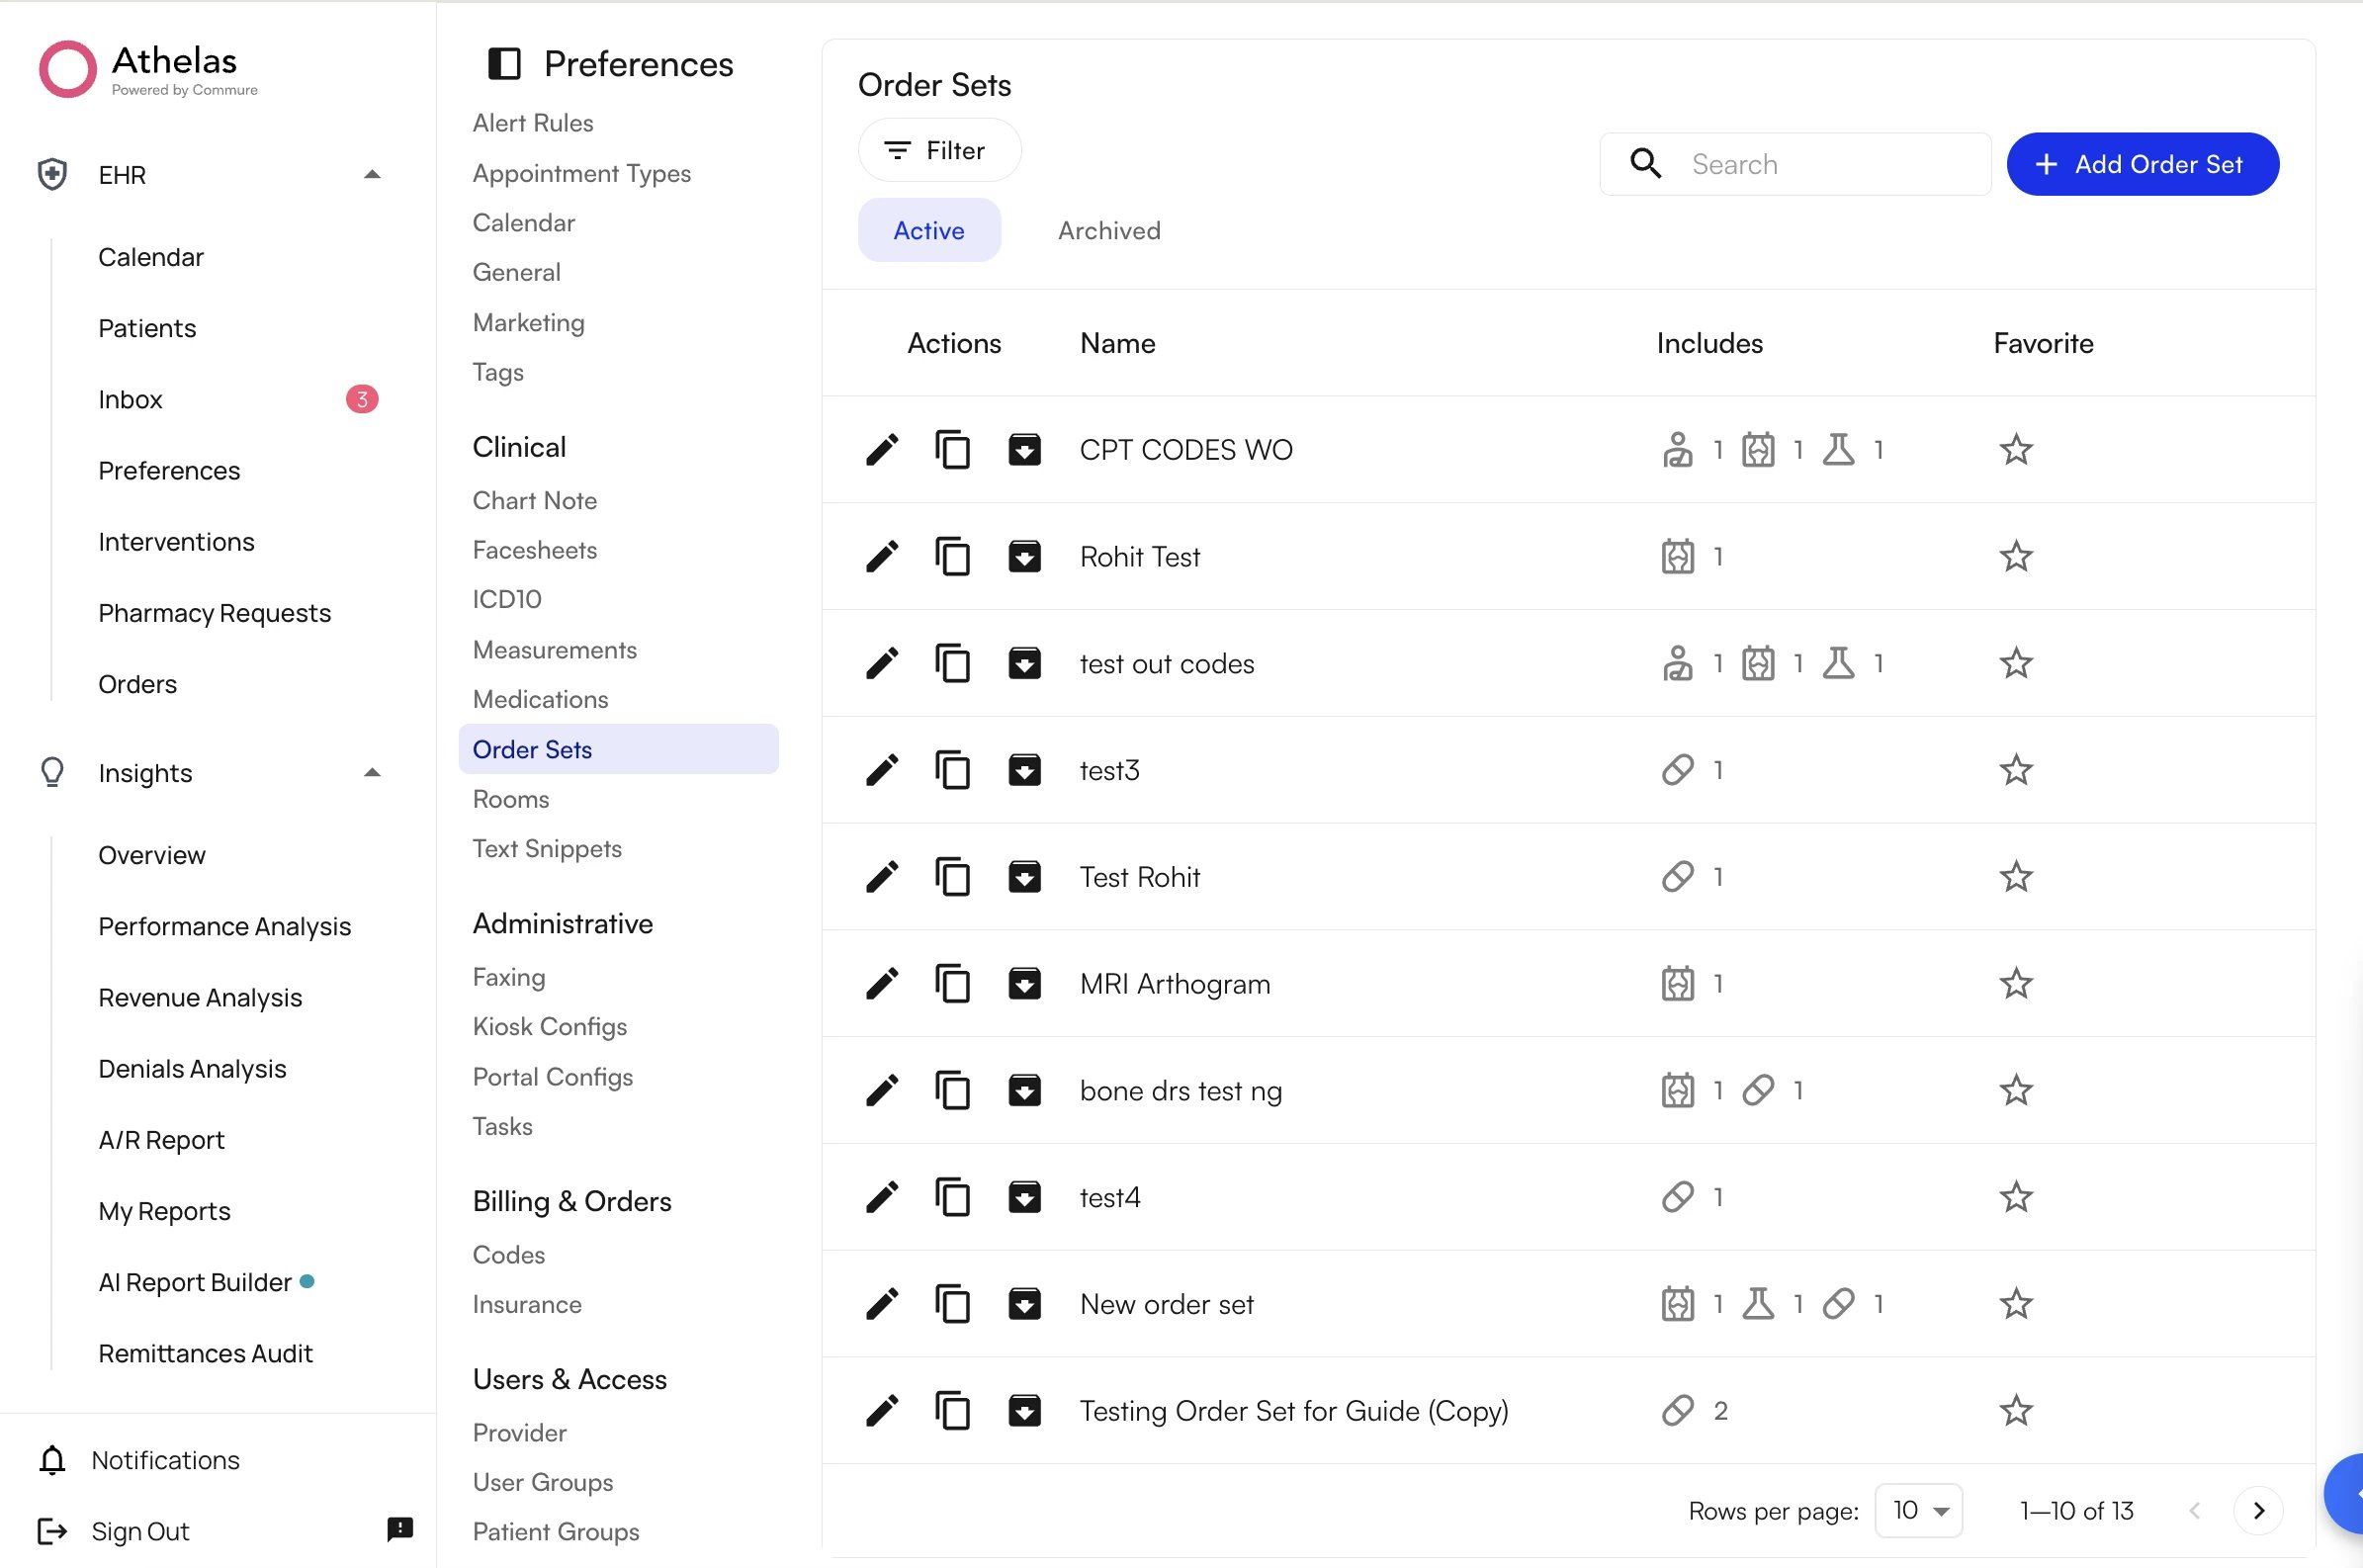
Step 1: Open the Order Sets page
- Go to Preferences in the left sidebar.
- Click the Order Sets tab.
- Click the blue Add Order Set button (top right).
Step 2: Name your order set
- Click the pencil icon next to Name your order set (or click the text directly).
- Type a clear, descriptive name — for example,
Knee Pain – NSAID Protocol,Post-Op Labs Panel, orDiabetes Annual Screening.
Step 3: Add a description (optional)
In the Add a description field, enter any context that helps other providers understand when to use this set (e.g., “Use for patients with acute low back pain without radiculopathy”).Step 4: Link diagnosis codes (optional)
- In the Diagnosis Code field, search for ICD-10 codes or condition names.
- Select one or more codes from the dropdown; they appear as removable tags.
Step 5: Add orders
Click the + button or Add Item to add order rows to your set. You can mix multiple order types — medications, labs, imaging, DME, and referrals — in a single order set. The fields available in each row depend on the order type you choose (see Order types and their fields below).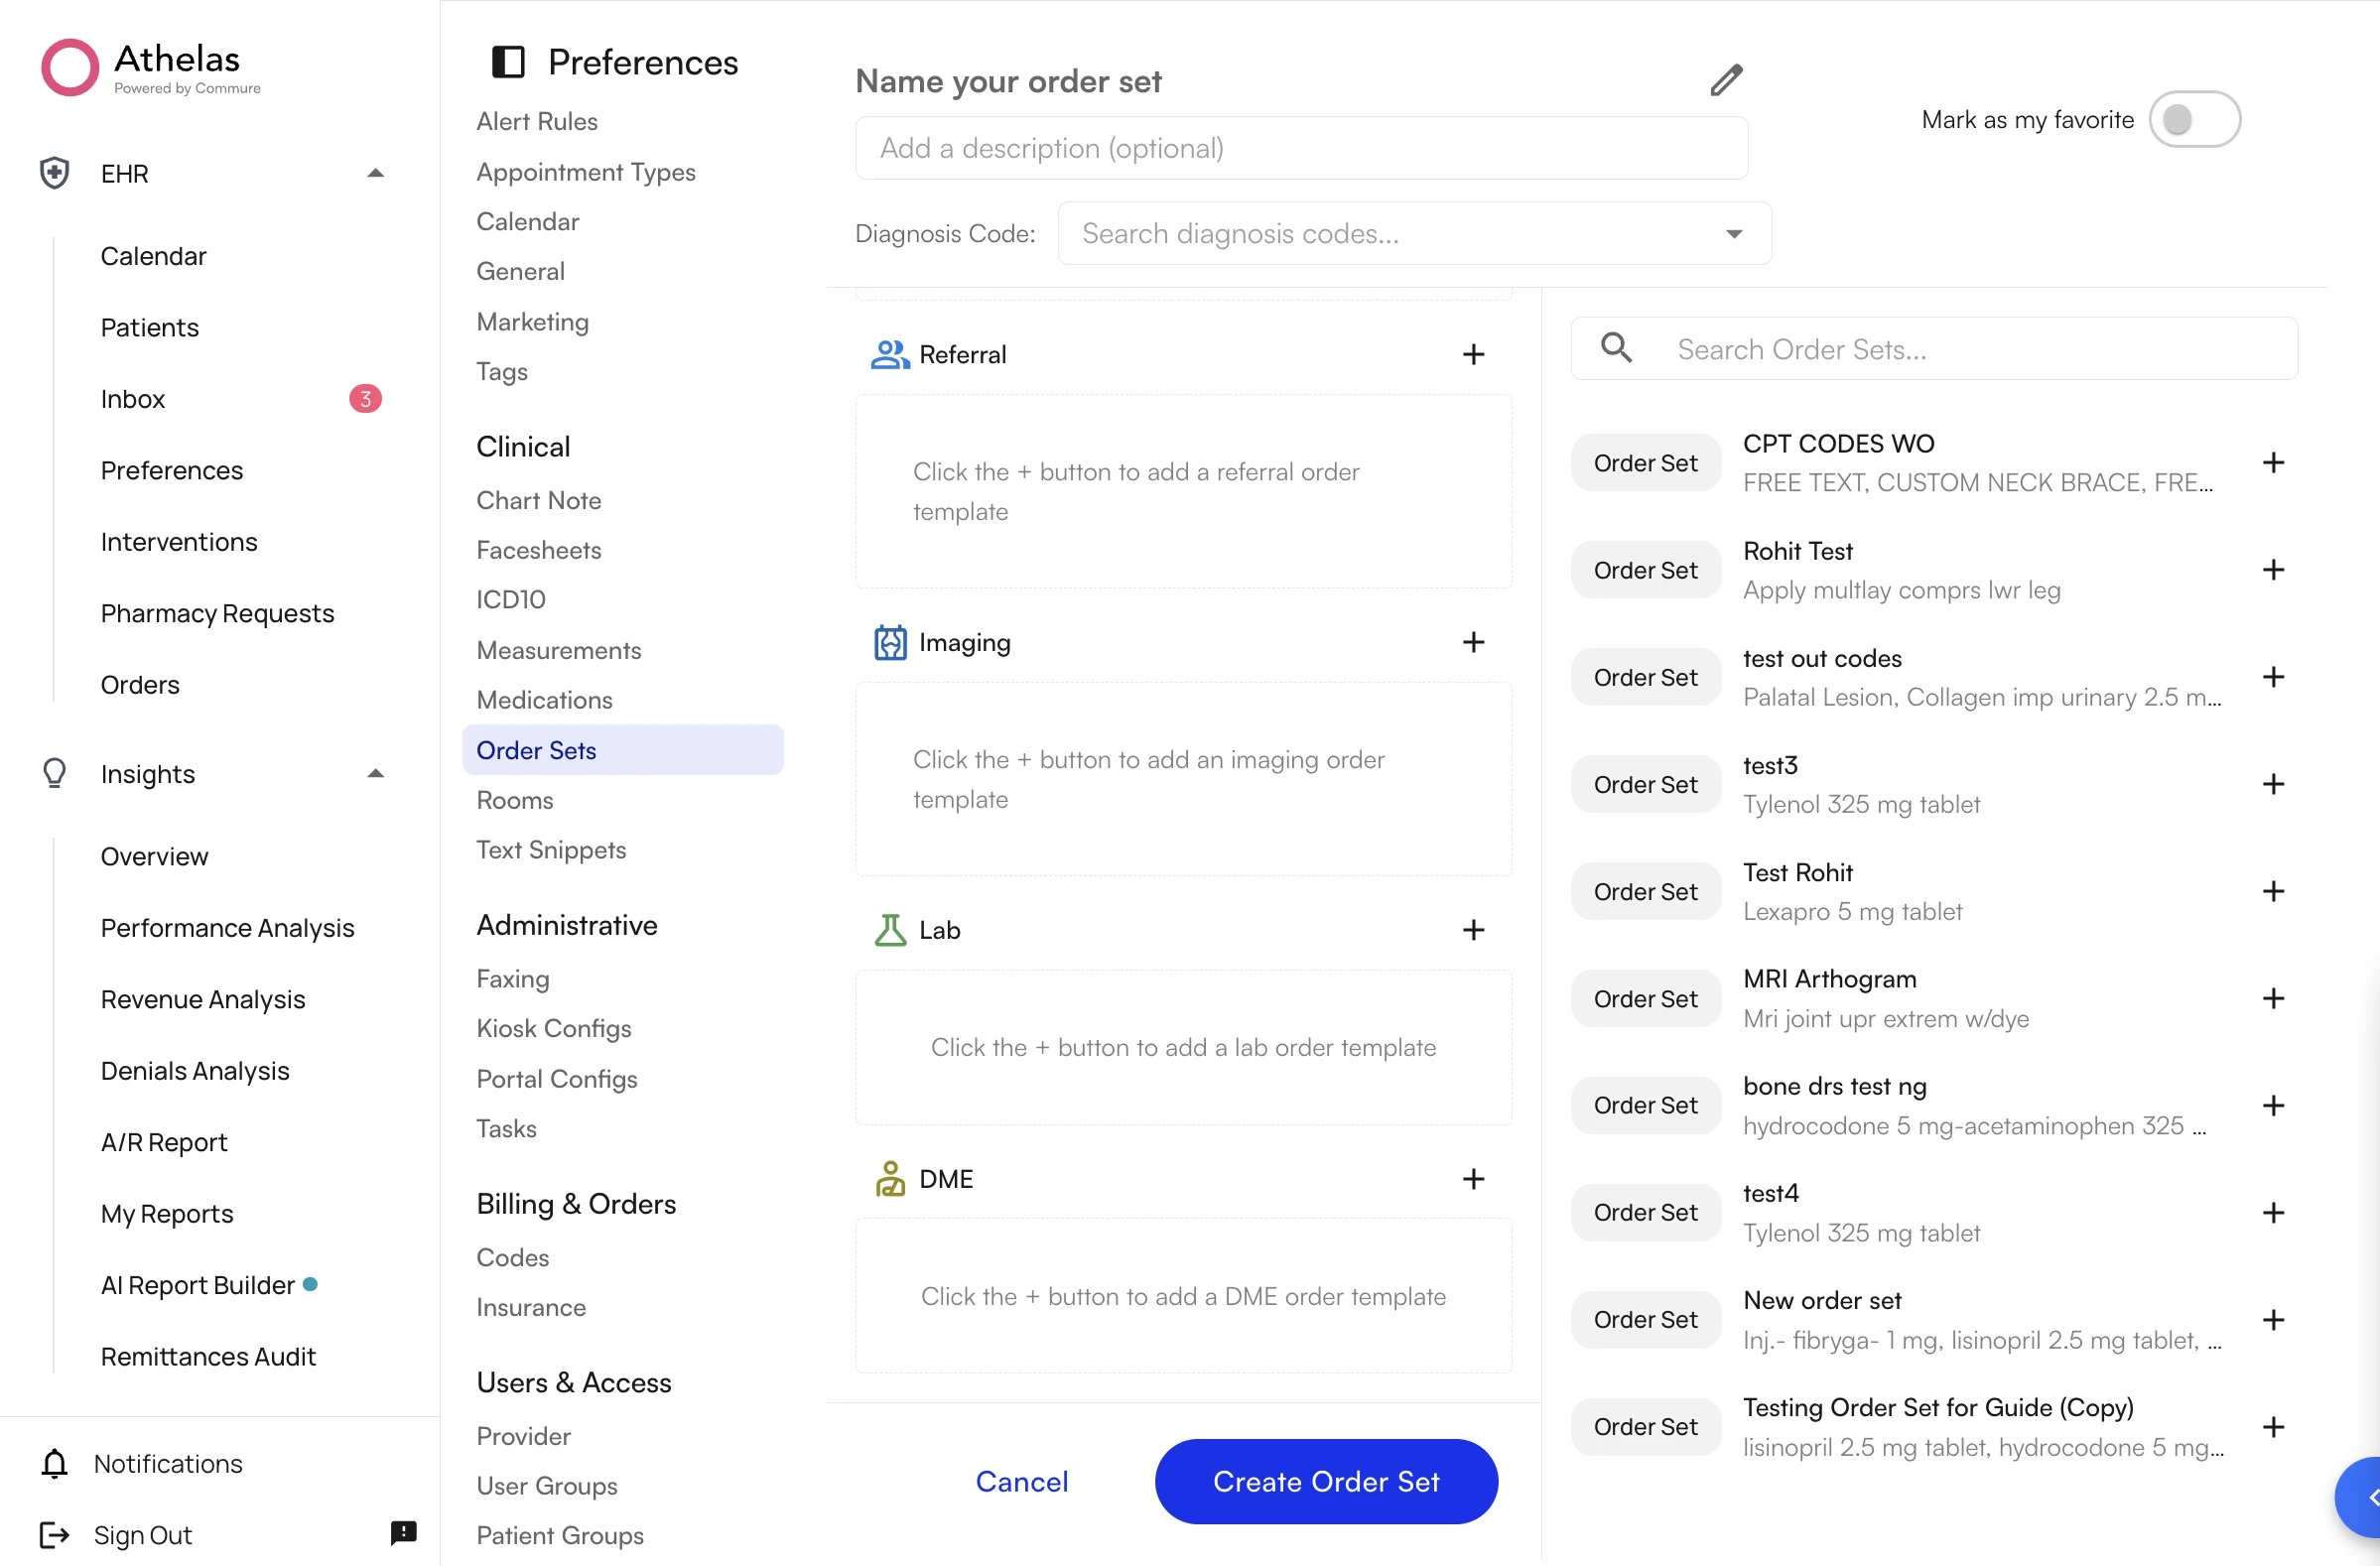
Step 6: Save your order set
Click Create Order Set at the bottom of the page. The new order set appears in the Active list and is immediately available for use.You can create an order set with only a name (no orders) and add items later by editing it. However, if you add any order row, that row must have a valid item selected before you can save.
Mark an order set as a favorite
Toggle Mark as my favorite in the header when creating or editing an order set. Favorited sets appear under a Favorites section for quick access when ordering. Note: Favorites are per provider — only you see your favorites.
Order types and their fields
You can add any combination of the following order types to a single set. Each order type has its own set of fields, and the values you enter become the defaults that pre-fill when the set is applied — providers can adjust them per patient at the time of ordering.Medications

- Select Medication as the order type.
- Search by medication name and select the correct formulation (e.g., hydrocodone 5 mg–acetaminophen 325 mg tablet).
- For each medication, fill in SIG (directions), Duration, Quantity, Refills, and Pharmacy (optional).
Labs
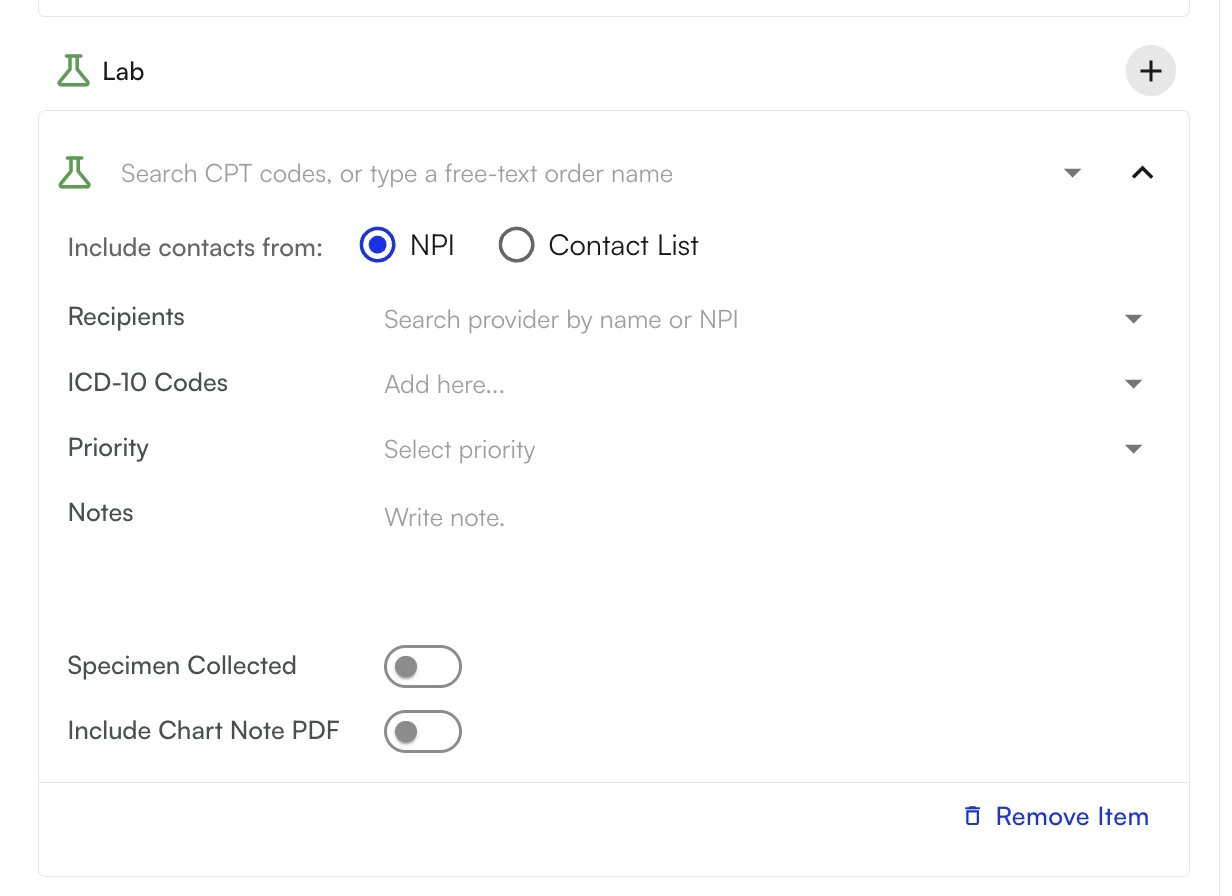
- Select Lab as the order type.
- Search for a lab test by name or CPT code (e.g., “CBC”, “BMP”, “Lipid Panel”).
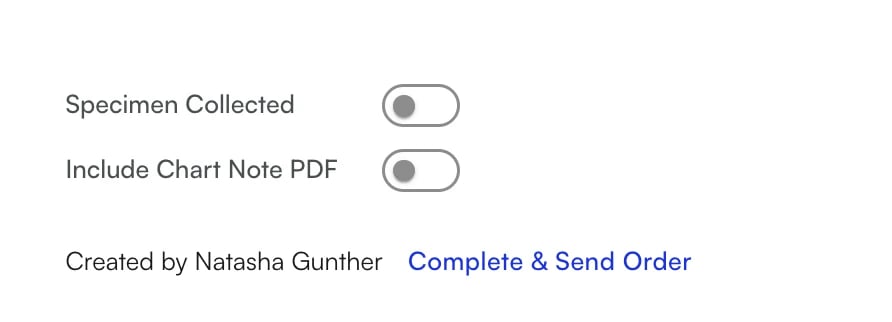
- Set the available fields: optional CPT code, Priority (Routine/Urgent), Specimen Collected (toggle), and Notes.
Imaging
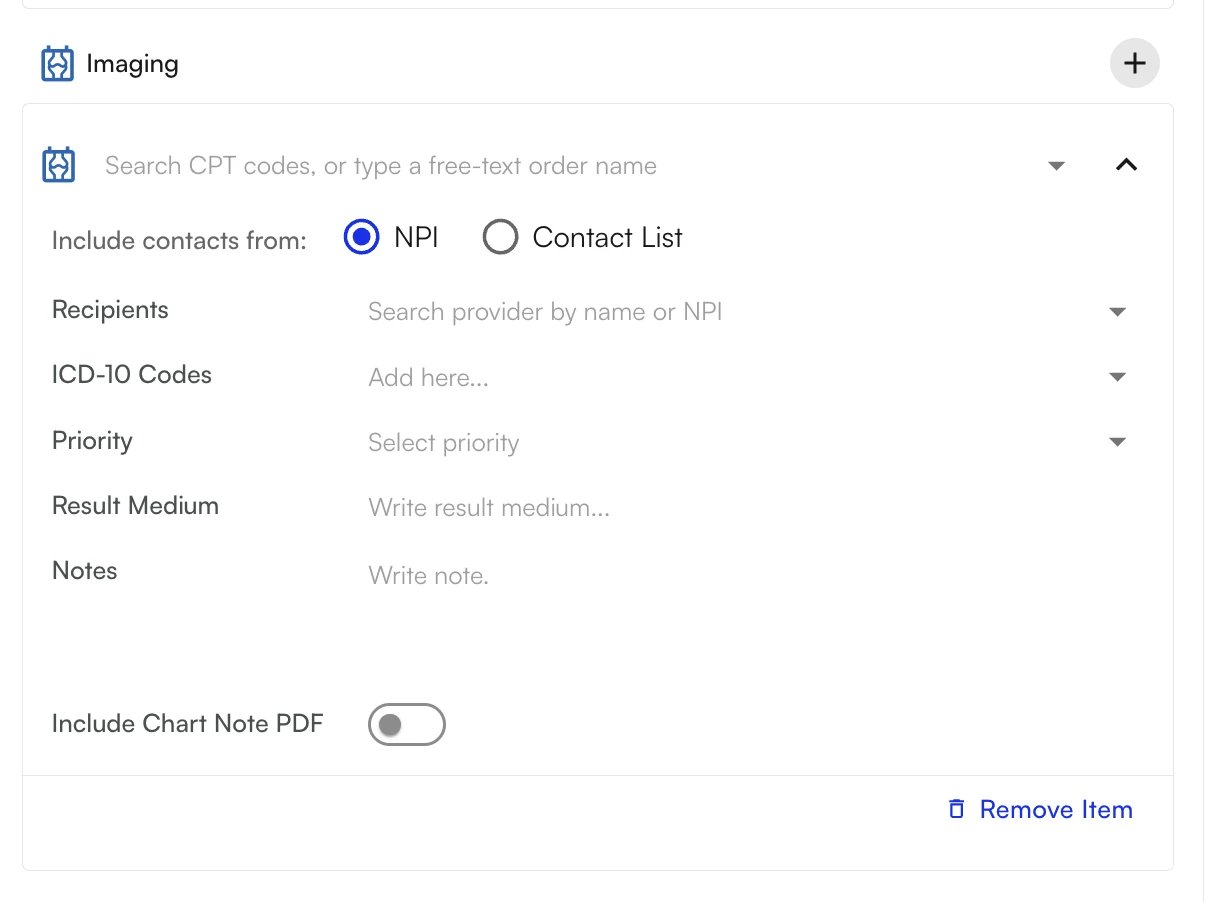
- Select Imaging as the order type.
- Search for imaging orders by name (e.g., “X-ray”, “MRI Knee”, “CT Abdomen”).
- Set the available fields: Order name, Priority (Routine/Urgent), and Notes.
DME (Durable Medical Equipment)

- Select DME as the order type.
- Search for DME items by name (e.g., “Knee brace”, “Crutches”, “CPAP”).
- Set the available fields: Item name, Quantity, ICD-10 diagnosis linking, and Notes/Justification.
Referrals

- Select Referral as the order type.
- Search for the referral specialty (e.g., “Physical Therapy”, “Orthopedic Surgery”, “Cardiology”).
- Set the available fields: Specialty, Clinical reason/notes, and Diagnosis linking.
Combine order types in one set
One of the most powerful features of order sets is combining multiple order types into a single set. For example, a Knee Pain – Full Workup order set could include:- Labs: CBC, CRP (inflammation marker)
- Imaging: X-ray Knee
- DME: Knee brace
- Referral: Physical Therapy
Manage your order sets
From the Order Sets page (Preferences → Order Sets), you can manage all of your site’s order sets.Active and Archived tabs
- Active — Order sets currently available for use when ordering.
- Archived — Order sets you have archived. They are hidden from search and the ordering popover but can be restored at any time.
Search
Use the Search field at the top to filter the list by order set name or linked diagnosis code.Row actions
- Edit (pencil icon) — Open the order set to change its name, description, diagnosis codes, or orders. Click Update Order Set to save your changes.
- Duplicate (copy icon) — Create a new order set with the same orders. The copy is automatically named Original name (Copy) to stay unique, and you can then edit it as needed.
- Archive (archive icon) — Move the order set to the Archived tab. You will be asked to confirm. Archived sets cannot be used for ordering until restored.
- Restore (from the Archived tab) — Bring an archived order set back to Active so it can be used again.
Copy from another order set
When creating or editing an order set, use the right-hand panel (Search Order Sets…) to find another existing order set and click Add to copy all of its items into your current set. The items are appended to your existing list.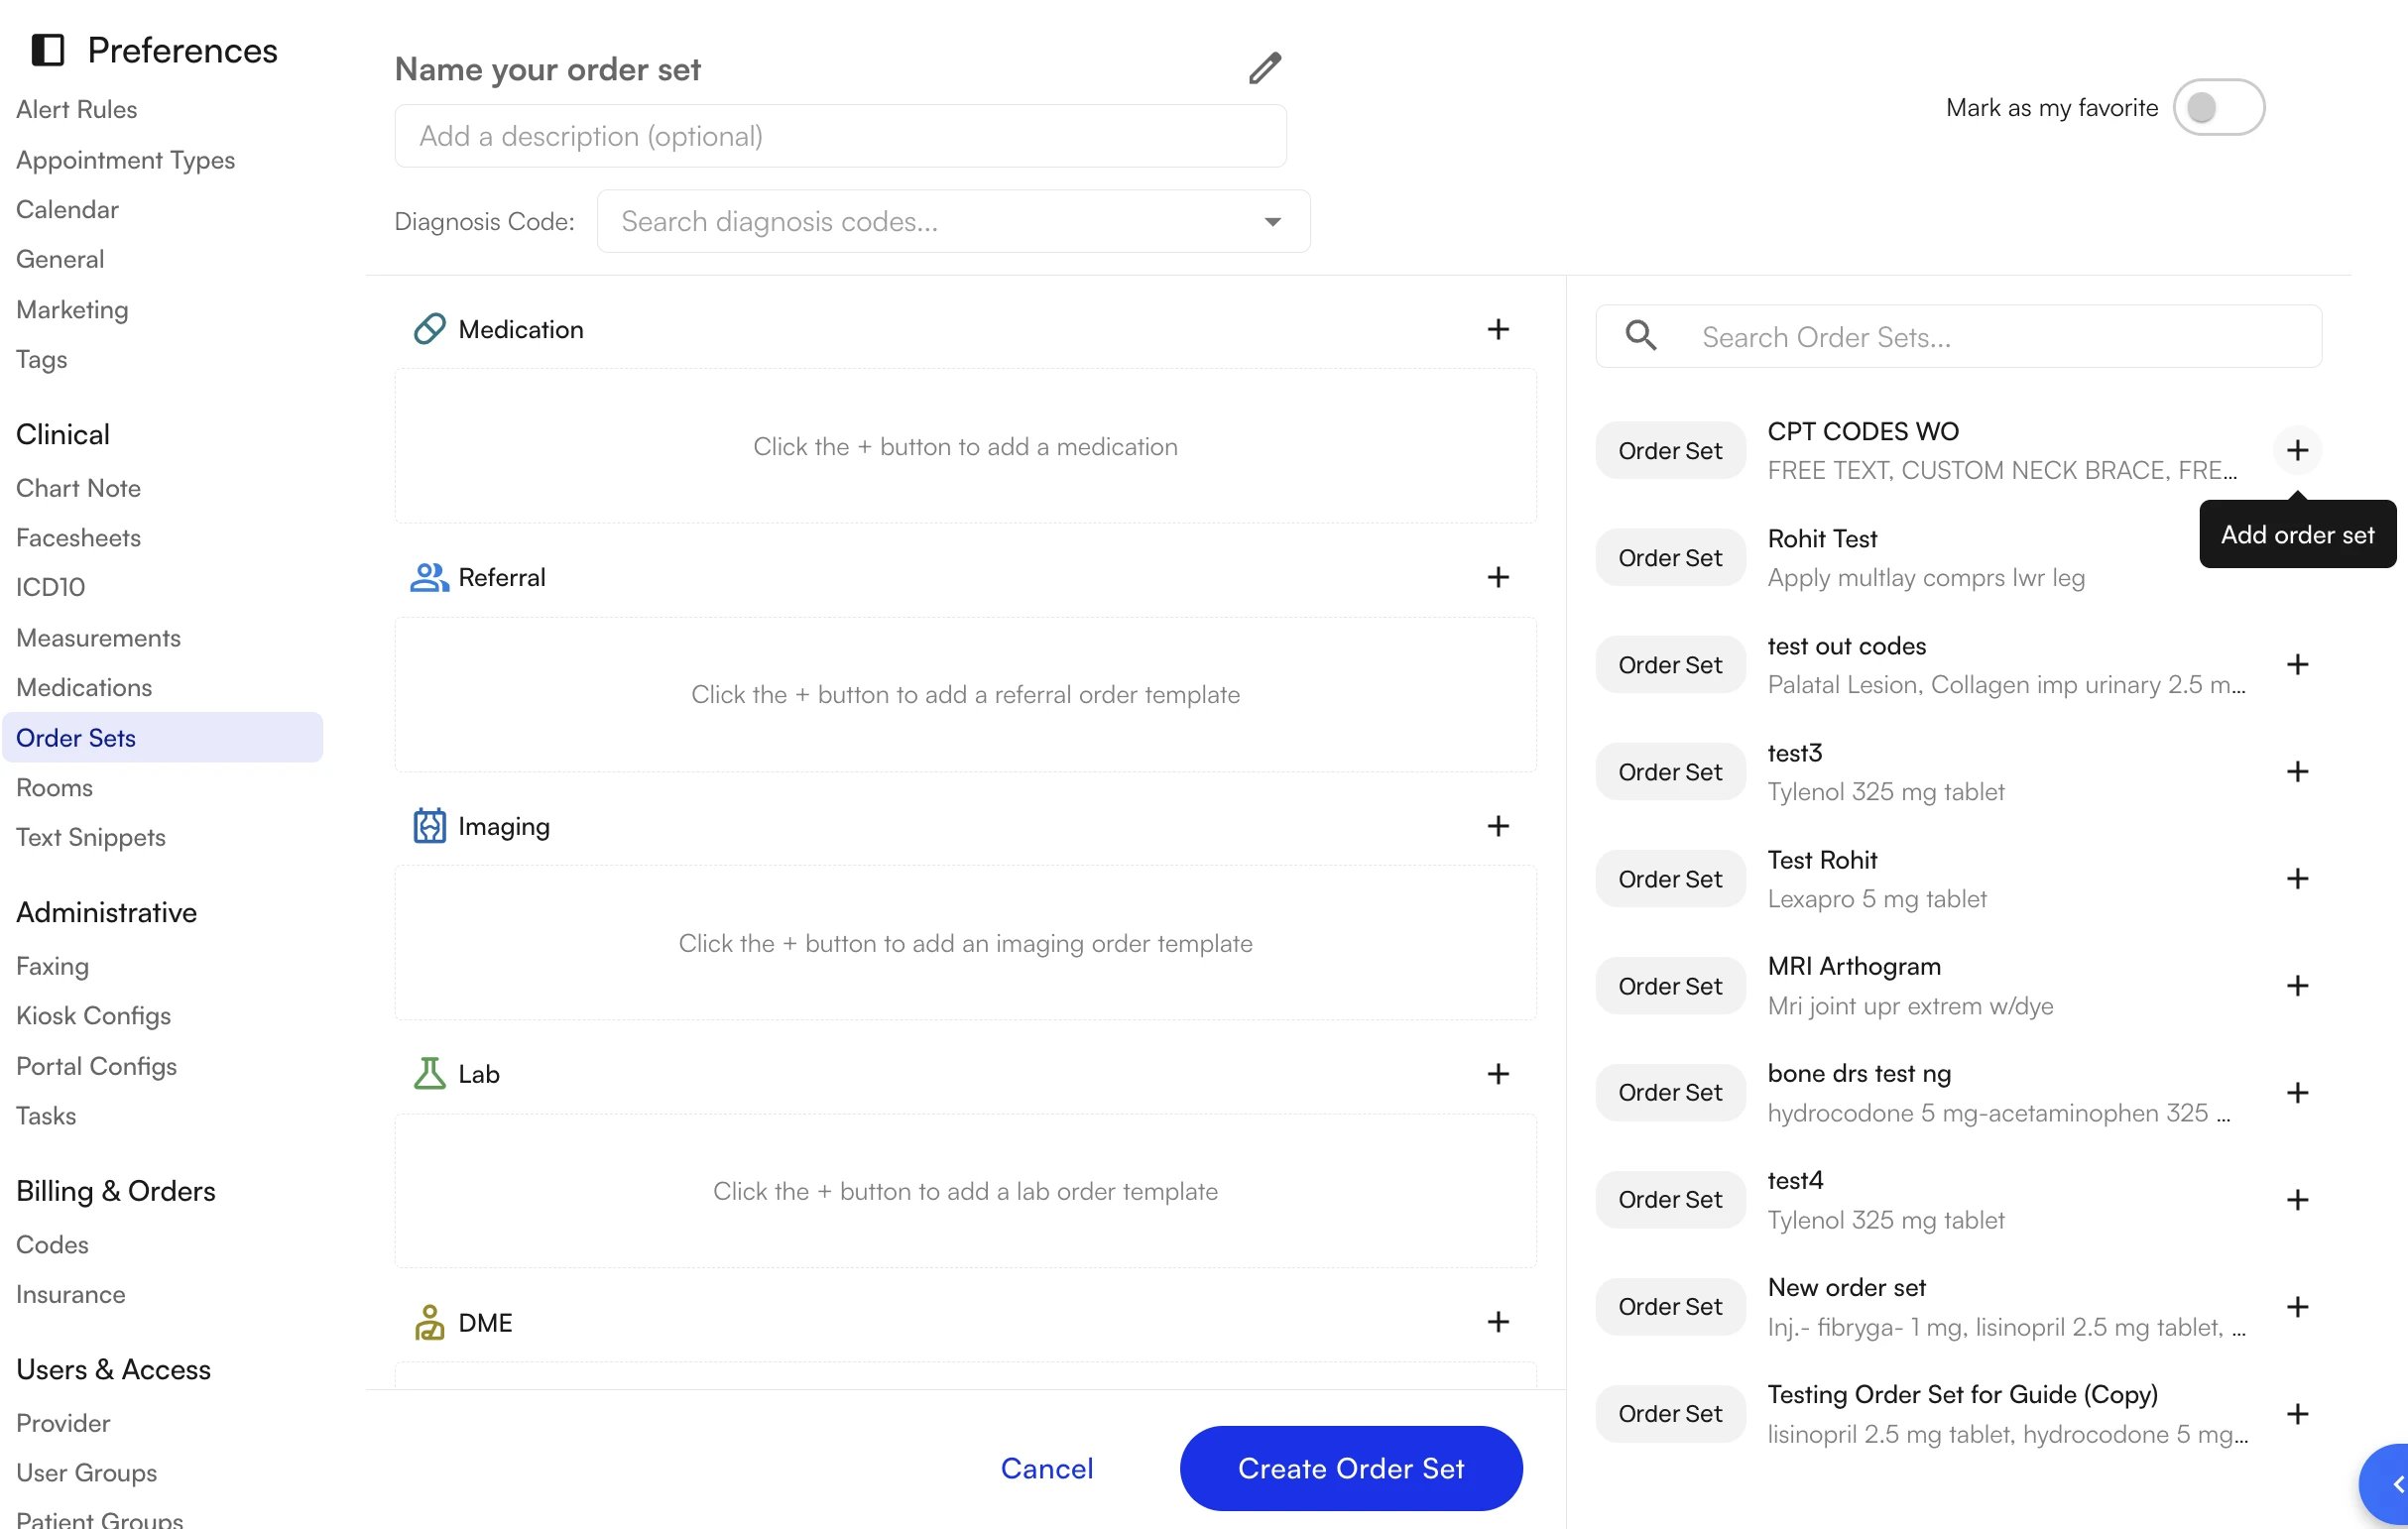
Use an order set during a visit
Order sets are designed to speed up ordering from within a patient’s visit note.Step 1: Open the visit note
- Open the patient’s chart and navigate to the current visit note.
- Go to the Orders section.

Step 2: Insert an order set
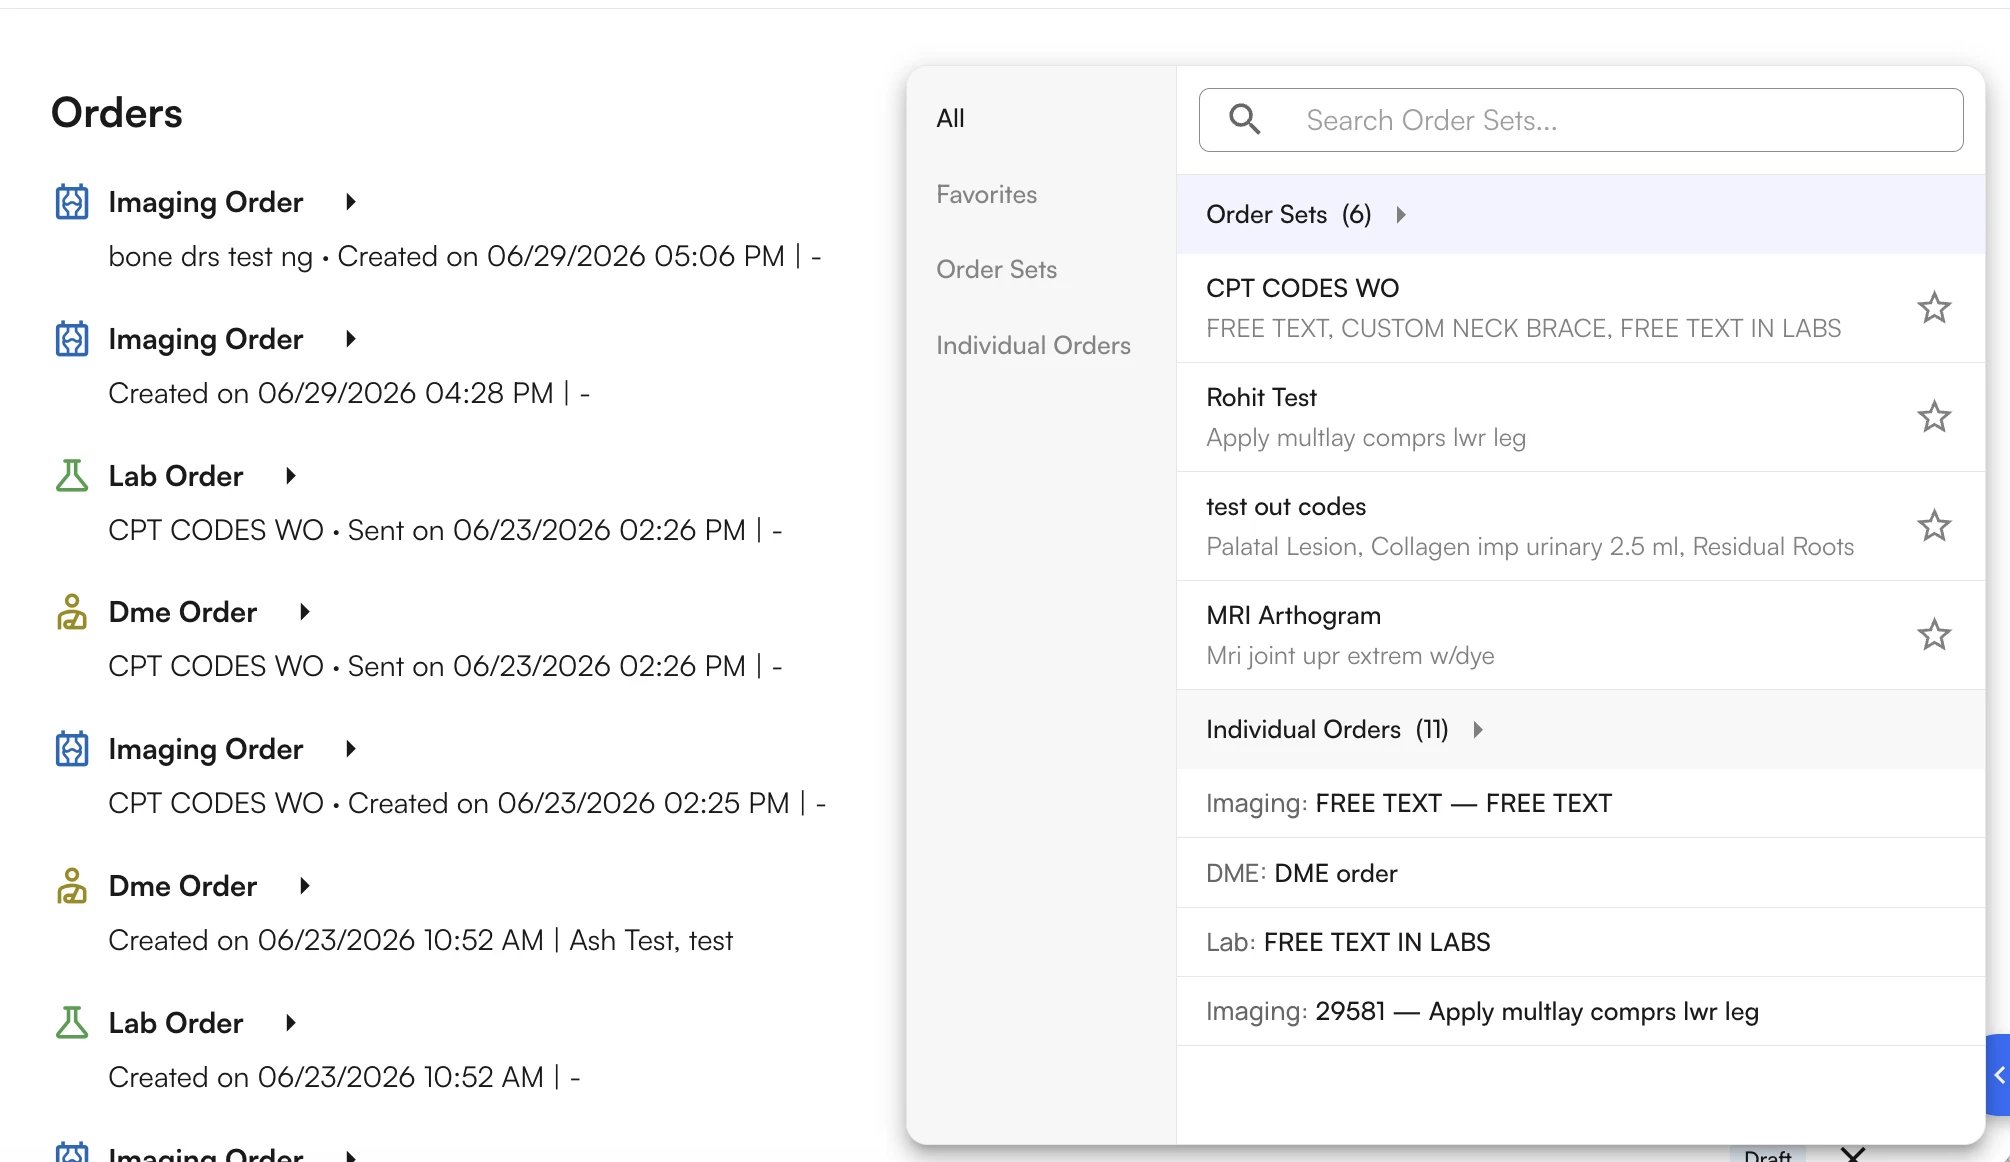
- Click Add Order Set.
- Search for the order set by name, or browse your favorites in the modal.
- Select the order set — all of its orders appear in the Orders section with their default values pre-filled.
Step 3: Review and adjust
- Review all inserted orders — Each order appears under its individual order name with the default values from the template.
- Edit any order — Change quantities, priorities, durations, or any other field to customize it for this patient.
- Remove individual orders — If a particular order doesn’t apply to this patient, remove it without affecting the others.
- Diagnosis auto-linking — If the order set has linked diagnosis codes, they automatically populate on the inserted orders.
- CPT/HCPCS auto-linking — If the order set has a CPT or HCPCS code linked, it automatically populates in the Services section.

Step 4: Sign and submit
Once you have reviewed and adjusted all orders, submit them all at once or submit each individually.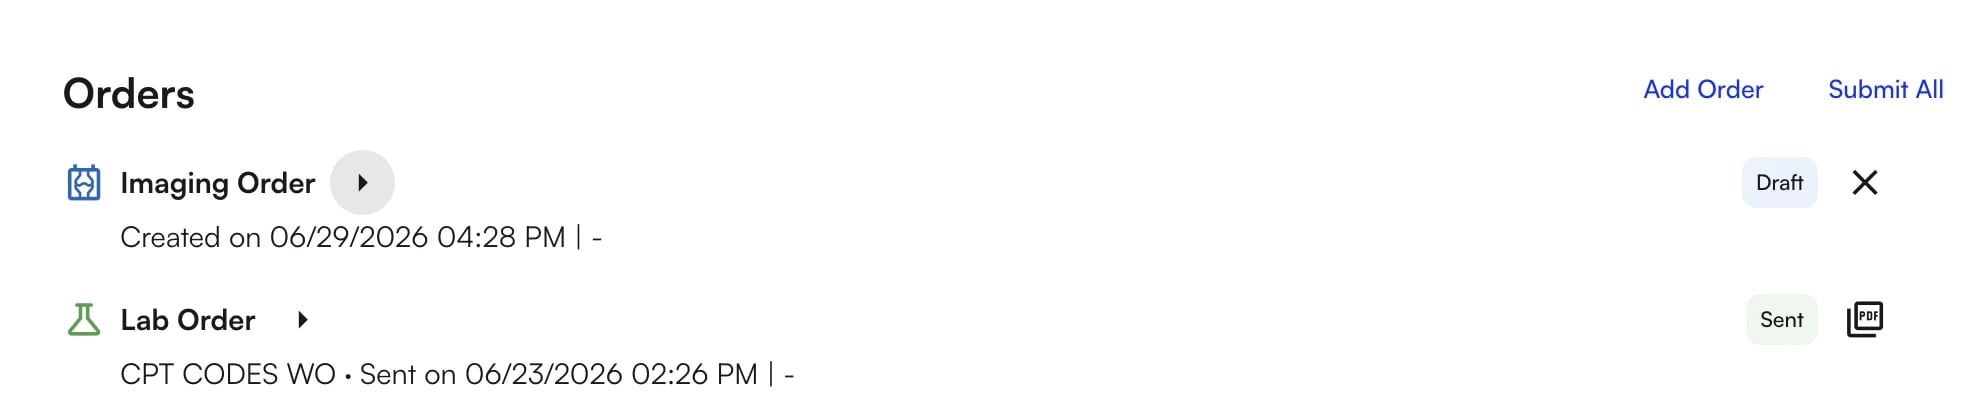
Tips and best practices
Naming conventions
- Use descriptive names that include the condition and key treatment approach (e.g., “Back Pain – Hydrocodone”, “Diabetes Annual Screening Labs”).
- Keep names concise but distinguishable — other providers at your site will see and use these sets.
- Consider prefixing with the condition or specialty area for easier searching.
When to use order sets
- Frequent conditions — Create order sets for conditions you see regularly (e.g., UTI, acute sinusitis, knee pain).
- Multi-step protocols — Use them for conditions requiring multiple order types (labs + imaging + meds + referral).
- Standardized care — When your practice wants consistent treatment for specific conditions across all providers.
- New provider onboarding — Pre-built order sets help new clinicians follow established protocols from day one.
Maintenance tips
- Periodically review your active order sets to ensure they reflect current clinical guidelines.
- Archive order sets that are no longer in use rather than leaving them in the active list.
- Use the Duplicate feature to create variations of an existing set (e.g., “Knee Pain – Conservative” vs. “Knee Pain – Aggressive”).
- Link diagnosis codes to help order sets surface automatically when those diagnoses appear in the patient’s assessment and plan.
Troubleshooting
I can’t save my order set.- Ensure the order set has a unique name — duplicate names are not allowed at the same site.
- If you added an order row, make sure a valid item is selected in that row. Empty rows with no selection will block the save.
- Check that all required fields are filled (medication rows need at minimum the medication selected).
- Make sure the order set is in the Active tab, not Archived.
- Try searching by name — the order set must match the site you are currently logged into.
- Check your Favorites filter. If you are only viewing favorites, non-favorited sets won’t appear.
- Edit the order set (Preferences → Order Sets → pencil icon) and verify the default values are set correctly.
- Remember that only fields you explicitly set in the template will auto-fill. Optional fields left blank remain blank.
Quick reference
Need help? Contact your site administrator or the Athelas support team for assistance with order set configuration.
FAQ
Can one order set contain more than one type of order?
Can one order set contain more than one type of order?
Yes. You can mix medications, labs, imaging, DME, and referrals in a single order set. When applied, every order populates at once and each routes to the correct system when signed.
If I change an order after applying a set, does it change the template?
If I change an order after applying a set, does it change the template?
No. Adjustments you make when applying an order set only affect that patient’s orders. To change the defaults for future use, edit the order set from Preferences → Order Sets.
What happens when I archive an order set?
What happens when I archive an order set?
Archived order sets are hidden from search and the ordering popover, so they can’t be used for ordering. You can restore them from the Archived tab at any time.