Create a Patient Intake Form
Navigate to the Templates tab under Utilities in the left navigation pane.View your forms, duplicate and edit them.Select from the drop down on the top left to move between EHR (chart note templates) and Patient Intake form templates.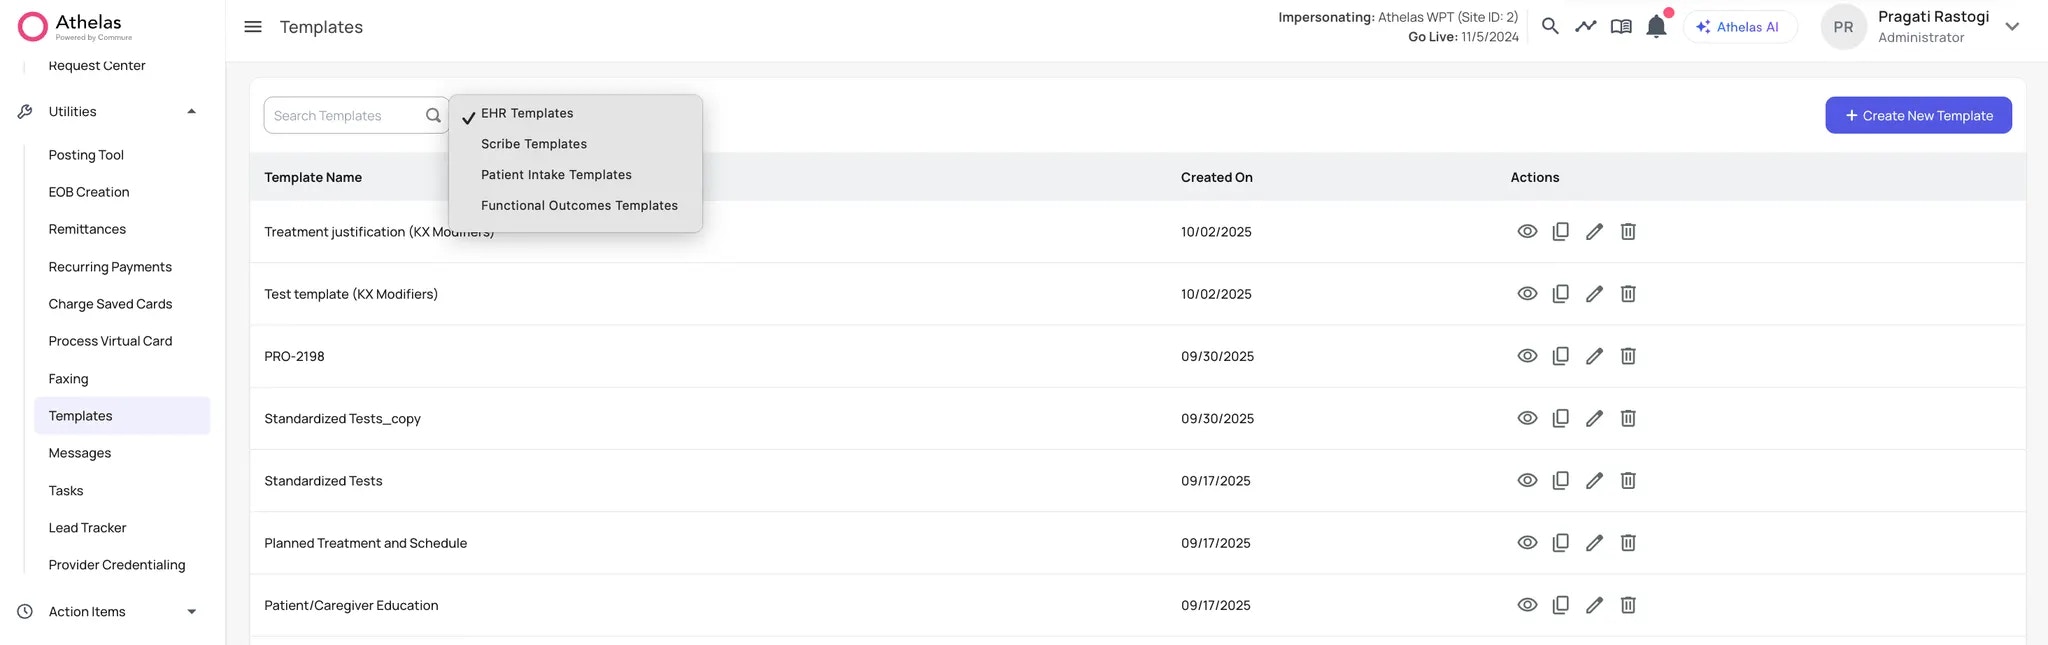
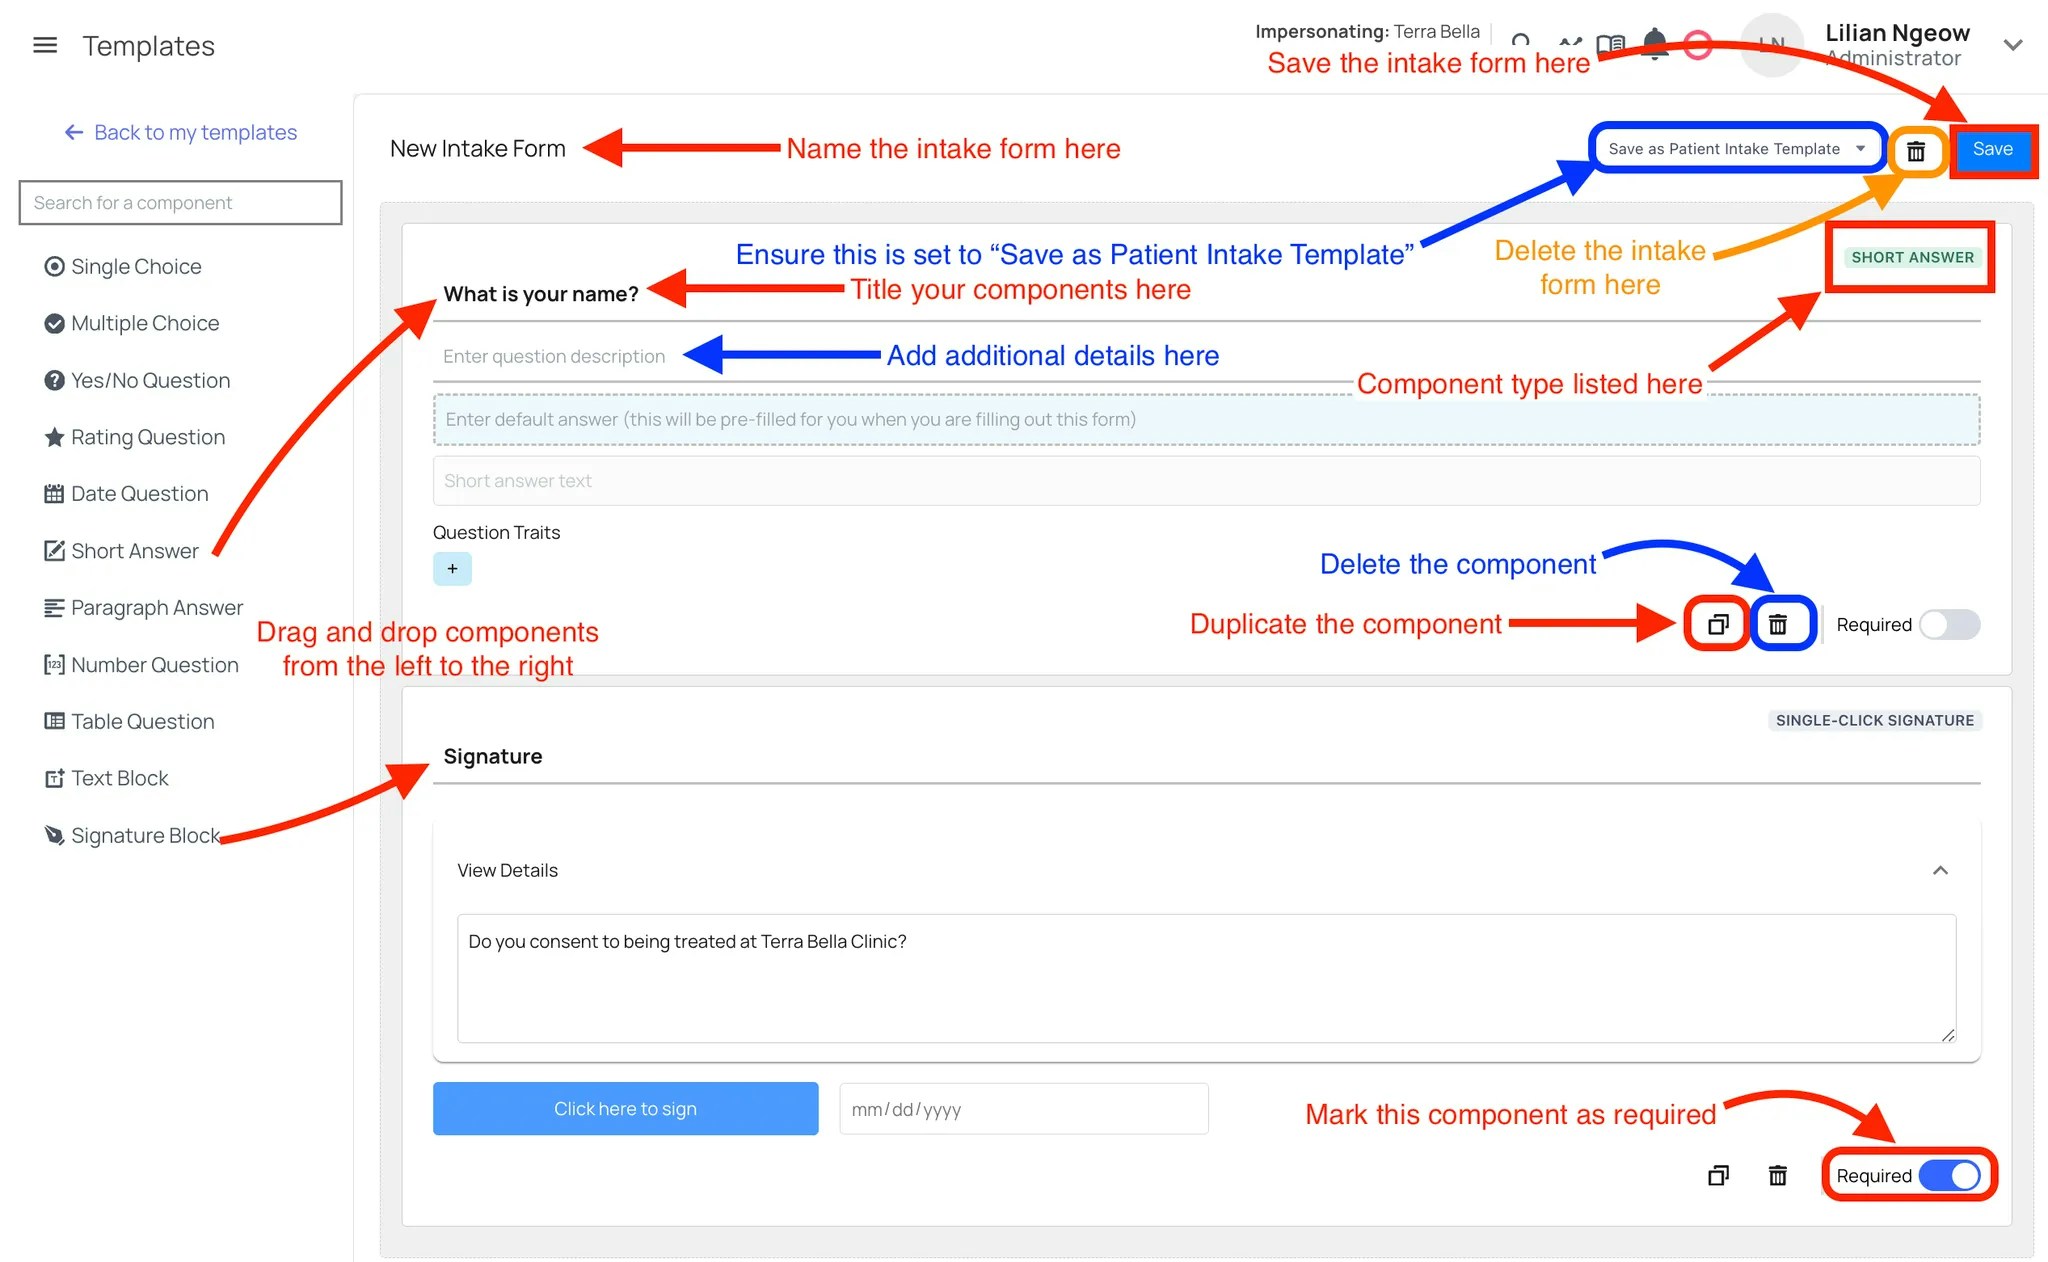
- Click + Create New Template in the top-right corner.
- Drag and drop components from the left panel to the right to add fields.
- Each component can be marked as required, duplicated, or deleted. The type of component is displayed in the top-right corner of the field.
- Once your form is built, give it a name on the top left and click Save on the top right**.** Be sure to select Save as Patient Intake Template so it’s stored as a patient intake form.
- You can also choose to show the intake form within the chart note by clicking on the checkbox on the top right.
- Patient Update: This will auto-fill information within the Patient’s Profile page in the Demographics section
- Insurance Update: This will auto-fill information within the Patient’s Profile page in the Demographics section. Patients can share a photo of their insurance card which will auto-create an attachment available in the patient profile.
- Paperwork upload: Patients can share any documents they would like (e.g. diagnostic tests, etc.) which will auto-create an attachment available in the patient profile.
- Note: These forms cannot be edited, even if an edit option appears.
Single Choice
Single Choice
Ask a question with one selectable answer.
Short Answer
Short Answer
Accepts short, typed responses.
Multiple Choice
Multiple Choice
Ask a question with multiple selectable answers.
Paragraph Answer
Paragraph Answer
Accepts longer, free-text responses.
Yes/No Question
Yes/No Question
Provides a binary choice.
Number Answer
Number Answer
Accepts numeric input.
Rating Question
Rating Question
Collects a rating (e.g., 1–5 scale).
Table Answer
Table Answer
Displays responses in a table format, with columns added using the + button.
Date Question
Date Question
Accepts a date input.
Text Box
Text Box
Only available for patient intake forms (not EHR templates).
Create a Patient Flow
You can automate the patient intake process through Patient Flow.Create new patient flows:
- Click + Add New Workflow.
-
On the Workflows page, name your workflow and configure the rules for when intake forms and reminders should be sent.
-
At the top of the page: Name your workflow and configure specifications for when intake forms and reminders should be sent. Specifications include:
- Appointment Types – Define which appointment types trigger the workflow.
- Appointment Reasons – Specify applicable reasons.
- Patients – Choose which patients receive the workflow (useful for testing with a single test patient).
- Facilities – Choose which facilities are included.
- Providers – Restrict the workflow to certain providers.
- Appointment Insurances – Require specific insurance types.
- Minimum/Maximum Age – Set age limits for eligibility.
- To send intake forms immediately when an appointment is created, check Send Immediately on Appointment Creation.
- Select delivery methods: Email and/or Text. Both use the same customizable message.
-
Use the Message Preview at the bottom to confirm formatting. Always test with a test patient to avoid errors.

✨Smart Tip: Hover over the “i” icon in the Message Templates section to see dynamic fields (e.g.,
patient_name) that auto-fill with patient-specific data.Create an Appointment Reminder
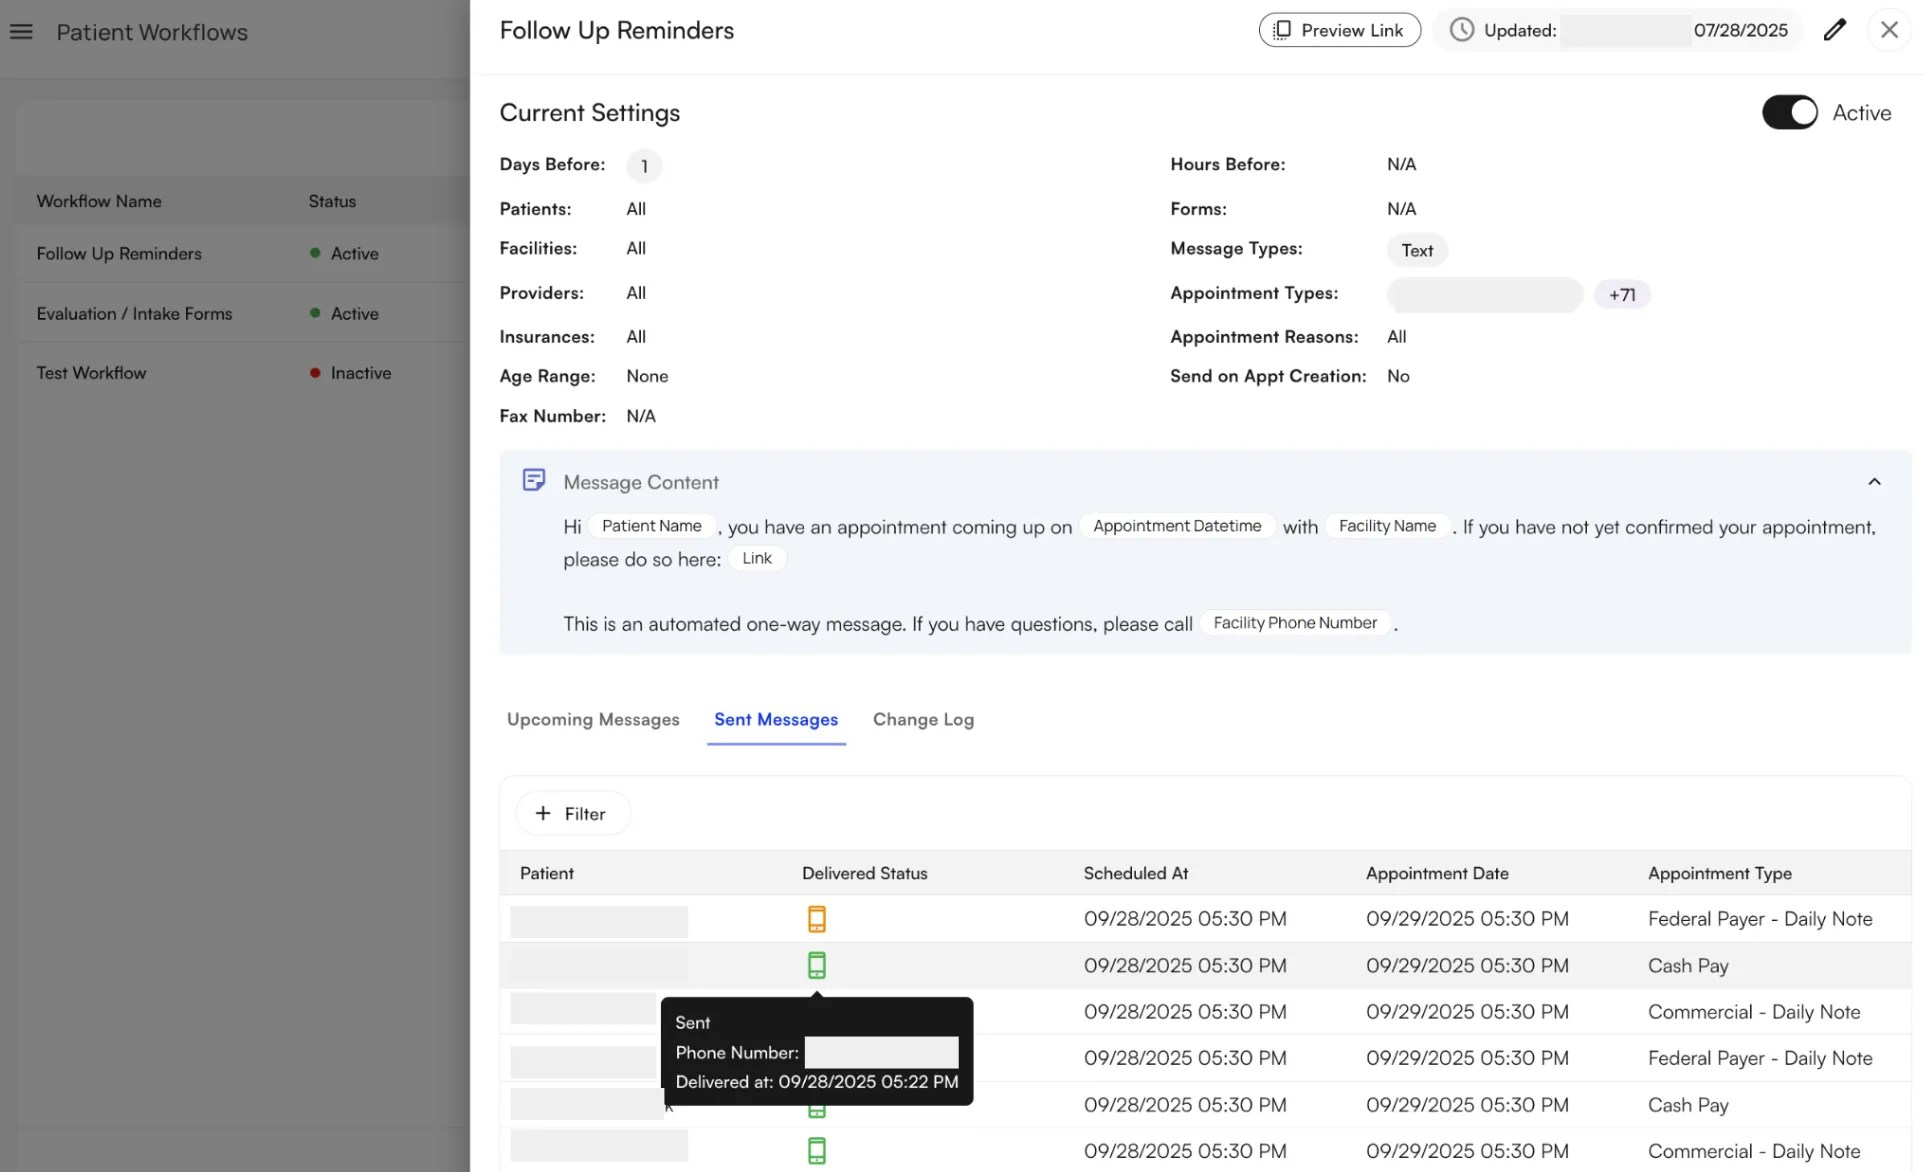
Appointment reminders can be configured to send up to three times (in addition to any immediate sends). You can set how many days/hours before the appointment reminders should be delivered.Note: Reminders are queued at midnight each day.
- If you create an appointment for the next day, a reminder set for “1 day before” will not send.
- However, a reminder set for “1 hour before” will send successfully.
Review Status of Appointment Reminders / Intake Forms
Once you create the workflows, you can track the status of messages sent to patients for reminders or patient intake forms1. Review from Patient Workflows TabNavigate to Patient Workflows within the Automation section on the left navigation pane. Click on **Upcoming Messages Today **or **Sent Messages Today **to review the status.
Send Text Blasts to All Patients
The Text Blast page allows you to create reusable templates and send one-off mass texts with dynamic information tags, so each patient sees details personalized specifically for them.Note: Text blasts are one-way only, patients will not be able to reply back these messages.

- Navigate to the Text Blast page within Automation on the left navigation pane. Click Create New Text Blast.
- Enter a descriptive name for your blast.
- Choose recipients. Leaving a field blank means “all.”
- Compose your message. To add dynamic fields, enclose each variable in
{brackets}and replace spaces with underscores. Example:Hi {patient_name}!
- Click Preview Text Blast to review: Message text, Number of recipients, Estimated cost ($0.01 per recipient)
- Language translations: Patients receive texts in their preferred language; Default is English if none is listed.
- Once confirmed, click Send. Depending on the number of recipients, sending may take a few minutes. The blast will then appear in the main page log.